Showing posts with label decorating. Show all posts

Monday, August 22, 2011

Return to the Slanty Bathroom

Way back in January and as one of our very first Grafton projects, John and I painted our upstairs guest bathroom.  When we moved in, it was a horrible mint color and we thought we'd tone it down with a creamy chocolate brown on the walls and a soft blue-green on the ceiling.  At first, we were thrilled with the results, but looking back, I think we were just happy to have the mint gone and would have been happy with any other color.  A few months down the road with our new color scheme, we were sad to discover it made the room feel small and dark.  So, until we can figure out how to bust out walls and install windows... it was back to the drawing board/paint chip aisle.

Inspired by this bathroom, found on House Beautiful's website in the slideshow "Beautiful Designer Bathrooms", I convinced John to let me try out stripes.  Since it's such a small, plain room, I hoped some bright stripes might help jazz it up and provide some height to the room.  As an aside, aren't those little hexagonal tiles adorable?  Again, I am a little saddened on how modern they went with our home remodel.  Maybe one day we can help bring it back to its roots.
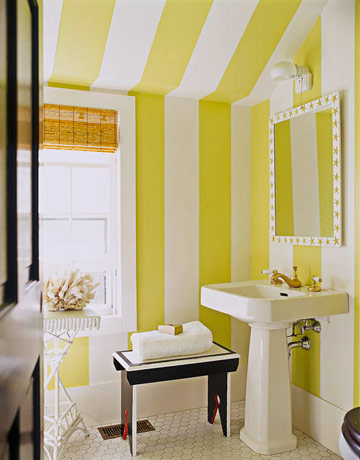

I'm not quite as brave as the designer of this bathroom, so to soften up the stripes, I decided to go with a warm yellow and creamy white, so we have the contrast, but it's not too in-your-face.  I browsed around on Benjamin Moore's website for a bit and sent John out to collect some paint chips before finally deciding on Sundance for the yellow and Creme Brulee for the creamy white (on the same paint chip, just two colors apart).  We headed over to Home Depot with our chips in hand (yes, we're still cheapos who steal Benjamin Moore's amazing selection of chips and get them color matched to cheaper Behr paint) and got our paint.  Thanks to the mistake of a carleless Orange Vest, we ended up getting a gallon each for the price of a quart, so yay for extra free paint!

Our first step to actually implementing our redesign was to paint over everything (well, just the walls) with the Sundance.  Even with our "paint and primer in one", this took maybe three or four coats and forever.  Literally, it was so frustrating and then we got side tracked by several other things, just getting the yellow up took me almost two months.  Shame on me.  After that, it was time for the Creme Brulee stripes which was even more horrible.  OK, it probably wouldn't have been that bad if our room wasn't teeny and our weeks-long heatwave didn't turn the bathroom into an oven.  So, don't be scared of stripes.  Be scared of being trapped in a teeny oven (or I suppose any size oven). 

To do our stripes, I first measured the length of the wall and tried to come up with a stripe width that would give me an even number of stripes that weren't too wide or too skinny.  The wall is 70 inches long, so 5 inches would give me 14 nicely sized stripes.  I went along measuring every 5 inches and putting down a small square of Frog Tape to mark it off.  The trickiest part was to remember what would be painted white and what was left yellow.  The white bits had to have 5 inches of exposed wall while the yellow bits were partially covered by tape.  Then I had to actually tape off the stripes.  I did this using our suction cup laser level, by crouching on the floor, beaming up the laser to match up with my tape squares, and then making sure it was level for straight stripes... in the dark so I could see the beam line. 

Laser level in action!
Good times, crouching in the dark in the oven bathroom... I then carefully applied the tape in a single strip, placing the edge along the laser beam.  John was merciful enough to help me with the ceiling stripes, with his amazing height and monkey-like long and strong arms.


With the tape finally up after months and months, it was time to paint the stripes.  Since some of the tape stripes had been on for a while, I made sure to run my thumb over the edges to make sure they were still stuck on well.  Frog Tape says it'll stick for up to 21 days, but it seemed to do well for us for over a month.  I didn't have a small roller, so I painted all my stripes with my Purdy Cub paintbrush.  Definitely tedious, but I think it gives me the most control.  After crouching around the toilet, crawling around on the floor, going up and down my step ladder, and doing a few ninja moves on the vanity (while being cooked by our two sun-like light fixtures... on the brighside, I think my face got a little tan...), the paint was up and John took down the tape and we were done.  Sidenote: taking down the tape ASAP is a good practice to avoid the paint drying and peeling off as well as providing some inspiration to keep going.

Our stripes are done and I love them so much, even though the process was painful.  They're like my little stripe children.  Here's our almost-complete bathroom.  I'm pretty sure we have the worst house ever for photographs, with our tiny rooms and poor lighting.  These photos don't really do the colors justice and that makes me sad.


So, next steps?  Definitely need to do some decorating in there.  I'm thinking of some watercolor bird prints by dimdi on Etsy.  Maybe like this robin, the state bird of Michigan and frequent backyard visitor of ours.  Simple and whimsical, right?  Plus, we could brag about our imported Italian art.  Molto di fantasia!


I'm also working on a handmade (by me and my sad sewing skillz) shower curtain, using this tutorial I found on Design*Sponge, but with just two fabrics with a solid band at the top and bottom, surrounding a subtle floral fabric in the middle.


We'll see.  At my current rate of project completion, I just might do all this by December!  erf.

Wednesday, August 10, 2011

6 Months = 4 Pillows

Sweet cheesus, I just might be the laziest, most procrastinating person in the world.  Way, way back in February I was trolling Design*Sponge and came across this tutorial on zippered throw pillows (the same tutorial I used to make the petbed/end table pillow).  It seemed easy enough and I thought it would be a perfect project to get cracking on my sewing and jazz up our lackluster throw pillows that came included with our sectional.  While they are softish and perfect for naps, they practically disappear on the couch and don't add much visual interest.  On top of that, Chewie has recently taken it upon himself to chew little holes in the corners of the pillows, so I guess he didn't like them much, either.


I convinced dragged John to Jo-Ann's and found some fun cotton fabrics to accent our orange walls, along with matching zippers and thread.  Back at home... it took me almost six months to finish the darn things.  I honestly don't remember when I actually started, but through some email investigation, it was mid-February when I asked John if he'd take me out to Jo-Ann's to hunt for fabric.  I started with the plain green-blue fabric and it was just a nightmare.  I can't cut a straight line to save my life and pretty much botched my first squares, but somehow managed to get them in a square shape.  Then I didn't understand the instructions on installing the zippers and did a whole bunch of the exact opposite things as I should have done.  Let's just say there was a bunch of seam ripping going on.  It was pretty dismal and distressing and an easy project to set aside until I had grown some courage.  In the meantime, we came up with a bunch of other things and my poor empty sacks sat alone along with the untouched floral fabric.
The two fabrics.  I forgot any "before" or "during" photos.  Also notice lifelike cat head pillow.
This also happened...

The innards of one of pillow forms.  It didn't deserve this.  :'(
My craziness drives John crazy and he instituted a "no new projects until Amanda finishes old projects" rule... which we sorta almost follow.  I realized I need to stay focused, too, or our house will be littered with empty pillow sacks and half-finished painting projects and sadness.  Like it is now, but I'm working on it!  So, a couple weekends ago I finally sat down and took care of these darn things.  You might remember I had a nice thing going upstairs in my Mom Den, but with our wicked heat wave, it's about 1,000 degrees on our second floor and I was afraid of being found all dessicated like the creepy dried up apple man my Grandma had in front of my sewing machine, pillow cases still unfinished... so I gathered up my stuff and moved down into the basement where I could sew and watch Candice Olson (the only downside being it gave Elliot more angles to jump up on the table and lay on my fabric, or dig on my fabric, or sit under the table and paw at my fabric...).

My current situation, complete with pet butts.
I read and re-read the instructions and stared at my fabric and examined my zippers and thought back to all my mistakes and moved forward.  Luckily, it went so much better the second time around.  I still struggled to cut square squares, even though I was using my new cutting board, my fancy rotary cutter, a level (for a straight edge), and! an actual square!  I don't know what my problem is.  By some miracle, I didn't mess them up too badly and I'd have to say, they came out pretty OK.

A pillow, six months in the making! 
A zipper!  Check out my mediocre skills!
So, that's that.  In six months, I finished four pillows.  Maybe five, if you count the pet bed hexapillow.  In the meantime, I've managed to amass fabric with the intentions of making a shower curtain for our upstairs slanty bathroom, a window covering for John's office, and more pillows for our main floor living room!  I guess I didn't do to well sticking to my "no new projects" rule, but my setbacks and struggles with these wretched pillows didn't seem to dampen my enthusiasm, either...

Thursday, April 21, 2011

Mom Den: Part 1.25

First, some bits of randomness... last Tuesday was our sixth month Graftonniversary.  I can't even believe it has already been six months, but then, it feels like The Grafton has always been our home.  We've accomplished so much in the last six months and I could probably go on for another six months just talking about all the projects we have planned and all the projects we can only dream about doing.  I'm just glad we're as happy as we are and haven't met any crazy setbacks yet.  I need to go rub my Buddha (the little red dude, not Elliot) and try to reverse any jinxing I may have just brought upon myself...

Rub his tummy for good luck. :)
Second, every once in a while I like to check the "stats" tab in Blogger to see all the random countries people are reading our blog in (I have no idea how they stumble upon it).  There's also a section that shows what search strings people navigate to get to our blog.  Since we don't get much traffic, it's usually empty, but today, there was a fun surprise for my viewing pleasure...


If you can't quite read it, it says "new sprout marijuana mold".  Tisk tisk, anonymous searcher.  I feel slightly scandalized that our beautiful, innocent plants have attracted these types of hooligans.  Oh well.  Hopefully while they were here, they got to enjoy some photos of our glorious sons or felt inspired to put down their pot and paint something.  Rapscallions...

OK, back on subject... I have finally found direction on my mom den.  Ever since I was given this space, I have gone back and forth on the colors and feel for the room.  I always thought I'd go pink in there for fun, but with everything else going on, never really decided on anything.  My latest idea was either a magenta and navy blue scheme or maybe something like coral and turquoise.  Well, we can throw all those out the window because I found and bought this green floral chair yesterday on Target's website:


I can't even remember now what brought me to Target's website, but this chair was featured on their homepage as part of an advertisement for their furniture sale.  It just looked so bright and cheery, I couldn't resist.  Plus, I think using the chair and its colors will be a great inspiration for the rest of the room.  The colors go so much better with the rest of our house than something pink ever would have.  There's some orange like our basement, a slate blue to complement our Gossamer first level, and a green that is similar to what we're thinking about using for the second level.  It's like it was meant to be!  To sweeten the deal even further, it's on sale for $99.99 from $139.99.  Remembering my success in finding a coupon code for our basement rug, I Googled around again and found a $5 off a purchase of $50 or more code and typed that in to save a few more bucks.  Still, not a ton of money, but it's something.

I got the wonderful news my chair shipped this morning, so you know there will be an exciting 3-5 business days of tracking ahead of me.  In the meantime, I'll ponder if I should repaint my den, what kind of window coverings to put up, maybe DIY'ing some art... OK, I probably won't ponder too hard since we're heading home tomorrow morning for the Easter weekend.  Plus, we still need to finish all our other painting projects and I think John deserves to have his office decorated before my den.  He's so great and deserves a great place to spend the few hours a day that he actually works.  :)

Happy Easter everyone!

Monday, April 18, 2011

A Magic Carpet Ride

A couple of weeks ago, I wrote about how our long and arduous search for a new rug for our basement finally came to an end.  Well, our rug's own long and arduous journey from the Overstock warehouse finally came to an end last Wednesday.  I'm sure if you've read any of my previous posts, you'll realize I'm not normal(?), and I'm pretty embarrassed to confess one of my favorite things to do is tracking.  No, I don't go all Rambo and track enemies/animals/Commies through the woods... I enjoy receiving the tracking information for an online purchase and relentlessly tracking it until it arrives on our front porch.  Maybe it's a relic from staying up on Christmas Eve, listening to the radio with my parents, where they "tracked" Santa from the North Pole, giving updates on his ETA for the Lansing area.  Or maybe I'm just crazy.

Either way, our rug safely escaped the grasp of Mormons in Salt Lake City, spent a few days in Hodgkins, Illinois, had a quick layover in Richmond, and finally arrived here in Alexandria.


John hauled it down to the basement and after disassembling the couch, moving it to the other end of the basement, cursing the ginormous couch, laying down the rug, moving the couch pieces back, reassembling the couch, cursing the ginormous couch's mother, and making a couple slight adjustments, we had our long-awaited rug.  Lucky for us, we love it.  It's not as thick as our upstairs rug, but it's soft on bare feet and the boys all seem to love it.  It gives them traction to run around and protects them from the cold tiles, so they actually lie on it whilst chewing on their bones.  The accent colors are fun and bright and I think will provide inspiration for our other accents and decor, whenever we get around to that.  So, without further ado, here's the rug in action:


Thursday, April 7, 2011

Updating Mirrors with Spray Paint!

I was hard at work hardly working the other day and started thinking about possible new projects and what I didn't like about our house and solutions to those things.  One thing that stuck out was the mirror situation on our first floor.  We hung one old mirror I've had since my freshman year in college that I bought at the antique mall that used to be in the Lansing Factory Outlet Mall (right in between the period between when it used to be an outlet mall and its current state of ghost town) above our awesome pie safe in the living room.  It helps bounce light around from the window, but I realized I had grown weary of its dirty goldish frame.

The mirror in its home.
I decided it was time to update the mirror, help it tie into the room better, and serve as a fun splash of color by spray painting the frame a warm yellow to match our end table pet bed.  First, we took it off the wall to prep it for painting...

Here you can see the color a bit better.
And then I used some pages from one of my thousands of catalogs that arrive daily (seriously, I think we could re-side our house in catalog pages...) and my beloved Frog Tape to cover up the mirror itself.  Of course, Elliot was there to provide quality assurance...


The spray paint we went with for this project was Rust-oleum's glossy "Warm Yellow".  It's not quite as mustardy as our end table, but it was that or frightening neon yellow.

Seriously, he's always there...
Then it was out to the backyard to get a-sprayin'.  The trick is shake it up a ton (at least a minute to get started) and once you start, keep your arm moving and never just blast in one spot, or you'll end up with nasty runs and drips.  Here's the mirror after one coat:


Honestly, two coats doesn't look much different, so let's just skip to the grand reveal!


He's on the floor now since we haven't finished painting the wall where he usually lives, but look how nice it pops on the blue wall.  It looks so bright and happy!  However, as you may be able to tell, I didn't think to tape down the middle of the sheets (as you can see it lifts slightly on the previous picture) and now there's a slight dusting of yellow in places on the glass, but we'll just scrape that off gently.  Live and learn.

So, following the relative success of that project, we moved onto our second target.  We have this large guy leaning up against a wall in the hallway by our bedroom that I like to use to check myself out before heading to work, since our bedroom is too small to have one.  This mirror is a relic of Overlook and used to live in our master bathroom where the bright white trim popped against the gray walls, but for some reason, it just wasn't doing much for me here.


I hauled him over to the living room and did the same taping up (this time with packing paper to save time) and, of course, remember to tape all the seams to avoid a similar misting as the yellow mirror received.

And of course, I couldn't have done it without the assistance of three petsons.
It was back to the yard to spray him... this time with the assistance of our brand new sawhorses and a can of Rust-oleum " Lagoon".

Much easier than crouching in the dirt... and check out our bits of grass!


After one coat, we had this:


Then with another coat and some little touch-up spurts:


So shiny!
Since the Lagoon only came in a satin finish and I wanted a finish as shiny and glossy as possible, we also picked up a can of the Crystal Clear Enamel for both protection and shine.  You can't really tell much of a difference in photos, but we're so happy with the results.  It looks super bold, vivid and shiny.  Definitely an upgrade from the boring ol' white.


I absolutely love the vibrant blue and it looks awesome up against the Gossamer walls.  I think we're going to go ahead and mount it on the wall, so there's no risk of pups or kitties knocking it over.

So, we're really happy with our results and the fun pops of color they add to our house.  In case anyone out there wants to go spraying up their junk, I'd definitely recommend gloves of some sort unless you want to go to work the next day with slightly speckled blue hands.  Like I said, shaking a bunch beforehand and throughout the spraying is crucial, as is swaying the can to avoid drips.  As you'd expect, the Frog Tape worked wonderfully on the glass and pealed off nice and easy without leaving any sort of gunk behind.  We had rain here, so the mirrors couldn't sit outside to dry, but I'd also recommend leaving any spray painted pieces outside at least overnight unless you like a nice fog of VOCs lingering in your house.  Overall, it was a quick and easy project and only cost about $12 to give us two practically new mirrors.  Win!

And now for the obligatory adorable Dexter photo:


He was our little helper as we worked outside... and by "helper" I mean "dirt and moss eater", as evidenced by his little grimy beard and dogstache.  That's our baby bichon for you.  :)

Tuesday, April 5, 2011

A Tuesday Miracle

OK, maybe "miracle" is an overstatement... I suppose "serendipity" is more accurate and more appropriate for my heathen soul, so let's go with that.  Anyways, similar to my apparent obsession with Google-defining things, I have been compulsively checking a wide variety of retailers' rug selection for months in the seemingly endless quest to find a rug for our basement, which following its board and batten transformation, hasn't received much love from the Bedtelyons. 

Yes, those are tumbleweeds.
Let me tell you, it has not been easy.  We need at least an 8x10 rug to fully cover the U-ish shape of our couch, which once you make the jump from a 5x8, so does the price... like a lot, and then they usually stick you with at least a $25 freight charge for an oversized item... and I hate fees.  Then there is the challenge of finding something that won't look ridiculous with the Flaming Torch walls or create some enormous beige splotch (cough = beige, floor tiles = beige... beige x 3 = sadness).  We wanted something modern, but not too flashy, and maybe bring in some additional fun accent colors to help balance out the orangsicle party... but what goes well with orange??  See the problem(s)?  Ugh, it's too much even rehashing it now... *deep breaths*

*yawn*

waaa!
Finally in a miraculous serendipitous occurrence, I stumbled upon a rug on Overstock that met all of my many criteria: the not-so-creatively-named "Loomed Replica Brown Floral Rug"!  Seriously?  They couldn't come up with anything better too add to my excitement?  That's just lazy. 

The soon-to-be newest addition to our basement family.
So, we got a dark brown background, which will help hide any... pet mistakes... and won't create the dreaded Beige Monster.  I'm not sure what you'd call the floral stick things, but there's an orange one to match the basement and some blue and green accents, too.  I think the pattern is fun, but subtle, and modern, but not too crazy.  Plus, I don't think you can beat the under $300 price plus no stupid "freight" charges and only $2.95 for shipping!  Oh wait, yes you can!

Right before I hit "check out", I thought to myself... I'll try Googling "overstock coupon code" and see what happens.  Lo and behold, I found a coupon on Dealio for $10 off a purchase of $200 or more.  I suppose $10 isn't much in the grand scheme of things, but who doesn't love saving ze money?  I could buy a pretty OK bottle of wine with that $10 and enjoy it on my couch whist going slipperless (gasp!) downstairs.

I need to wait 5-10 business days to actually experience my rug, so who knows?  Maybe it'll be a piece of junk, but at least for 5-10 business days, I can turn my obsessions somewhere else like... well, any of the thousands of projects in my docket.

Monday, April 4, 2011

First Adventures in Sewing

Last Valentine's Day, John surprised me with a new sewing machine - a Husqvarna Viking Emerald 118, to be exact.  Since then, I'm sad to say it received no use.  Even though my mom crafted amazing Halloween costumes for me year after year, I have no experience using a sewing machine and really wasn't sure where to start.  During their last trip down to visit, my mom sat with me and showed me the very basics, like how to prepare the bobbin and get the thing to work.  I finally felt like maybe I could make something, but with so many other projects to attend to, my sewing got put on the back burner once again.

On Friday, I decided enough was enough.  It was time to face my fear and finish up my end table/pet bed project I started a month ago.  That night, I managed to drag John out to JoAnn Fabrics (yeah, that's what we do on our Friday nights now...) and we picked out a fun cotton striped fabric with colors to complement the table, some stuffing, and matching brown thread.  Then Saturday I headed up to my mom den to get to work on the cushion.  Since I was still pretty leery of my less-than-novice sewing skills, I also picked up some cheapo scrap bin fabric to do a test run to avoid messing up the pretty stuff.  The sewing gods were smiling down on me because my little test sack turned out great and I found the confidence to go on.

My test stitches.
And now I have a tiny... hamster sleeping bag?
To start on the actual cushion, I popped the top off the table once again (glad I was too lazy decided not to Gorilla Glue it down yet) and used it as a template to trace out the cushion, leaving a one-inch border on sides for my stitches.  A Sharpie pen worked great for this (and I made sure the ink didn't bleed through before going all trace-crazy).


After my hexagon was all traced out, I used my Fiskars rotary cutter to cut the first panel out.  The rotary cutter worked amazingly and I was left with nice, clean lines.  I probably should have used a cutting mat underneath it, but luckily, it didn't leave any marks on my incredibly expensive and fancy IKEA table.  Using that panel, I flipped it over, lined it up as best as I could to match the stripe pattern, and cut out the second panel.

First panel = template for second panel!
My panels all ready to go and the neato cutter... and possible celebratory pizza cutter??
With the panels cut out, I carefully went around and pinned them together so they wouldn't go scooting around when it was time to sew.
Little pins all lined up.

At long last, it was time to get down to sewing business.  Thankfully, it actually went super quick and I went right around the piece, making sure to stop and lift up my foot at each corner and pivot to continue on, and of course, leaving a small bit open for a stuffing portal.

My glorious stitches.

After pulling out all the pins, I snipped off each corner tip to remove excess fabric and prevent bunching in the corners to keep them nice and pointy.  Here's my finished empty cushion sack:


I honestly couldn't believe how nicely it turned out and ran down the stairs to proudly present my handiwork to John... and I had to iron down the seams, anyways, to get a nice finished product.  Back up in my den, I stuffed the cushion until I had this puffy guy:

And yes, it took a grande Starbucks and a large Diet Coke for me to power through this project.
Then I just had to sew up the last bit by hand, which took longer than sewing the rest, I think.  I passed the time by pretending I was on Grey's Anatomy and just finished another amazingly revolutionary yet controversial surgery.  Instead of a McSteamy or McDreamy by my side, though, I only had... McKitty? He's still very handsome, though. :)

Me-ow!
To finish it off, I gave it a once over with the lint roller to remove all the little stray stuffing bits and I was done with my first sewing project.  I think it turned out pretty well, if I do say so myself.


And there he is in his home.
I seriously doubt any pets will ever use it, but John assured me it's nice enough that he would use it himself if they don't.  He's such a nice husband.  If nothing else, it was a quick and easy introduction to sewing for me... but now I have sewing fever and have all sorts of projects mulling around now... Can you say custom dog outfits?  I kid... :)