Showing posts with label projects. Show all posts

Thursday, January 12, 2012

Elfa Redux

Back a year or two ago when I first announced my desire to get an Elfa system for my closet, John laughed at me.  He couldn't understand why anyone would want to spend a couple hundred dollars (or more) to add some shelves to their closet.  Oh how the tides have turned.  Following the installation of my Elfa system, he was instantly overcome with jealousy.  Thus began our Elfa Redux.

John saw the benefits of an organized and glorious closet and decided he, too, needed an Elfa.  So, he did the same wizarding I did and came up with his own closet design.  It's pretty similar to mine, as there's only so much you can do in a small space, but you'll see he has more room for shirts and a space for pants while I had more room for dresses (I make him store his dresses in the attic).


This time, he submitted the order electronically, and sure enough, when we arrived, a cart was waiting for us full of his Elfa components.  We did the same prep work as before - demolition, repair, and painting.  In case anyone out there is curious on how to go about installing an Elfa unit...

First, you hang up a support strip along the top of the closet.  They provide you with the screws, and all you really have to do is ensure it's all level and screw it in.

Don't you love how level/even the intersection of our ceiling and wall is?
Next, you just pop in the hanging bracket braces and slide them according to the appropriate spacing.  You're given a spacing guide, so you just scoot it over until it's properly spaced.


Then you just pop in the brackets and set the shelves in place.  You can space them as you'd like, according to whatever you'd like to store and if you don't like the placement, you can just pop them back out and try again.


Once your shelves are in, you pop in the rod brackets and snap in the rod itself.


Before you know it, you're done and so happy you didn't spend a ton of money paying some fool to install it for you!  Rejoice!


This time around, we removed all the tags and stickers beforehand and total installation was only about 15 minutes.  Of course, our systems are about as simple as they come.  

John's final product.
So, that's that.  Two nicely organized closets in two weekends.  Pretty good progress for us since on average, I think projects usually take us about 4 months from start to finish...

Sunday, January 8, 2012

Merry Elfa-mas To Me!

Back at Overlook, we were enormously spoiled with a cavernous walk-in closet complete with shelving units and lighting.  Here at 64 year old Grafton, our master bedroom closets are minuscule in comparison.  I've been able to make it work, but since we moved in, I've been dreaming about adding an Elfa storage system.  Since most of our readers are Michiganders, you may not be familiar with the heaven-on-earth that is the Container Store (sadly, it looks like the nearest store location is Chicago).  Just another reason to abandon the Mitten and join us here in NoVa (obvious hint-hint, Mom and Dad).  Once a year, Container Store has their 30% off Elfa Sale and I just so happened to have a bit o' cash in my pocket from a Christmas bonus and thought: 2012 is the year my dreams come true.

So, you can go online and enter the measurements of your space and the closet wizard will suggest some designs based on the info you provide.  That is what I did.  Here is what the wizard and I decided on:


It's pretty great because it breaks down every component of your design and you can make all sorts of adjustments and it'll give you the exact price, so there aren't any surprises at check-out.  Once you're done, you can submit your design to your nearest store and they'll put together all the pieces in a cart for easy and quick check-out!  Amazing!  I didn't quite get that at first, so I just printed out my design and brought it into the store and a helpful employee still pulled all the pieces whilst we browsed the store.

Back at home with all the parts, I had to pull out all my junk and then remove the existing shelf and bar... and patch up the wall where our demolition caused some minor damage.

Before Elfa.  The horror! 
My handsome assistant demo'ing the existing shelf brace.
Post-spackle.
The walls of my closet were pretty banged up from me repeatedly throwing my shoes in there.  I thought, why not paint in there?  We have bought paint for our master bathroom and bedroom (months and months ago, as usual), so I brought out the lighter shade designated for the bathroom and went to town on the closet.

Freshly painted!
I'm not sure if you can really get a feel of the color, but it's a soft gray that looks so much better than the flat, banged up white and infinitely better than the nasty old yellowed paper color of our bedroom walls.  I'm glad I love it since our bathroom will one day be that color.  FYI, it's Benjamin Moore's "Big Bend Beige" color matched to Behr's Premium Plus Ultra base.

Once the paint was dried, we installed the Elfa.  You can pay Container Store to install it for you, which would have cost us an additional $180, but we were able to do it in about 30 minutes... which half of that was peeling off all the stupid price tags and opening assorted packaging.  I finally got my Elfa and I love it.  I'm still working on complete organization, but here's a sorta-after for you:


Doesn't that look so much better already??  If you can't tell, there's a top shelf that runs the entire width of the closet which is currently empty.  One thing I'd note for women, buying a couple solid shelves might be better than the wire ones I went with.  I found some of my skinnier-heeled shoes have a hard time balancing on the wires, so we might return one or two for the solid shelves.  I'm just hoping one day when we're ready to leave Grafton, it might help someone realize how much you can shove in a small space and not be scared off by our tiny closets.  In the meantime, I love my newly organized closet and am slightly afraid of how happy organization makes me...

Thursday, August 4, 2011

Project Built-Ins: Planning

Our house is small in general and our upstairs living room got only a tiny slice of our humble home pie.  With our current situation, we have two large, brown-black bookcases surrounding a small brown-black TV stand, upon which sits a black rectangle of a TV.  Back in Overlook where ceilings were high, windows and sunlight were aplenty, the black seemed to balance all the light, but now it just seems to weigh down our little room.  We've been dreaming of a wall of built-ins practically since we moved in, but with very little experience, know-how, or just plain guts, we put it off and kept it only in our dreams.  I don't know if the summer heat has made us crazy, but a couple weekends ago, we finally decided to take the plunge and get cracking.

This is an older photo (we've since painted and added a bunch more stuff to our shelves, but I feel too lazy to take a new photo at this time. :)
The first step in our planning process was to find some inspiration to work off of.  Maybe there's an awesome place where you can find plans for things like this, but I don't know where that is.  Instead, I stumbled upon this photo, featured in one of Apartment Therapy's House Tours:


I was instantly drawn to how open, airy, and modern his shelves look.  It doesn't seem huge and imposing, but more of a subtle focal point... if that makes sense.  With its simple, yet elegant design, I thought it would serve as our perfect inspiration piece.  Unfortunately, the next step wasn't as fun because it required some math and spatial skills, both of which I sadly lack, but here's how it went down...

1)  We measured the dimensions of our wall.  Easy.  Except our stupid, slanty house isn't square anywhere, so the left side of our wall is actually 0.5" shorter than the right side.  grr.  We just decided to go with that height and hope no one notices.

Super techical drawing.
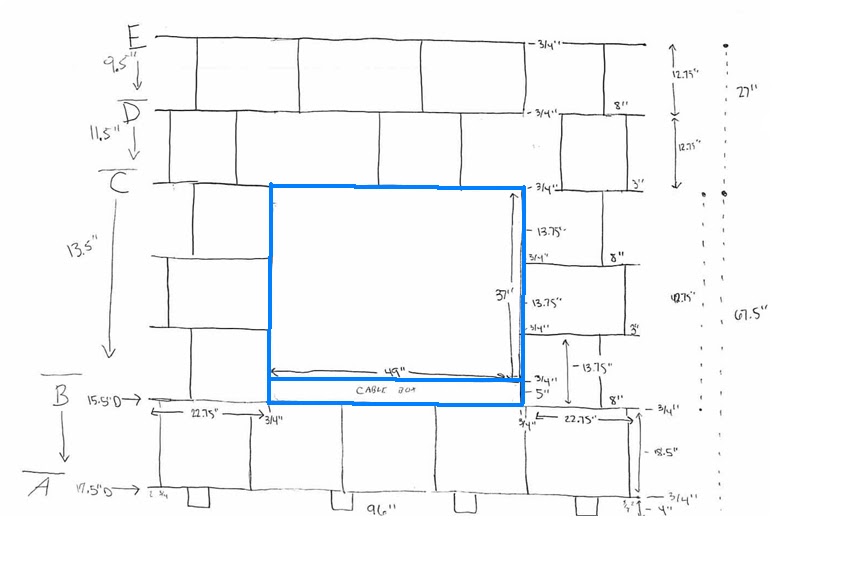
2)  Since our built-ins will house a TV, we used that as our starting point.  We currently have a 32", but plan on upgrading to a 42", so we had to account for that (I hopped on Best Buy and checked out the stats on a few 42" TVs and took the average of those).  Also Googling around, Sony recommends leaving 4" of ventilation space around a TV, so we added that into our measurements.  We also need a space for the cable box, so I just measured the current cubby we use because that seems to be working out fine.

*side note* As I mentioned, I'm spatially-challenged, so my saving grace here was graph paper.  I counted out my squares and figured out we could fit a scale of one square = 4" and went with that.  It was much easier for me to see the proportions and how it'll all look in the end.  Plus, who doesn't love a trip to Staples?  I heart office supplies in a weird way.

*side note 2* One thing I had to keep in mind is the shelves take up space.  We are going to use 3/4" wood, so with each line I drew for a shelf, I had to note that was 3/4" of space used.  A small detail, but something I could easily understand forgetting.

3)  Now we had to decide on the heights of the shelves.  I liked the look of having larger books on the bottom shelf and then tapering off as we move up, so we measured some of our larger books and the shelves they currently sit on.  I added that on, plus 4" of feet at the bottom (we picked 4" of feet because our current stand sits up about 4" and we liked how the inspiration built-ins sit up on feet and not a solid base).  With our layers of feet, bottom large shelf, cable box cubby, space for TV, and additional space for the shelves themselves, it was time to add all that up and subtract it from our remaining height to see what else we could fit in. 
4)  Once all the horizontal shelves were drawn in, it was time to decide how to place the vertical supports.  One of my favorite aspects of the inspiration photo are the open ends.  Right now, our bookcase has solid ends, so as you enter the living room from the dining room, you're confronted with a wall of black.  I love how the open ends are more... open and provide a small space for little knick-knacks.  To still provide stability, we decided to alternate starting with 8" in, then 3" in, except for the bottom shelf, which we only did 2" in since it's the bottom shelf where all the weight will press down on.  For the remainder of the vertical supports, I just randomly stuck them in where I thought they'd look best.

After many hours of calculating, measuring, drawing, erasing, and pondering, we finally had our sketch.  Before skipping off to Home Depot, we sat down and made a cut list to (1) make it easier for us when it came time to actually make all the cuts and (2) know exactly how much wood we would need.  Then it was time to actually make our trip out for supplies.

In speaking with a very helpful employee (usually very rare at our store) and going back and forth to stare at our various options, we settled on birch plywood because it was cheap, strong, and will be covered by a few coats of primer and paint, so who cares what it looks like?  The edges are a little rough, so he recommended some stripping we can add simply by ironing it on.  Hopefully that'll be as easy as it sounds.  Along with that, we picked up more pocket screws, pocket hole plugs, wood glue, primer, and straight-off-the-shelf ultra white paint.  We also had them cut down our boards a bit to reduce the amount of cuts we'll have to make and, well, they just wouldn't fit in John's SUV otherwise.

Iron-on veneer tape stuff!
Back at home, we dragged out the saw and sawhorses, put on our safety glasses and bug spray, and... realized John's Ryobi table saw's rip guard only goes up to 12"... meaning we couldn't make our larger cuts (like 18").  So... we put away the saw and sawhorses, took off our safety glasses, lugged everything inside, and washed off our sweat, tears, and bug spray in defeat.  What to do now?  Well, we contemplated trying to borrow a saw, if we could find someone who has one around here, or possibly renting one for a day.  John had another thought that he might be able to use the workshop at our local Woodcraft and stopped by one afternoon to check out that possibility.  In speaking with the more experience gentlemen, one suggested using a long, straight board to make a jig/guide to use in conjunction with a circular saw.  That seems to be our best option and we really don't have too many larger cuts to make.

So, we have a plan and all our materials and then this ridiculous heat wave came rolling in and now it's impossible to be outside for too long before feeling like you just might pass out.  Until the temperatures drop to a bearable level, we're stuck with plywood in our kitchen, but at least we've made a small bit of progress.

Saturday, July 2, 2011

Trash Pad: Part 1

Holy moly, I can't believe it has been a month since we've last posted... or done anything worth posting about.  We were in New York for a week, but other than that, I guess we've just been super lazy lately.  Even though it was 94 degrees today, we forced ourselves outside to begin a project we sort of began months ago.

As you know, we have no shed or garage or outdoor storage, except for our small under-the-addition space that we spruced up a month ago with some lattice renovations.  We do have two big ol' bins for our trash and recycling that just sit next to the house and generally look ugly.  In a small effort to make them look a little nicer, a few months ago I wandered into the overgrown space to the right of our house where someone had thrown a bunch of paver rock things.  With their random shapes, I thought I could piece them together and form a cute landing pad for the bins to sit on.  Unfortunately, they were just a bit too random and no matter how I moved them around, it just didn't work out right.  Plus, they are all different widths and I suppose I could have dug down to make them level, but who wants to do that much work?  Over the last couple of months, rain showers and the weight of the bins helped push the stones more firmly into place, but it was still kind of ugly.

My sad attempt at a rustic/natural looking trash pad.
The bins on their sad trash pad.
Eventually, we'd like to go all out and build ourselves a trash shed, inspired by this article on the This Old House website.  Look how cute it looks:


To start off, though, we decided to replace the pad with something... better.  So, we headed out to Lowe's yesterday afternoon to check out our paver options.  I wanted to go with something cute and fancy, but realized once we build the shed, no one will ever see them, so why pay extra?  We just picked up some cheap, plain concrete squares, a couple bags of patio and paver base, and a tamp.

Our first step was to utilize slave-puppy labor and have Chewie haul away all the old stones.


Then John had the horrible task of digging down about an inch in our nasty clay/rocks to help get a nice, flat surface.  This was not made any more enjoyable by the 94 degree heat.  Luckily, we have our oaks to provide shade, so at least it wasn't in full-on sun.

Kinda looks like a grave...
Our next step was to spread out the patio and paver gravel base for the bricks to sit in.  We dumped out our two bags of that, spread it around with the metal shovel, and John went crazy with the tamp.

Dump...
Spread...
Tamped!
We then started laying down the bricks, only to realize they weren't lying as flat as we'd like them.  After some discussion, we decided we probably needed a bit of paver sand, so it was off to Home Depot.  Following the same technique of dump, spread, and tamp, we were left with what looked like a giant graham cracker crust.


Once it was all smoothed down, John and I carefully placed the bricks and stomped on them a little to get them in their place.  Here's the new pad:


Not much to look at really, but like I said, it'll eventually all be enclosed with our awesome trash shed.  Until then, at least our bins have a nice, even surface to sit on.


So, that's not a very exciting project to come back with after a month long hiatus, but it's one more thing marked off the list.  Plus, it's only the beginning of a three-day weekend, so who knows what else we'll force ourselves to get around to doing. :)

Wednesday, June 1, 2011

Lattice Rejoice!

I can't believe it has been almost two weeks since our last post.  We've been dealing with a bad mix of laziness and project ADD. We have a few projects in the works and keep alternating between them without really accomplishing anything.  We finally crossed one project off our list this weekend, though - replacing the lattice skirt underneath the addition.

In its existing state, two pieces of white vinyl lattice were screwed directly into the exterior of the bottom of the addition and just left wild and free on all other sides.  As a result, it started to sag and get all bendy and terrible looking.  Since we don't have a shed or garage, we've been using the under-addition space as storage for things like bags of dirt and mulch and our garden tools.
Before left side lattice.
Before right side lattice.  We actually forgot to take "befores" so these aren't great photos.
The unsightly lattice and tackiness of a bunch of junk has been haunting us for quite a while and we have been forming our plan of attack, but couldn't act on it because John needed a circular saw.  During our last trip to Michigan, we were discussing our projects with my parents and lo and behold, my Dad just happened to have an extra circular saw (of course).  Unfortunately, the TSA frowns on passengers travelling with power tools, so we had to wait until he could so kindly ship it to us.  Without any further excuses, we were ready to replace our rotten lattice.
Thanks, Papa Harold!
I should mention we took our inspiration for this project from the This Old House article "How to Install Porch Lattice", in case anyone wants a better written technical description.  So, first we obviously ripped out the nasty piece on the right, but decided to keep the left one.  As you can see in the photo above, our cable wire was run right through one of the holes and we decided it would be a pain to deal with that, so we'd just work around it and save us the cost of another lattice panel.

Nakey!
Our first step was to make the frames that would hold the lattice securely in place.  Once all the wood was cut to size, John attempted to use his new Kreg Jig to make pocket holes, but unfortunately, the wood was slightly damp and the sides pulled apart.  We had to wait while the boards sat in the sun to dry out... and then spent the night inside to completely dry.

The sunbathing boards.
After the boards were finally dry, John drilled in the pocket holes and screwed together all the frames, and then it was my turn to paint them all.  We just went with straight-off-the-shelf white to blend in with the siding.

One pitiful looking frame.  We were working at night after work, so please excuse the poor lighting.
John then used the frames as a template to cut out the lattice panels, using his new-to-him circular saw.  Look, we're putting our old fence chunks to good use as a work table... and sawing in the dark which probably isn't the safest thing to do...


Then came the arduous task of painting all the lattice panels.  It was kind of a pain trying to get all the sides covered, especially while we were being eaten alive by mosquitoes.  Luckily, we were really happy with the color we chose - Martha Stewart's "Sea Glass" color matched to our favorite Behr paint and primer.


Dexter seemed to like it, too, as he couldn't help but keep rubbing up against our sawhorses and ended up with a bit of Sea Glass in his fur.


Once the lattice was dry, John screwed the panels onto the frames.  We then attached the right-side panel using some L-brackets.  You can see the piece of wood here where the old lattice was directly screwed into.


To secure the front panels, we used hinges and attached a handle, allowing us to lift the panels and access our storage space.  I gave the hinges and their screws a quick once over with some white spray paint to help them blend in with the siding and frames.


Our new panels and the creepy dungeon hole.
John displaying the liftable panels and rejoicing in our success.
Finally, John painted the last vinyl lattice panel we decided to keep on the left-side and hung the frame directly over it.  We still need to paint the screw heads to help them blend in, but it looks a lot better than it did to begin with.  Don't our Manhattan euonymus look cute in front of it?


And that was that!  All together, it was really easy and was a pretty inexpensive improvement.  It took longer than we expected due to rain delays, the boards being unexpectedly damp, and trying to beat the dark (and mosquitoes) after work.

Now for a gratuitous cute pet photo.  Look at this adorable little face peering through the fence.

Saturday, March 19, 2011

So Mulch Fun!

After installing the brick edgers along our flower beds, it was obvious we couldn't stop there.  While we were digging around, we noticed how awful the existing mulch looked.  I'm no mulch expert, but the stuff looked a lot like... just a bunch of ground up junk and saw dust.  It was a disgrace to our new beautiful bricks, so we started researching our mulching options.  I found a great "Backyard Conservation Tip Sheet", courtesy of the USDA's Natural Resources Conservation Service, with a bunch of information on when and how to mulch.  The tip sheet suggests waiting to mulch until the ground has completely warmed, so we may have jumped the gun a bit on that.  However, our beds didn't contain any flowers, vegetables, or seeds and since the little bushes made it through a year of complete neglect, I don't think some slightly early mulching will do them any harm.  They must have tiger blood...

Eww... junky.
Instead of heading over to the Depot, we decided to check out a new-to-us local nursery, Meadows Farms Nursery.  Although it's still early in the season, we were pleasantly surprised to find a great selection of ground cover, bushes/shrubs, trees, and even some bright and happy pansies.  It was a beautifully sunny day, so we took our time strolling around their grounds and filling our heads with landscaping dreams.  We were also delighted to find their prices were much lower than our usual haunt, Campbell & Ferrara's, (more in line with the prices you'd expect at Home Depot) but with much better selection, quality, and customer service.  After chatting with the helpful garden center employees, we finally made our mulch selection... and of course had to pick up two more bushes.  At only $20 a pop, who could resist?

MFM: New Bedtelyon nursery of choice.
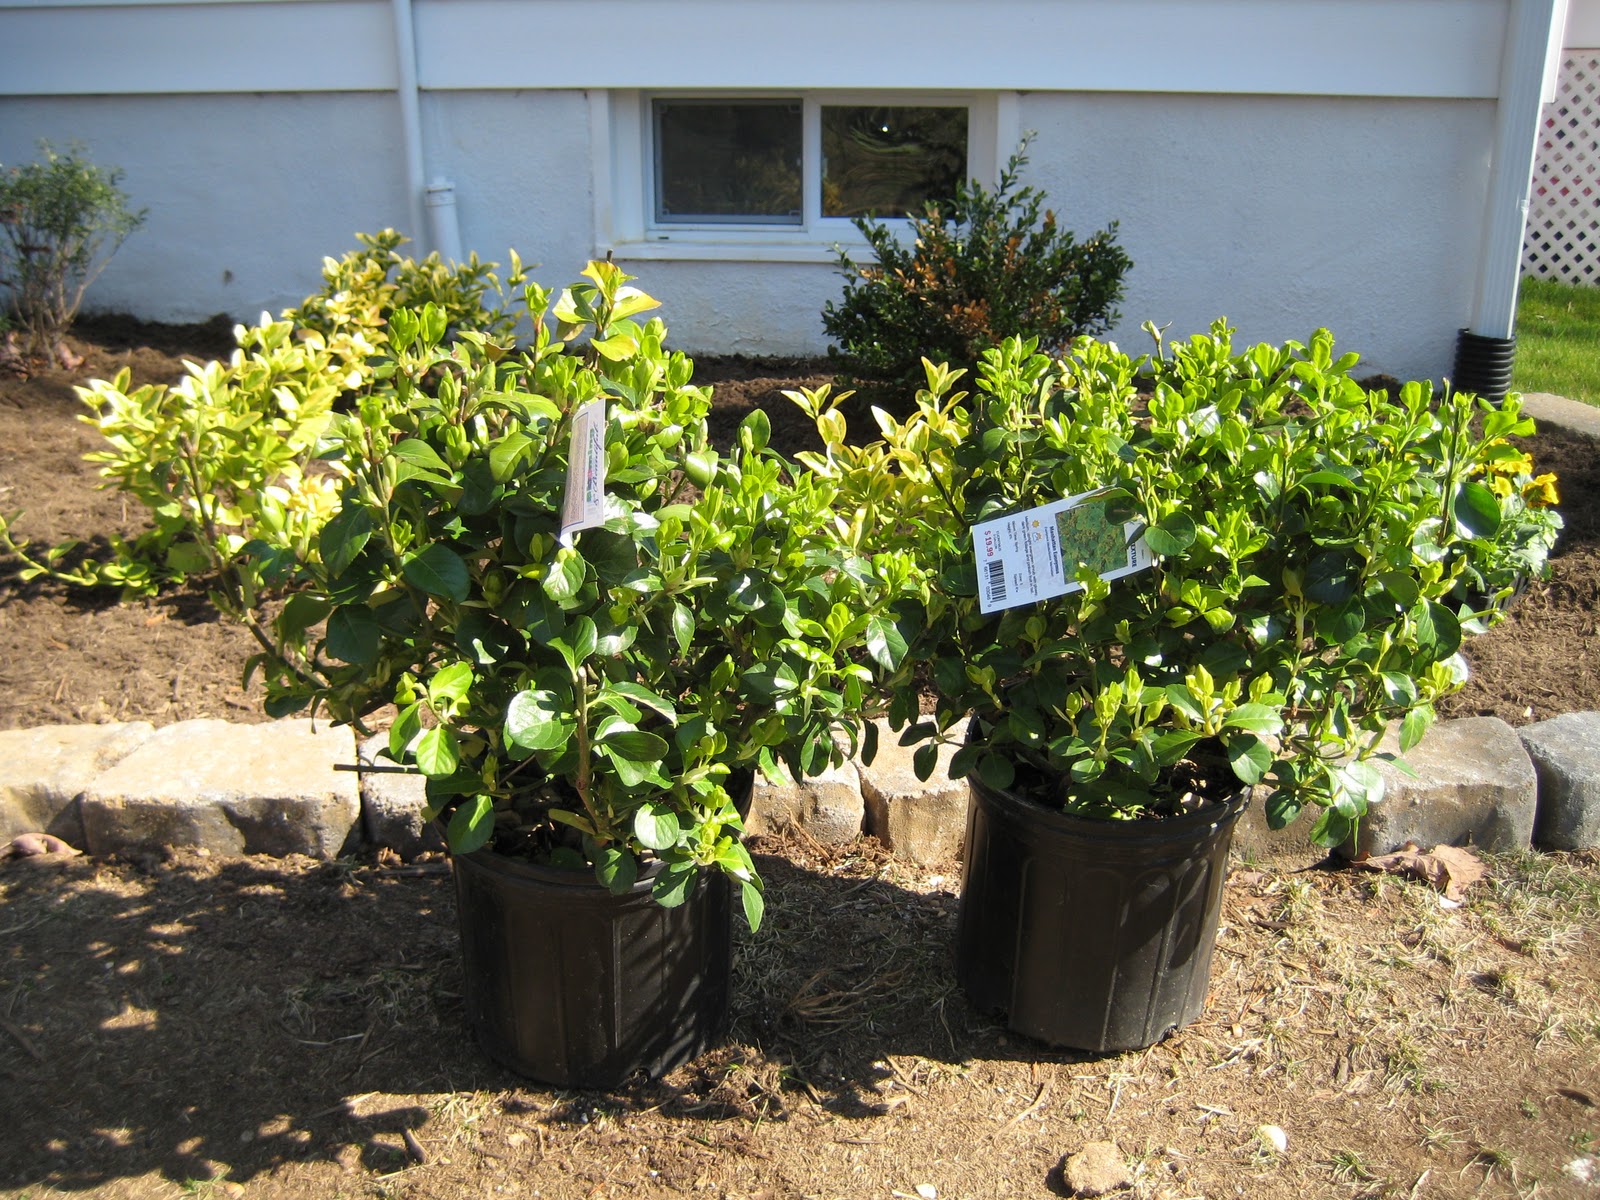
We decided to go with their shredded hardwood mulch because it was the most affordable option and came highly recommended from the staff.  It's supposed to hold up the best and I think has the best aesthetic appeal for our house, with a very natural and soft look to it.  Perfect for our little Cape Cod.  The bushes we chose are Manhattan Euonymus.  We loved their little glossy leaves and the fact they'll have little white flowers in late summer, followed by pinkish fruits in fall.  Plus, they're great for an informal hedge.  Now if we could just decide where to put them...

Homeless Euonymus bushes.
Before dumping in our new mulch, we first tried to rake out as much of the old junk as we could.  Then we just emptied the bags, raked it around the little bushes, and swept the scraps off the bricks.  The hardest part was lugging around the ginormous bags.  The mulch looks so soft and plush, and weirdly has a faint aroma I've smelled in wines before.  That must be the "earthy" smell they talk about.

Post-raking bed.

New bed (right of front door)

Another new bed!

And another!
So, with just a quick 2.2 mile drive to a great local nursery and about $100 later, our beds were further spruced up and we have two new little bushes to put somewhere and hopefully enjoy for years to come.