Showing posts with label DIY. Show all posts

Tuesday, January 24, 2012

Extreme Makeover: Entryway Edition

As I mentioned in my last post, we recently acquired a new bench for our entryway which set off a whole explosion of new ideas for a makeover.  Our bench is so large (I can comfortably lie down on it), it made the hanging shelf thing look so pathetic and measly in comparison and we knew a complete overhaul was necessary.  Going off some inspiration photos found on Pinterest, we decided to install some beadboard and build a wall mounted coat rack/shelf.

First step: hanging shelf thing gets the heave-ho.  More like gets the heck sawed out of it until John was able to rip it off the wall.  A stripped screw forced desperate measures.  As you can see below, John had to take the Dremel Multi-Max to it to first try to cut the head off the screw, and when that didn't work, he just cut the hole to bits until we could pop the shelf off.


Next step: building the wall mounted coat rack/shelf.  We're not carpenters or furniture designers, so it took me a couple months of poking around on the internet before I could find a plan of exactly what I had in mind.  In a stroke of luck, I came across this tutorial through a photo pinned on Pinterest (of course).  Going completely off of that tutorial, we picked up all our supplies at Home Depot and headed home to make our cuts.  Cutting the wood itself was easy peasy, but the crown molding was another story.  John had some difficulties getting the correct angles and our first attempt took approximately four hours... even though our Turkish neighbor's father (who speaks no English) came out to help... Once that first piece of molding had given all it could give, John headed back to Home Depot, found a piece of double-sided crown molding, made the cut, it fit perfectly, and it was all over in a matter of minutes.  I should mention this all happened the weekend before last when it was about 35 degrees and we were all bundled up in our winter coats, hats, and gloves.  After the cuts were made, we nailed on the trim, filled the holes, did some caulking along the seams, and took it downstairs for priming.

My lovely priming/painting station.
My lovely assistant.  He has a weird thing for plastic.
While the shelf was drying, we started in on the beadboard paneling.  Our first step on that was to install a thin piece of stop trim along the right side of the wall as a finishing piece for the paneling (so there wasn't just a weird raw panel edge).  After that was up, we cut the paneling to length (they come in 8' sheets and we decided to go with height of 5') and trimmed the bottom to fit over the baseboard molding.  We then did a dry fitting and used some old lipstick of mine (gotta love the Clinique free samples) to mark the register and outlet holes that would need to be cut out.

Step 1: Apply lipstick!
Step 2: Smoosh board on wall to create an outline!
John used his Dremel Trio to cut out the holes and the panels were ready to be installed.  John first used  paneling adhesive and 16 gauge finishing nails, but discovered the nails went all the way through the panel without securing it.  So, he switched to 18 gauge brad nails and that worked perfectly.  I was at work for the installation, but luckily, our neighbor was able to step in and help.

The paneling goes up!
We then installed a piece of chair rail molding along the top of the beadboard to cap that off.  John used some adhesive and brad nails to hang that, followed by some caulking to hide the seams.

The trim!
After everything was nailed into place, I filled all the holes with some Elmer's Carpenter's Wood Filler (in a little tub, not the squeezy tube which is awful and I would never, ever recommend unless you have a vice-like grip), waited for that to dry overnight, John sanded it down, and then it was time to paint.  Our first attempt went horribly, horribly wrong with the roller leaving a gross speckled/raised texture that was just nasty, so we gave up for the night and decided to take another crack in the morning.  So, I went to town sanding down the first attempt (which probably took an hour) and then painstakingly painted the entire thing with my trusty 1.5" Shur-line paint brush.  Luckily, it only took two coats and the beadboard was done.

In the meantime, I painted the shelf a nice light gray (Bedford Gray by Martha Stewart color matched to Glidden paint so we could just buy a little tester tub).  We had originally planned on painting the shelf white, too, but then realized we'd go from a blob of black to a giant blob of white.  Still wanting to keep it light and airy, we settled on a soft, kitteny gray.  When the shelf was dry, John drilled pilot holes and then counter sink holes so once it was installed, the screws would hide beneath the surface and we could patch over them.  John installed the shelf, patched the holes, and repainted and we were close to done!

Pre-hole filling, but it's getting there!  We picked up that giant cast iron "B" on sale at Restoration Hardware.  woop!
We had a slight delay in obtaining the hooks we had chosen to finish off the project.  Our Old Town Alexandria Restoration Hardware is sadly closing (boo), but we did score that giant "B" for 60% off.  The Tysons Corner Restoration Hardware was doing inventory the day I went in and wouldn't sell me the hooks (still don't understand that), so we had to order them and wait patiently for 4.5 days until they arrived this afternoon!  On the upside, they were on sale, so we saved about $36.  In case you're curious, we went with the Vintage Hooks.  After powering up with some Panda Express tonight, we came home and screwed those puppies in.

There's a tiny photo-taking John in the hook!
Bam!  It's done!
Don't you think the scale looks so much better?  And it's so much brighter!  Here's a side shot for you...


But how will it look all full o' coats and such??  Have a look!


We're still working on the shelf decor, so we just threw some stuff up there for photos.  Doesn't look half bad, though.  So, all in all, it took us about a week and half, with a lot of time spent on the crown molding and waiting for caulk/wood filler/primer/paint to dry.  I'd like to get a new appropriately sized rug for the entry way, add some pillows to the bench, and find some more or less permanent junk for the top of the shelf.  For now, though, we're happy... that it looks good and it's done.

Just another picture of Elliot because he's so darn cute.

Saturday, January 7, 2012

Banishment of the Baker's Rack

Just about a year ago, I did some work on our baker's rack that made me not want to pitch it out the window anymore.  Try as I might, my hate for the stupid thing continued to fester for another year until it was just too much.  The baker's rack had to go.  We finally got our act together on a couple fronts which laid the path for banishment.  First, we (mostly) cleaned and organized the unfinished portion of our basement which allowed for some infrequently used appliances to be moved downstairs (a post on that will be forthcoming).  Second, we came up with something that looks so much better in the space the baker's rack used to occupy.

Offensive.
Look how horribly it blocked the view.  Ignore the wood in our kitchen.  Those will eventually be our built-ins.  I hope.

Back in June, we were at my parents' house and I noticed they had a vintage Singer sewing machine stand base in their garage... that my Dad was using as a base for a drill press.  I managed to convince them I could put it to much better use and they were kind enough to bring it down to us in August.  Just like all of our projects, the stand sat in the basement for 4.5 months until we finally got around to doing something with it.

We decided to build a top for the stand to use it as a little side table.  We contemplated buying a small piece of granite or marble or possible a more expensive cut of fancy wood, but decided in the end, we're cheap.  We ended up buying a 10 foot 1x4 piece of maple and a can of stain at Home Depot.  To make it look a little more interesting, I came up with this very technical and intricate pattern:


John dragged his saw and wood outside (last weekend when it was like 20 degrees out when this weekend it was 60!  Darn our luck!) and while we shivered in the cold, we cut up the wood into the 14 pieces we needed.

The chunks chillin' on the patio.
After I sanded the rough edges a bit, I stained the tops and sides of every piece.  It was the first staining project we've tried and I must say it went pretty well.

My staining station in the basement.
The pieces sat and dried overnight before John brought out his Kreg Jig and screwed in all the pocket holes to affix the pieces to each other.

Pocket holes in progress!

All the pieces screwed together.
Once that was done, all we had to do was screw our new top onto the base.  The base has four holes that we just used four one-inch screws and some washers to attach the top.  Easy peasy!  And now for the grand reveal!


We're not really sure what to put on it yet, but we're so happy with the end result.  The much smaller table doesn't block the view from the living room into the dining room and you wouldn't believe how much larger it makes the whole kitchen/dining room space feel.

Oh, I almost forgot about the stupid baker's rack.  As I mentioned, that's been banished to the basement where its job is now to hold cat litter and cans of cat food.  ha!

Monday, August 22, 2011

Return to the Slanty Bathroom

Way back in January and as one of our very first Grafton projects, John and I painted our upstairs guest bathroom.  When we moved in, it was a horrible mint color and we thought we'd tone it down with a creamy chocolate brown on the walls and a soft blue-green on the ceiling.  At first, we were thrilled with the results, but looking back, I think we were just happy to have the mint gone and would have been happy with any other color.  A few months down the road with our new color scheme, we were sad to discover it made the room feel small and dark.  So, until we can figure out how to bust out walls and install windows... it was back to the drawing board/paint chip aisle.

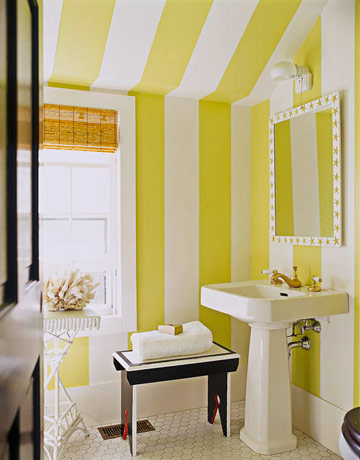
Inspired by this bathroom, found on House Beautiful's website in the slideshow "Beautiful Designer Bathrooms", I convinced John to let me try out stripes.  Since it's such a small, plain room, I hoped some bright stripes might help jazz it up and provide some height to the room.  As an aside, aren't those little hexagonal tiles adorable?  Again, I am a little saddened on how modern they went with our home remodel.  Maybe one day we can help bring it back to its roots.


I'm not quite as brave as the designer of this bathroom, so to soften up the stripes, I decided to go with a warm yellow and creamy white, so we have the contrast, but it's not too in-your-face.  I browsed around on Benjamin Moore's website for a bit and sent John out to collect some paint chips before finally deciding on Sundance for the yellow and Creme Brulee for the creamy white (on the same paint chip, just two colors apart).  We headed over to Home Depot with our chips in hand (yes, we're still cheapos who steal Benjamin Moore's amazing selection of chips and get them color matched to cheaper Behr paint) and got our paint.  Thanks to the mistake of a carleless Orange Vest, we ended up getting a gallon each for the price of a quart, so yay for extra free paint!

Our first step to actually implementing our redesign was to paint over everything (well, just the walls) with the Sundance.  Even with our "paint and primer in one", this took maybe three or four coats and forever.  Literally, it was so frustrating and then we got side tracked by several other things, just getting the yellow up took me almost two months.  Shame on me.  After that, it was time for the Creme Brulee stripes which was even more horrible.  OK, it probably wouldn't have been that bad if our room wasn't teeny and our weeks-long heatwave didn't turn the bathroom into an oven.  So, don't be scared of stripes.  Be scared of being trapped in a teeny oven (or I suppose any size oven). 

To do our stripes, I first measured the length of the wall and tried to come up with a stripe width that would give me an even number of stripes that weren't too wide or too skinny.  The wall is 70 inches long, so 5 inches would give me 14 nicely sized stripes.  I went along measuring every 5 inches and putting down a small square of Frog Tape to mark it off.  The trickiest part was to remember what would be painted white and what was left yellow.  The white bits had to have 5 inches of exposed wall while the yellow bits were partially covered by tape.  Then I had to actually tape off the stripes.  I did this using our suction cup laser level, by crouching on the floor, beaming up the laser to match up with my tape squares, and then making sure it was level for straight stripes... in the dark so I could see the beam line. 

Laser level in action!
Good times, crouching in the dark in the oven bathroom... I then carefully applied the tape in a single strip, placing the edge along the laser beam.  John was merciful enough to help me with the ceiling stripes, with his amazing height and monkey-like long and strong arms.


With the tape finally up after months and months, it was time to paint the stripes.  Since some of the tape stripes had been on for a while, I made sure to run my thumb over the edges to make sure they were still stuck on well.  Frog Tape says it'll stick for up to 21 days, but it seemed to do well for us for over a month.  I didn't have a small roller, so I painted all my stripes with my Purdy Cub paintbrush.  Definitely tedious, but I think it gives me the most control.  After crouching around the toilet, crawling around on the floor, going up and down my step ladder, and doing a few ninja moves on the vanity (while being cooked by our two sun-like light fixtures... on the brighside, I think my face got a little tan...), the paint was up and John took down the tape and we were done.  Sidenote: taking down the tape ASAP is a good practice to avoid the paint drying and peeling off as well as providing some inspiration to keep going.

Our stripes are done and I love them so much, even though the process was painful.  They're like my little stripe children.  Here's our almost-complete bathroom.  I'm pretty sure we have the worst house ever for photographs, with our tiny rooms and poor lighting.  These photos don't really do the colors justice and that makes me sad.


So, next steps?  Definitely need to do some decorating in there.  I'm thinking of some watercolor bird prints by dimdi on Etsy.  Maybe like this robin, the state bird of Michigan and frequent backyard visitor of ours.  Simple and whimsical, right?  Plus, we could brag about our imported Italian art.  Molto di fantasia!


I'm also working on a handmade (by me and my sad sewing skillz) shower curtain, using this tutorial I found on Design*Sponge, but with just two fabrics with a solid band at the top and bottom, surrounding a subtle floral fabric in the middle.


We'll see.  At my current rate of project completion, I just might do all this by December!  erf.

Tuesday, August 16, 2011

Wine Cork Art!

Hi, my name is Amanda and I have a drinking problem.  OK, I like to think of it more as a "solution" to life's miseries... and of course all the celebrations like, "Hooray, it's Wednesday!" or "A Panda Express is opening in a more convenient location for us!".  We've amassed quite a collection of corks (which wasn't as massive as I was expecting, so maybe I'm not too much of a lush...) over the years and have been using my Mom's method of "store them away until one day I find the inspiration/motivation to do something with the darn things".  Back at Overlook, we threw them in a glass jar which was easy and looked OK, but hadn't really found a place for them at the Grafton (although, some do end up in a little cut crystal dish we hide in the weird square in our kitchen cabinets... or just roaming wildly in the same weird square... seriously, what did they possibly think we'd put in there??).

Ick.  It looks worse in photos.  I especially love the exposed, unfinished cabinet bottom... bleh.
Anyways, the other day, I was looking around on Pinterest (as I mentioned in my last post) for ideas on what to do with my corks.  I saw cork initials, which looked cute, but I'm not big on initial/monogram things.  Of course, trivets or making things that look like trivets and sticking them on a wall.  Loose corks in a jar (done that).  Finally, I thought, I'll incorporate the randomness of corks in a jar/vase/whatever with framed corks and throw a bunch in a shadow box.  Luckily for me, Michael's had their frames on sale for 40% off (when are they not on sale?  who do they think they are?  Kohl's?) and I found an additional 25% your entire purchase coupon on their website.  So, I picked up the cheapest shadow box I could find and a pretty sheet of scrapbook paper to use as a mat/accent for a grand total of $8.16 (not counting the numerous bottles of wine it took to harvest the corks)... I got this guy:


Which we then hung in the basement to bring our "art" grand total down there up to a whopping... two pieces.  I have dreams of that entire wall being covered in wine-themed things, but at the rate I'm moving at now, I might have five pieces up before we move out.  Oh well.  It's a bit of progress.  I don't know if I'm 100% happy with it, but if I decide to display the corks differently, all I have to do is pop open the back and dump them all out.  For now, it works.

Just ignore everything on the top of the buffet... including our decanter/cable holder and giant sponge...

Spray Painting More Stuff!

This past weekend I had high hopes of moving on to Phase Two of our built-in project (finally cutting the boards), but Mother Nature had other plans for us, which included storms both days.  Not wanting to end up with a bunch of soggy boards or be electrocuted, we were forced to move onto other projects.  Sure, I could have worked on some existing projects, like finishing up the slanty bathroom re-do, sewing the shower curtain for the same slanty bathroom, or heck, even clean something, but none of that sounded any fun.  I'm not entirely sure how I defined "fun" in hindsight of my adventures...

Somehow I ended up with a bunch of things I did not like in their current state and thought spray painting them would be an easy fix.  First up: IKEA lantern.  We bought the lantern months ago and stuck it on top of our too-small-for-the-wall entry way shelf thing.  Unfortunately, it became another black-on-black situation and just seemed to disappear on the shelf.  So, I thought, how could I make it pop?  Paint it red!  Poor Buddha is our only bit of red and I thought it would help him feel at home among our blue and yellow accents.  Blue, yellow, and red?  Maybe it's all too primary colors, but I like it think of it more as... modern cottage awesomeness.  So, out to the yard it went and after a couple coats of red spray paint, the lantern is now, well, red and much more visible.  I forgot "before" pictures, but I'm sure you can imagine it as black.


Next up: (now this is an exciting one) plant saucer!  I bought an awesome pot months(?) ago at Campbell & Ferrara's for my amazingly still alive violet, but they didn't have any matching saucers.  Dumb.... which reminds me of this commercial...


We bought a plain terra cotta saucer with the intention of painting it to match and like everything else, it sat untouched for months.  After a few shots of spray paint, I now have a sort of matching tray for my pot.  Although the can promises a reflective, metallic finish, I did not find this to be so.  It is metallic-ish, but not reflective and shiny like the pot.  Oh well.  It's close enough and not terra cotta anymore.


Next victim: picture frame!  I think the only room in our house that hasn't been featured in any projects is our guest bedroom which is too bad because it's probably the nicest room in our house.  We only ever go in there to retrieve extra toilet paper, paper towels, etc. from the closet (since our house has no linen closets... darn you house from 1948!), so I guess it's not on our minds much.  I have been thinking about it lately, though, and have decided I'll try for a apple green and navy blue color scheme and stick with our weird collection of illustrations from old books.  We have our apple green comforter, so to bring in the first touch of navy blue, I decided to spray paint a frame we have holding our awesome bison print.  I also added a "mat" consisting of some fun scrapbooking paper that I just cut down to size and stuck the print on top of.


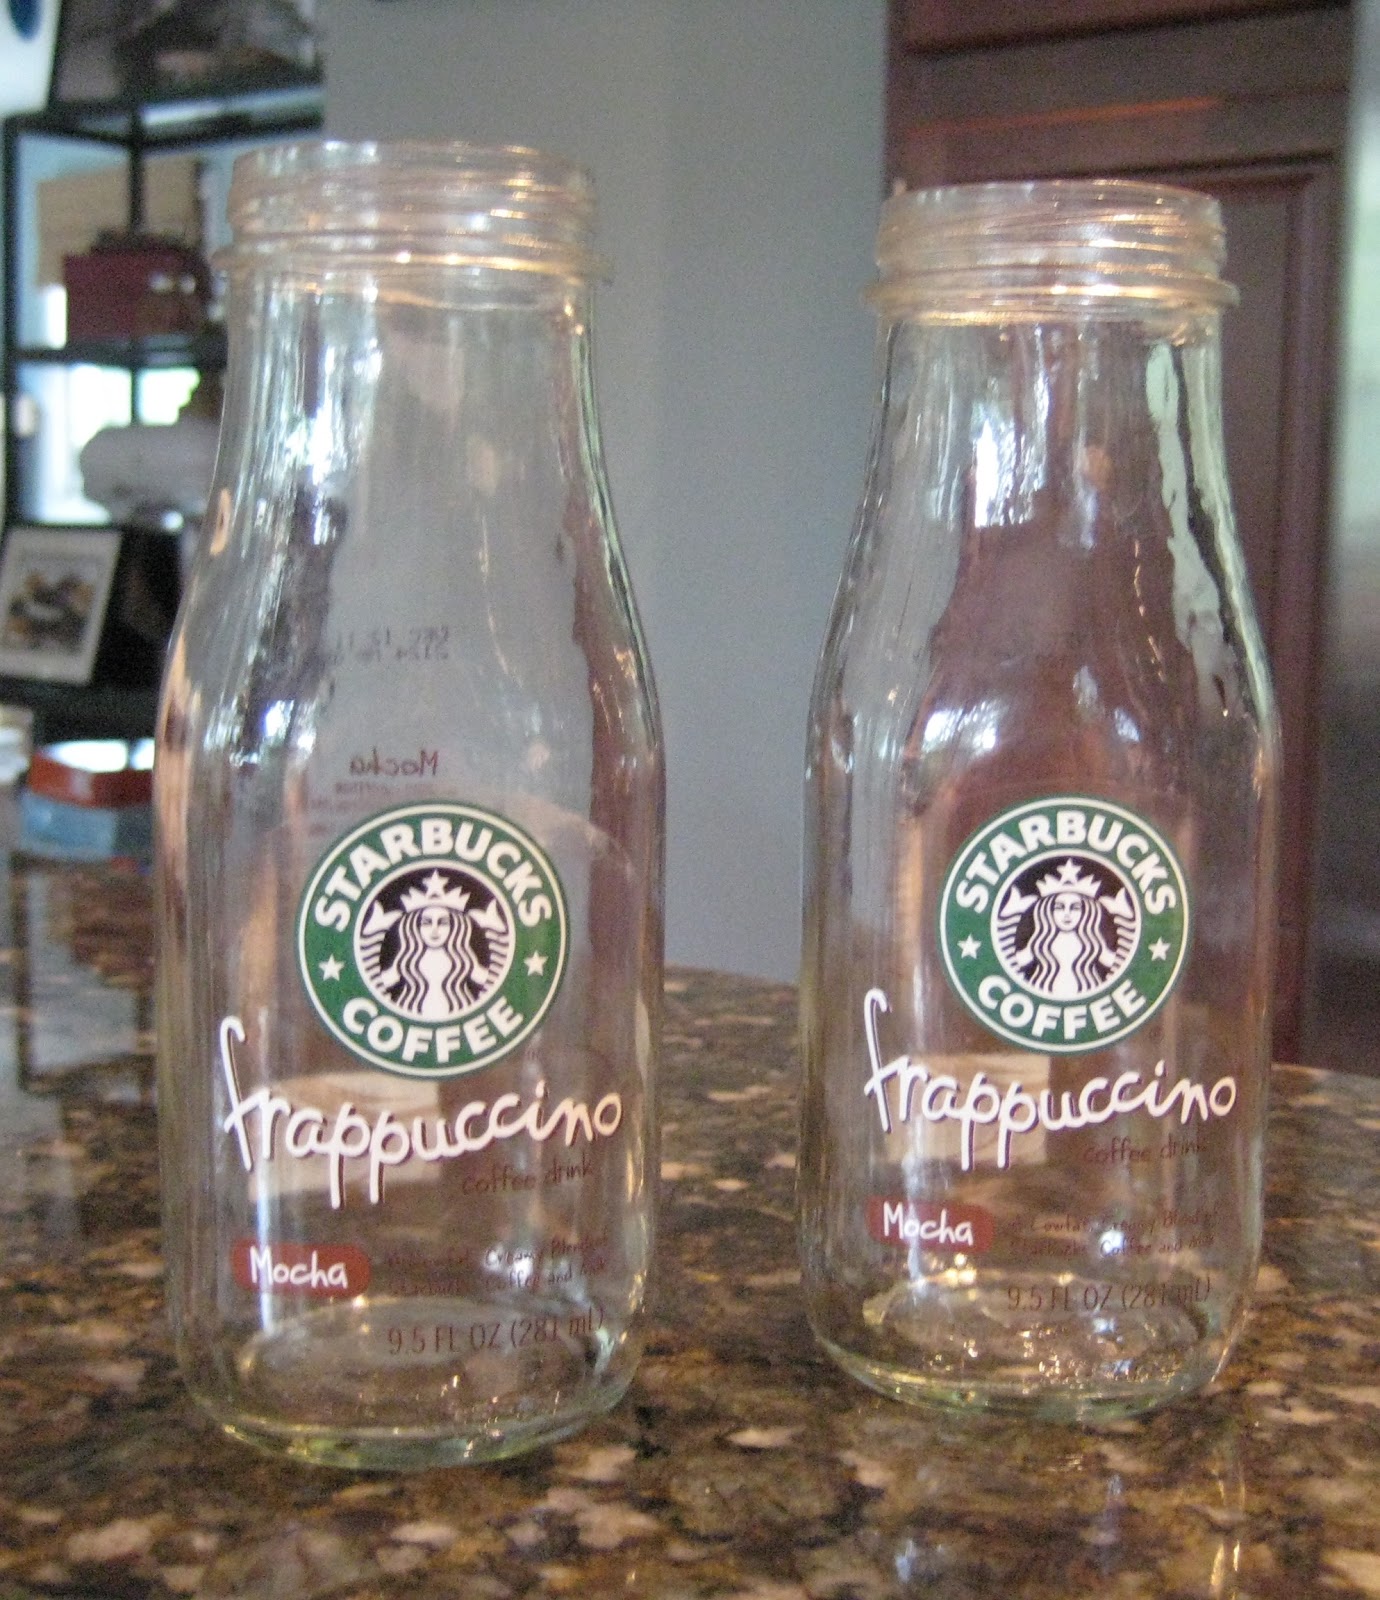
Final project: Frappuccino bottles!  I was scrolling through Pinterest (another site designed specifically to distract me from doing anything productive) the other day and saw some cute little white bottles/vases and I thought to myself, those look like Frappuccino bottles (as I actually had a Frappuccino bottle in hand).  I washed out two bottles, removed the labels (which took a bit of Goo Gone-ing), washed off the Goo Gone, and headed out to the yard with some matte white spray paint.  I thought, how do I spray paint these bottles easily?  Solution: shove sticks in the dirt, place bottles on top, spray.  However, our "dirt" should just be called "concrete" and I could not penetrate the "dirt" at all.  John suggested using an empty flower pot (the final home of our poor bleeding heart before it met its maker), so I put two plastic shopping bags over the pot to prevent that from becoming white, stuck my sticks through the bags and into the dirt, and placed the bottles on the sticks.  That worked wonderfully and now I have two little vases that look more like ceramic than glass because of the matte finish!  Lovely!

Before!
Nakey!
Gettin' sprayed!
On a shelf!  Looks kind of pathetic...
PS, don't the spray painted bottles kind of sort of look like these vases from West Elm?  The little jug sells for $19!  All four bottles only cost me about $5 and I got to enjoy some delicious coffee treats!


In the end, I now have a "new" lantern, picture frame, and two vases thanks to the miracle of spray paint.  Oh, and enough mosquito bites to make me look like I have some sort of pox.  I think Virginia mosquitoes must be craftier than Michigan mosquitoes because I was completely eaten up before I even realized I was being feasted upon.  Maybe that's why I felt lightheaded and not because of the paint fumes...

Or maybe it's because I feasted my eyes upon these handsome boys...


Apologies for grainy pet photos.  The threat of a flash makes Dexter go:

Wednesday, August 10, 2011

6 Months = 4 Pillows

Sweet cheesus, I just might be the laziest, most procrastinating person in the world.  Way, way back in February I was trolling Design*Sponge and came across this tutorial on zippered throw pillows (the same tutorial I used to make the petbed/end table pillow).  It seemed easy enough and I thought it would be a perfect project to get cracking on my sewing and jazz up our lackluster throw pillows that came included with our sectional.  While they are softish and perfect for naps, they practically disappear on the couch and don't add much visual interest.  On top of that, Chewie has recently taken it upon himself to chew little holes in the corners of the pillows, so I guess he didn't like them much, either.


I convinced dragged John to Jo-Ann's and found some fun cotton fabrics to accent our orange walls, along with matching zippers and thread.  Back at home... it took me almost six months to finish the darn things.  I honestly don't remember when I actually started, but through some email investigation, it was mid-February when I asked John if he'd take me out to Jo-Ann's to hunt for fabric.  I started with the plain green-blue fabric and it was just a nightmare.  I can't cut a straight line to save my life and pretty much botched my first squares, but somehow managed to get them in a square shape.  Then I didn't understand the instructions on installing the zippers and did a whole bunch of the exact opposite things as I should have done.  Let's just say there was a bunch of seam ripping going on.  It was pretty dismal and distressing and an easy project to set aside until I had grown some courage.  In the meantime, we came up with a bunch of other things and my poor empty sacks sat alone along with the untouched floral fabric.
The two fabrics.  I forgot any "before" or "during" photos.  Also notice lifelike cat head pillow.
This also happened...

The innards of one of pillow forms.  It didn't deserve this.  :'(
My craziness drives John crazy and he instituted a "no new projects until Amanda finishes old projects" rule... which we sorta almost follow.  I realized I need to stay focused, too, or our house will be littered with empty pillow sacks and half-finished painting projects and sadness.  Like it is now, but I'm working on it!  So, a couple weekends ago I finally sat down and took care of these darn things.  You might remember I had a nice thing going upstairs in my Mom Den, but with our wicked heat wave, it's about 1,000 degrees on our second floor and I was afraid of being found all dessicated like the creepy dried up apple man my Grandma had in front of my sewing machine, pillow cases still unfinished... so I gathered up my stuff and moved down into the basement where I could sew and watch Candice Olson (the only downside being it gave Elliot more angles to jump up on the table and lay on my fabric, or dig on my fabric, or sit under the table and paw at my fabric...).

My current situation, complete with pet butts.
I read and re-read the instructions and stared at my fabric and examined my zippers and thought back to all my mistakes and moved forward.  Luckily, it went so much better the second time around.  I still struggled to cut square squares, even though I was using my new cutting board, my fancy rotary cutter, a level (for a straight edge), and! an actual square!  I don't know what my problem is.  By some miracle, I didn't mess them up too badly and I'd have to say, they came out pretty OK.

A pillow, six months in the making! 
A zipper!  Check out my mediocre skills!
So, that's that.  In six months, I finished four pillows.  Maybe five, if you count the pet bed hexapillow.  In the meantime, I've managed to amass fabric with the intentions of making a shower curtain for our upstairs slanty bathroom, a window covering for John's office, and more pillows for our main floor living room!  I guess I didn't do to well sticking to my "no new projects" rule, but my setbacks and struggles with these wretched pillows didn't seem to dampen my enthusiasm, either...