Just about a year ago, I did some work on our baker's rack that made me not want to pitch it out the window anymore. Try as I might, my hate for the stupid thing continued to fester for another year until it was just too much. The baker's rack had to go. We finally got our act together on a couple fronts which laid the path for banishment. First, we (mostly) cleaned and organized the unfinished portion of our basement which allowed for some infrequently used appliances to be moved downstairs (a post on that will be forthcoming). Second, we came up with something that looks so much better in the space the baker's rack used to occupy.
Offensive.
Look how horribly it blocked the view. Ignore the wood in our kitchen. Those will eventually be our built-ins. I hope.
Back in June, we were at my parents' house and I noticed they had a vintage Singer sewing machine stand base in their garage... that my Dad was using as a base for a drill press. I managed to convince them I could put it to much better use and they were kind enough to bring it down to us in August. Just like all of our projects, the stand sat in the basement for 4.5 months until we finally got around to doing something with it.
We decided to build a top for the stand to use it as a little side table. We contemplated buying a small piece of granite or marble or possible a more expensive cut of fancy wood, but decided in the end, we're cheap. We ended up buying a 10 foot 1x4 piece of maple and a can of stain at Home Depot. To make it look a little more interesting, I came up with this very technical and intricate pattern:
John dragged his saw and wood outside (last weekend when it was like 20 degrees out when this weekend it was 60! Darn our luck!) and while we shivered in the cold, we cut up the wood into the 14 pieces we needed.
The chunks chillin' on the patio.
After I sanded the rough edges a bit, I stained the tops and sides of every piece. It was the first staining project we've tried and I must say it went pretty well.
My staining station in the basement.
The pieces sat and dried overnight before John brought out his Kreg Jig and screwed in all the pocket holes to affix the pieces to each other.
Pocket holes in progress!
All the pieces screwed together.
Once that was done, all we had to do was screw our new top onto the base. The base has four holes that we just used four one-inch screws and some washers to attach the top. Easy peasy! And now for the grand reveal!
We're not really sure what to put on it yet, but we're so happy with the end result. The much smaller table doesn't block the view from the living room into the dining room and you wouldn't believe how much larger it makes the whole kitchen/dining room space feel.
Oh, I almost forgot about the stupid baker's rack. As I mentioned, that's been banished to the basement where its job is now to hold cat litter and cans of cat food. ha!
Hi, my name is Amanda and I have a drinking problem. OK, I like to think of it more as a "solution" to life's miseries... and of course all the celebrations like, "Hooray, it's Wednesday!" or "A Panda Express is opening in a more convenient location for us!". We've amassed quite a collection of corks (which wasn't as massive as I was expecting, so maybe I'm not too much of a lush...) over the years and have been using my Mom's method of "store them away until one day I find the inspiration/motivation to do something with the darn things". Back at Overlook, we threw them in a glass jar which was easy and looked OK, but hadn't really found a place for them at the Grafton (although, some do end up in a little cut crystal dish we hide in the weird square in our kitchen cabinets... or just roaming wildly in the same weird square... seriously, what did they possibly think we'd put in there??).
Ick. It looks worse in photos. I especially love the exposed, unfinished cabinet bottom... bleh.
Anyways, the other day, I was looking around on Pinterest (as I mentioned in my last post) for ideas on what to do with my corks. I saw cork initials, which looked cute, but I'm not big on initial/monogram things. Of course, trivets or making things that look like trivets and sticking them on a wall. Loose corks in a jar (done that). Finally, I thought, I'll incorporate the randomness of corks in a jar/vase/whatever with framed corks and throw a bunch in a shadow box. Luckily for me, Michael's had their frames on sale for 40% off (when are they not on sale? who do they think they are? Kohl's?) and I found an additional 25% your entire purchase coupon on their website. So, I picked up the cheapest shadow box I could find and a pretty sheet of scrapbook paper to use as a mat/accent for a grand total of $8.16 (not counting the numerous bottles of wine it took to harvest the corks)... I got this guy:
Which we then hung in the basement to bring our "art" grand total down there up to a whopping... two pieces. I have dreams of that entire wall being covered in wine-themed things, but at the rate I'm moving at now, I might have five pieces up before we move out. Oh well. It's a bit of progress. I don't know if I'm 100% happy with it, but if I decide to display the corks differently, all I have to do is pop open the back and dump them all out. For now, it works.
Just ignore everything on the top of the buffet... including our decanter/cable holder and giant sponge...
Sweet cheesus, I just might be the laziest, most procrastinating person in the world. Way, way back in February I was trolling Design*Sponge and came across this tutorial on zippered throw pillows (the same tutorial I used to make the petbed/end table pillow). It seemed easy enough and I thought it would be a perfect project to get cracking on my sewing and jazz up our lackluster throw pillows that came included with our sectional. While they are softish and perfect for naps, they practically disappear on the couch and don't add much visual interest. On top of that, Chewie has recently taken it upon himself to chew little holes in the corners of the pillows, so I guess he didn't like them much, either.
I convinced dragged John to Jo-Ann's and found some fun cotton fabrics to accent our orange walls, along with matching zippers and thread. Back at home... it took me almost six months to finish the darn things. I honestly don't remember when I actually started, but through some email investigation, it was mid-February when I asked John if he'd take me out to Jo-Ann's to hunt for fabric. I started with the plain green-blue fabric and it was just a nightmare. I can't cut a straight line to save my life and pretty much botched my first squares, but somehow managed to get them in a square shape. Then I didn't understand the instructions on installing the zippers and did a whole bunch of the exact opposite things as I should have done. Let's just say there was a bunch of seam ripping going on. It was pretty dismal and distressing and an easy project to set aside until I had grown some courage. In the meantime, we came up with a bunch of other things and my poor empty sacks sat alone along with the untouched floral fabric.
The two fabrics. I forgot any "before" or "during" photos. Also notice lifelike cat head pillow.
This also happened...
The innards of one of pillow forms. It didn't deserve this. :'(
My craziness drives John crazy and he instituted a "no new projects until Amanda finishes old projects" rule... which we sorta almost follow. I realized I need to stay focused, too, or our house will be littered with empty pillow sacks and half-finished painting projects and sadness. Like it is now, but I'm working on it! So, a couple weekends ago I finally sat down and took care of these darn things. You might remember I had a nice thing going upstairs in my Mom Den, but with our wicked heat wave, it's about 1,000 degrees on our second floor and I was afraid of being found all dessicated like the creepy dried up apple man my Grandma had in front of my sewing machine, pillow cases still unfinished... so I gathered up my stuff and moved down into the basement where I could sew and watch Candice Olson (the only downside being it gave Elliot more angles to jump up on the table and lay on my fabric, or dig on my fabric, or sit under the table and paw at my fabric...).
My current situation, complete with pet butts.
I read and re-read the instructions and stared at my fabric and examined my zippers and thought back to all my mistakes and moved forward. Luckily, it went so much better the second time around. I still struggled to cut square squares, even though I was using my new cutting board, my fancy rotary cutter, a level (for a straight edge), and! an actual square! I don't know what my problem is. By some miracle, I didn't mess them up too badly and I'd have to say, they came out pretty OK.
A pillow, six months in the making!
A zipper! Check out my mediocre skills!
So, that's that. In six months, I finished four pillows. Maybe five, if you count the pet bed hexapillow. In the meantime, I've managed to amass fabric with the intentions of making a shower curtain for our upstairs slanty bathroom, a window covering for John's office, and more pillows for our main floor living room! I guess I didn't do to well sticking to my "no new projects" rule, but my setbacks and struggles with these wretched pillows didn't seem to dampen my enthusiasm, either...
I absolutely hate doing laundry and put off doing it for slightly disturbing lengths of time. For some reason, though, I dream of one day having a huge laundry room, full of windows letting in tons of natural light, countertops galore, and a small flat screen TV that I can watch my stories on. Apparently I'm also 80 in my dream... However, our current situation is the complete opposite. Our laundry "room" is a small space in the basement tucked away to the left of the stairs. There is just enough room along the wall for the washer, dryer, and a utility sink, and just enough depth for the doors to swing open and moderate maneuverability. I suppose if you're a realtor, you could call it "cozy" and it certainly doesn't waste any square footage.
When we moved in, it was a complete blank slate with just the utility sink and hook-ups. The day after we moved in, we had our laundry machines delivered, as I mentioned in this post way back in November. The space has looked the same ever since except we've painted the walls Flaming Torch and the tops of the machines are now covered in detergent bottles and dryer sheets. Classy. Back then, we dreamed of one day adding some shelves or cabinets, as well as a countertop. Well, some of that dream has finally come true.
Our laundry nook, circa November 2010
Our laundry nook as of yesterday... what an improvement...
In yet another fit of us putting off our other 3,000 projects, we decided last Sunday was the perfect time to drive down to IKEA and check out their cabinet selection. After wandering around the showrooms for a while, we finally happened upon a style we liked and headed over to the customer service station to price out a couple wall cabinets. Happily, it was about half of what we had priced out online. I don't know what it is about IKEA's website, but I can't figure out the cabinets for the life of me.
We decided to go with two AKURUM cabinets with Ståt doors. I thought the doors had a cute modern cottage look to them and once we got them home, we realized the lines in the doors nicely play off of our board and batten wall treatment. Yay for happy accidents. So, installation was fairly simple. On Sunday night, we sat right down and put together the cabinets which was standard IKEA assembly. Then we needed a hack saw to trim down the metal bracket/rail/attacher thing that attaches the cabinet to the wall, which we didn't have, so that was that for the night.
The cabinet frames.
We took the day off on Monday night to enjoy the skirt steak special at Overwood in Old Town (who could resist?), but tonight, we were back on track. John tried sawing through the metal bracket with the saw, which made a horrible metal-on-metal noise and really didn't work at all at first. He then tried clamping it down and switched out the blade for one with more oomph and this time, he managed to cut right through.
I told John to look victorious and this is what he came up with...
He screwed that into the wall while I stood on the other side of the wall in the cat room and made sure the screws didn't miss the studs, penetrate some electrical wiring, and shock him dead. Once that was up, we got the cabinets up without too much problem, except when one nut was dropped and of course fell right in between our machines.
After that, we just had to pop in the hardware to attach the doors and then stick the doors onto the cabinets. We also sprung for the additional $5 door dampers so they close smoothly and without any slamming. Kind of like my beloved "whisper close" toilet seats. Then it was time to install the shelves. We bought two packs of shelves with two shelves each, but decided we only really need one shelf per cabinet at this time. It's a little sad how excited we were that our jumbo HE Tide slides in perfectly into the cabinet.
* I apologize for the weird, dark, grainy photos. Our basement has horrible lighting. :(
We also bought some shiny little knobs for the cabinets, but that requires us to drill through the doors to install them, which we didn't really feel like tackling tonight. Besides, I think it looks pretty OK without knobs, so who knows? Maybe we'll just go knob-free.
So, that's that. We finally got our laundry storage tackled and ended up with way more space than we even really need at this time. Like I mentioned, we'd still like to add a counter top for a convenient folding area and are contemplating replacing the utility sink with something more visually appealing and maybe adding a garbage disposal so we can rinse out the cats' nasty wet food dishes. There won't be any floods of sunlight or mini TVs in my future, but who wants to spend that much time doing laundry anyways?
I'm not busy enough at work, which I'm sure many people dream of, but really, it gets old and I'm starting to get scared that I may develop early onset Alzheimer's from my lack of stimulation or thoughts that require my hemispheres to work together. As another side effect, I've become one of those people you see in the Bing commercials who just start rattling off random, unrelated words and facts from my long hours/days of perusing the internet.
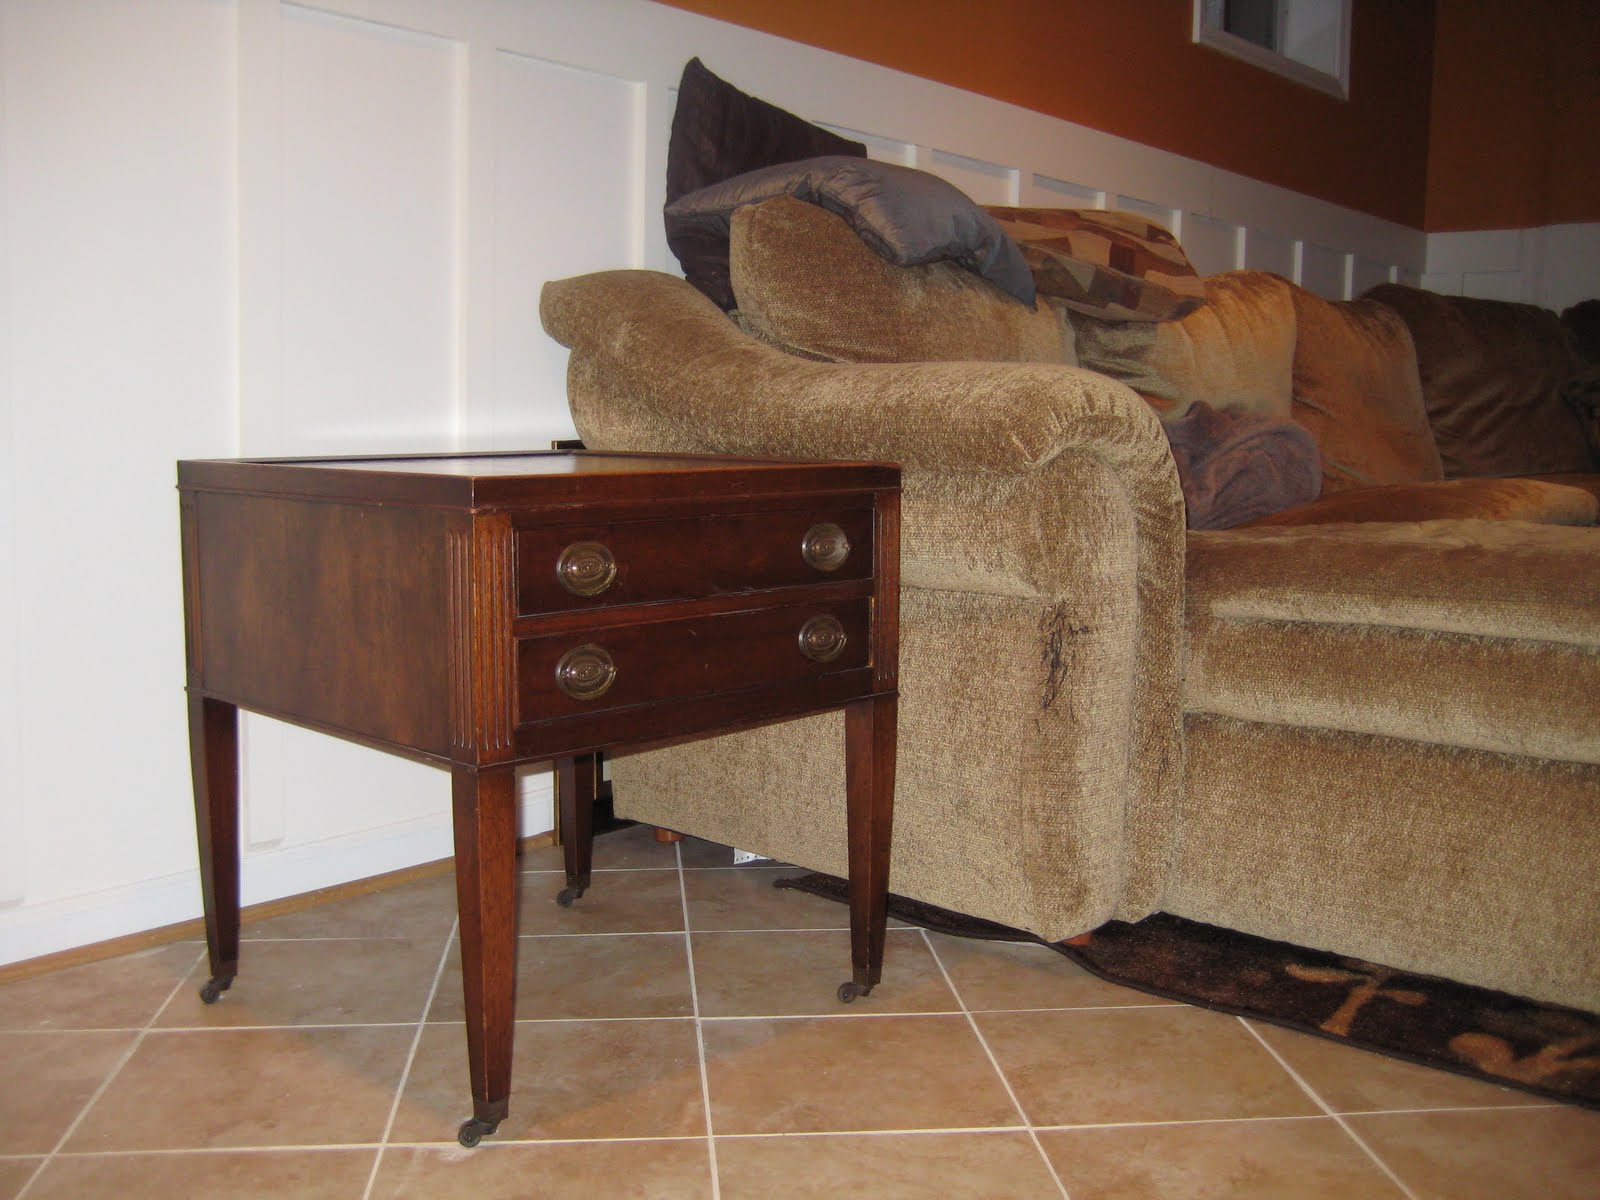
One of my favorite pastimes is scouring the furniture listings on Craigslist in the hopes of finding something I didn't know I needed. Most often, people are selling their nasty old junk at insane prices, but every once in a while, you can score a sweet deal. In the past, we've picked up our awesome pie safe and a vintage record cabinet that we use as a side table in our office. Last Tuesday, I stumbled upon a listing for some vintage looking end tables that I thought would fit perfectly with our sectional in the basement since our Lack side tables recently met their demise (we took them outside for Dexter's birthday party, forgot to bring them back in, humidity + laminated furniture = disaster).
What our end tables looked like before all the black laminate peeled off...
Luckily, I was able to convince John we needed them, so the next day we went venturing off to pick up our tables. Unfortunately for us, there was a huge storm in the middle of the day Wednesday, which ended by 3:30 or 4:00, but the damage was already done. Traffic was a nightmare on the larger side streets, so we decided to try the smaller side streets, which were just as busy. We finally escaped the traffic and our spirits were lifting... until we realized my Google Maps was on "walking" directions (from our trip to NYC) and not "driving", which lead us to a park where "trail" literally meant trail and not a street named trail... ugh.
At this point (all the traffic had set us back almost an hour), I was ready to just go driving through the park, but since John was driving and is decidedly more sane than me, we turned around, got our directions on "driving", and finally made our way to our destination. The side tables' current owners were an army family, and as a result, the tables had lived in exciting places like Jordan, Bahrain, and North Carolina! They picked up the tables years ago at an antique shop and had travelled the world with them since. I love having a back story like that instead of the usual, "Well, it was a lazy Sunday when we travelled to IKEA, brought home the box, battled the construction for hours, and now here we are with the same table as a million other people".
So, here are our new end tables!
John's providing us with a sense of scale.
The top is a tooled leather.
Close-up of the detail.
In its new home.
Close-up of the feet.
I'm really happy with them. They're much larger than I was expecting, but that's great because we really needed something with bulk to compete with our massive sectional and not feel all wimpy next to it. For some reason, the pulls on the front of the tables didn't really click with me until we saw them in person and I realized pulls mean drawers... which is perfect to finally provide a home for our remotes and John's Xbox controllers. I'm in love with the little wheel feet, too. I think overall, they just have great character. I originally thought I'd be adding them to my list of things to paint, but right now we're pretty happy with them, so I think I'll let that idea simmer for a while. At the very least, I might give the hardware a shot of spray paint to perk them up a little.
Another happy adventure in Craigslisting. If you just forget about our misadventures in actually getting there (and I won't even get into the return trip drama, but I'll just note that we had to stop at 7-11 for a couple of six-packs on the way home)...
A couple of weeks ago, I wrote about how our long and arduous search for a new rug for our basement finally came to an end. Well, our rug's own long and arduous journey from the Overstock warehouse finally came to an end last Wednesday. I'm sure if you've read any of my previous posts, you'll realize I'm not normal(?), and I'm pretty embarrassed to confess one of my favorite things to do is tracking. No, I don't go all Rambo and track enemies/animals/Commies through the woods... I enjoy receiving the tracking information for an online purchase and relentlessly tracking it until it arrives on our front porch. Maybe it's a relic from staying up on Christmas Eve, listening to the radio with my parents, where they "tracked" Santa from the North Pole, giving updates on his ETA for the Lansing area. Or maybe I'm just crazy.
Either way, our rug safely escaped the grasp of Mormons in Salt Lake City, spent a few days in Hodgkins, Illinois, had a quick layover in Richmond, and finally arrived here in Alexandria.
John hauled it down to the basement and after disassembling the couch, moving it to the other end of the basement, cursing the ginormous couch, laying down the rug, moving the couch pieces back, reassembling the couch, cursing the ginormous couch's mother, and making a couple slight adjustments, we had our long-awaited rug. Lucky for us, we love it. It's not as thick as our upstairs rug, but it's soft on bare feet and the boys all seem to love it. It gives them traction to run around and protects them from the cold tiles, so they actually lie on it whilst chewing on their bones. The accent colors are fun and bright and I think will provide inspiration for our other accents and decor, whenever we get around to that. So, without further ado, here's the rug in action:
OK, maybe "miracle" is an overstatement... I suppose "serendipity" is more accurate and more appropriate for my heathen soul, so let's go with that. Anyways, similar to my apparent obsession with Google-defining things, I have been compulsively checking a wide variety of retailers' rug selection for months in the seemingly endless quest to find a rug for our basement, which following its board and batten transformation, hasn't received much love from the Bedtelyons.
Yes, those are tumbleweeds.
Let me tell you, it has not been easy. We need at least an 8x10 rug to fully cover the U-ish shape of our couch, which once you make the jump from a 5x8, so does the price... like a lot, and then they usually stick you with at least a $25 freight charge for an oversized item... and I hate fees. Then there is the challenge of finding something that won't look ridiculous with the Flaming Torch walls or create some enormous beige splotch (cough = beige, floor tiles = beige... beige x 3 = sadness). We wanted something modern, but not too flashy, and maybe bring in some additional fun accent colors to help balance out the orangsicle party... but what goes well with orange?? See the problem(s)? Ugh, it's too much even rehashing it now... *deep breaths*
*yawn*
waaa!
Finally in a miraculous serendipitous occurrence, I stumbled upon a rug on Overstock that met all of my many criteria: the not-so-creatively-named "Loomed Replica Brown Floral Rug"! Seriously? They couldn't come up with anything better too add to my excitement? That's just lazy.
The soon-to-be newest addition to our basement family.
So, we got a dark brown background, which will help hide any... pet mistakes... and won't create the dreaded Beige Monster. I'm not sure what you'd call the floral stick things, but there's an orange one to match the basement and some blue and green accents, too. I think the pattern is fun, but subtle, and modern, but not too crazy. Plus, I don't think you can beat the under $300 price plus no stupid "freight" charges and only $2.95 for shipping! Oh wait, yes you can!
Right before I hit "check out", I thought to myself... I'll try Googling "overstock coupon code" and see what happens. Lo and behold, I found a coupon on Dealio for $10 off a purchase of $200 or more. I suppose $10 isn't much in the grand scheme of things, but who doesn't love saving ze money? I could buy a pretty OK bottle of wine with that $10 and enjoy it on my couch whist going slipperless (gasp!) downstairs.
I need to wait 5-10 business days to actually experience my rug, so who knows? Maybe it'll be a piece of junk, but at least for 5-10 business days, I can turn my obsessions somewhere else like... well, any of the thousands of projects in my docket.
Two months ago, we so bravely tackled our basement board and batten project and part of that process involved painting half the basement and the stairway a cheery bright orange (Behr's Flaming Torch). Since then, our basement decorating has fallen by the wayside. I blame the arrival of springtime weather that has been drawing us outside more and more. Plus, we really haven't decided which direction we want to go down there. We've been kicking around ideas ranging from a wine country theme to honor our tied-for-second favorite places, Sonoma and Napa, to maybe something including vintage movie posters.
While we let those ideas ferment in our mindgrapes, we decided something had to be done about the stairwell. The whole thing is a mess. The intersection of the walls and ceiling isn't even, which is glaringly obvious when you see the orange meet white. Plus, the sole light fixture is very bright and the way the light bounces around and hits the orange walls kinda feels like orange Push-Ups are being smashed into my eyes... but without any delicious sherbet to comfort me.
To fix this, it was finally time to hang up all the wedding photos that have been sitting in a box since we moved in October. We thought the addition of some framed photos would help break up the assault of orange and would provide the perfect place for a little collection of wedding memorabilia. John thinks I'm crazy, but I hate having photos of us strewn about the house. I know what I look like. I haven't slipped that far into the deep end yet to need to go all Memento on the house. And who needs to see my creepy exact same smile in every photo staring at them from all angles? So, this is what we've come up with so far:
Our only new addition to the group was the "Love" print we picked up a month ago or so from Eastern Market, which John detailed in this post. I loved the saying on it ("Love... because I like the sunshine in your eyes") because John is the sunlight in my life and it has all sort of bright and happy colors (including orange) to complement our paint. I'd like to break up the collage frames and do those individually to spread it all out, and intersperse some non-photo elements, like a framed copy of our wedding invitation and program. *sniff sniff* Do you smell another trip to IKEA in the works? I can almost smell the particle board and cinnamon rolls now...
So, a quick, inexpensive project. We didn't even bother measuring anything since we were dealing with a weird triangle shaped wall (although John's careful use of his level would make Papa Harold proud). Now our Flaming Torch has slightly been subdued and everyone can admire how cute and in love we were are. :)