Showing posts with label power tools. Show all posts

Saturday, January 7, 2012

Banishment of the Baker's Rack

Just about a year ago, I did some work on our baker's rack that made me not want to pitch it out the window anymore.  Try as I might, my hate for the stupid thing continued to fester for another year until it was just too much.  The baker's rack had to go.  We finally got our act together on a couple fronts which laid the path for banishment.  First, we (mostly) cleaned and organized the unfinished portion of our basement which allowed for some infrequently used appliances to be moved downstairs (a post on that will be forthcoming).  Second, we came up with something that looks so much better in the space the baker's rack used to occupy.

Offensive.
Look how horribly it blocked the view.  Ignore the wood in our kitchen.  Those will eventually be our built-ins.  I hope.

Back in June, we were at my parents' house and I noticed they had a vintage Singer sewing machine stand base in their garage... that my Dad was using as a base for a drill press.  I managed to convince them I could put it to much better use and they were kind enough to bring it down to us in August.  Just like all of our projects, the stand sat in the basement for 4.5 months until we finally got around to doing something with it.

We decided to build a top for the stand to use it as a little side table.  We contemplated buying a small piece of granite or marble or possible a more expensive cut of fancy wood, but decided in the end, we're cheap.  We ended up buying a 10 foot 1x4 piece of maple and a can of stain at Home Depot.  To make it look a little more interesting, I came up with this very technical and intricate pattern:


John dragged his saw and wood outside (last weekend when it was like 20 degrees out when this weekend it was 60!  Darn our luck!) and while we shivered in the cold, we cut up the wood into the 14 pieces we needed.

The chunks chillin' on the patio.
After I sanded the rough edges a bit, I stained the tops and sides of every piece.  It was the first staining project we've tried and I must say it went pretty well.

My staining station in the basement.
The pieces sat and dried overnight before John brought out his Kreg Jig and screwed in all the pocket holes to affix the pieces to each other.

Pocket holes in progress!

All the pieces screwed together.
Once that was done, all we had to do was screw our new top onto the base.  The base has four holes that we just used four one-inch screws and some washers to attach the top.  Easy peasy!  And now for the grand reveal!


We're not really sure what to put on it yet, but we're so happy with the end result.  The much smaller table doesn't block the view from the living room into the dining room and you wouldn't believe how much larger it makes the whole kitchen/dining room space feel.

Oh, I almost forgot about the stupid baker's rack.  As I mentioned, that's been banished to the basement where its job is now to hold cat litter and cans of cat food.  ha!

Thursday, August 4, 2011

Project Built-Ins: Planning

Our house is small in general and our upstairs living room got only a tiny slice of our humble home pie.  With our current situation, we have two large, brown-black bookcases surrounding a small brown-black TV stand, upon which sits a black rectangle of a TV.  Back in Overlook where ceilings were high, windows and sunlight were aplenty, the black seemed to balance all the light, but now it just seems to weigh down our little room.  We've been dreaming of a wall of built-ins practically since we moved in, but with very little experience, know-how, or just plain guts, we put it off and kept it only in our dreams.  I don't know if the summer heat has made us crazy, but a couple weekends ago, we finally decided to take the plunge and get cracking.

This is an older photo (we've since painted and added a bunch more stuff to our shelves, but I feel too lazy to take a new photo at this time. :)
The first step in our planning process was to find some inspiration to work off of.  Maybe there's an awesome place where you can find plans for things like this, but I don't know where that is.  Instead, I stumbled upon this photo, featured in one of Apartment Therapy's House Tours:


I was instantly drawn to how open, airy, and modern his shelves look.  It doesn't seem huge and imposing, but more of a subtle focal point... if that makes sense.  With its simple, yet elegant design, I thought it would serve as our perfect inspiration piece.  Unfortunately, the next step wasn't as fun because it required some math and spatial skills, both of which I sadly lack, but here's how it went down...

1)  We measured the dimensions of our wall.  Easy.  Except our stupid, slanty house isn't square anywhere, so the left side of our wall is actually 0.5" shorter than the right side.  grr.  We just decided to go with that height and hope no one notices.

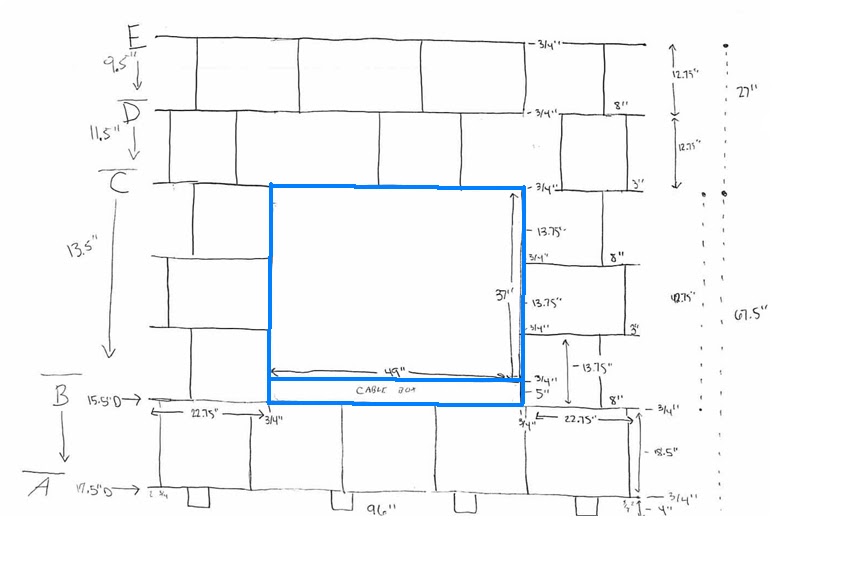
Super techical drawing.
2)  Since our built-ins will house a TV, we used that as our starting point.  We currently have a 32", but plan on upgrading to a 42", so we had to account for that (I hopped on Best Buy and checked out the stats on a few 42" TVs and took the average of those).  Also Googling around, Sony recommends leaving 4" of ventilation space around a TV, so we added that into our measurements.  We also need a space for the cable box, so I just measured the current cubby we use because that seems to be working out fine.

*side note* As I mentioned, I'm spatially-challenged, so my saving grace here was graph paper.  I counted out my squares and figured out we could fit a scale of one square = 4" and went with that.  It was much easier for me to see the proportions and how it'll all look in the end.  Plus, who doesn't love a trip to Staples?  I heart office supplies in a weird way.

*side note 2* One thing I had to keep in mind is the shelves take up space.  We are going to use 3/4" wood, so with each line I drew for a shelf, I had to note that was 3/4" of space used.  A small detail, but something I could easily understand forgetting.

3)  Now we had to decide on the heights of the shelves.  I liked the look of having larger books on the bottom shelf and then tapering off as we move up, so we measured some of our larger books and the shelves they currently sit on.  I added that on, plus 4" of feet at the bottom (we picked 4" of feet because our current stand sits up about 4" and we liked how the inspiration built-ins sit up on feet and not a solid base).  With our layers of feet, bottom large shelf, cable box cubby, space for TV, and additional space for the shelves themselves, it was time to add all that up and subtract it from our remaining height to see what else we could fit in. 
4)  Once all the horizontal shelves were drawn in, it was time to decide how to place the vertical supports.  One of my favorite aspects of the inspiration photo are the open ends.  Right now, our bookcase has solid ends, so as you enter the living room from the dining room, you're confronted with a wall of black.  I love how the open ends are more... open and provide a small space for little knick-knacks.  To still provide stability, we decided to alternate starting with 8" in, then 3" in, except for the bottom shelf, which we only did 2" in since it's the bottom shelf where all the weight will press down on.  For the remainder of the vertical supports, I just randomly stuck them in where I thought they'd look best.

After many hours of calculating, measuring, drawing, erasing, and pondering, we finally had our sketch.  Before skipping off to Home Depot, we sat down and made a cut list to (1) make it easier for us when it came time to actually make all the cuts and (2) know exactly how much wood we would need.  Then it was time to actually make our trip out for supplies.

In speaking with a very helpful employee (usually very rare at our store) and going back and forth to stare at our various options, we settled on birch plywood because it was cheap, strong, and will be covered by a few coats of primer and paint, so who cares what it looks like?  The edges are a little rough, so he recommended some stripping we can add simply by ironing it on.  Hopefully that'll be as easy as it sounds.  Along with that, we picked up more pocket screws, pocket hole plugs, wood glue, primer, and straight-off-the-shelf ultra white paint.  We also had them cut down our boards a bit to reduce the amount of cuts we'll have to make and, well, they just wouldn't fit in John's SUV otherwise.

Iron-on veneer tape stuff!
Back at home, we dragged out the saw and sawhorses, put on our safety glasses and bug spray, and... realized John's Ryobi table saw's rip guard only goes up to 12"... meaning we couldn't make our larger cuts (like 18").  So... we put away the saw and sawhorses, took off our safety glasses, lugged everything inside, and washed off our sweat, tears, and bug spray in defeat.  What to do now?  Well, we contemplated trying to borrow a saw, if we could find someone who has one around here, or possibly renting one for a day.  John had another thought that he might be able to use the workshop at our local Woodcraft and stopped by one afternoon to check out that possibility.  In speaking with the more experience gentlemen, one suggested using a long, straight board to make a jig/guide to use in conjunction with a circular saw.  That seems to be our best option and we really don't have too many larger cuts to make.

So, we have a plan and all our materials and then this ridiculous heat wave came rolling in and now it's impossible to be outside for too long before feeling like you just might pass out.  Until the temperatures drop to a bearable level, we're stuck with plywood in our kitchen, but at least we've made a small bit of progress.

Thursday, January 27, 2011

Extreme Makeover: Creepy Basement Edition - Phase 2

With the paint up on the walls and all dry (detailed in Phase 1) it was time to start preparing the board and battens.  Due to budget restrictions, we decided to use MDF.  During our Depot run, we picked up three 4'x8' sheets of MDF and had them make the initial cuts so we could squeeze them in the back of John's Escape.  They still stuck a bit out the hatch window, but luckily (not to our wallet), we only live about three minutes away from the Depot.

The MDF sheets chilling in the dining room.

Since we didn't finish painting until 3:00 a.m. Saturday morning, cutting these guys would have to wait until... later in the morning.  Poor John thought he was going to get a chance to sleep in, but unfortunately, was awoken by me around 9:30 or so.  I just couldn't help myself.  I'm definitely a would rather never see the morning person, but the excitement of power tools was too great for me.  After fueling up with some chocolate chip pancakes, we bundled up and headed outside to start making the B&Bs.  Using John's table saw, we worked out a system of John feeding the sheet in, me directing it, John pushing it through the end, and then I catch the pieces on the other side.  Once we got this figured out, cutting down the boards took no time.  I'm sure our neighbors thought we were crazy, out in the freezing temperatures, dashing about, tossing boards into a pile, and coating ourselves and backyard with MDF fuzz.

Our pile o' boards.

Me cleaning up in the wake of our MDF destruction.

A mountain of MDF shavings.
We started the process of affixing all these pieces to the walls by installing the boards (the horizontal pieces).  There was a snag with the air compressor that set us back (note to newbie air compressor owners: check your drain valve...), but once we got that figured out (thanks again, Papa Harold!), it started moving pretty quickly.  The boards were cut 8' long and 5" wide and we hung them 4' up the wall... except our basement is nowhere near level, so the boards are initially 4' up, but then vary as you move about... extremely annoying.  This oversight also resulted in the orange not being painted down far enough in about half the basement, so I was reunited with my Shur-Lines to fill in the gaps.  Definitely a pain, but also a learning experience.  *sigh*

The boards.  And yeah, we eat at KFC/Taco Bell.  Don't judge us.

The plan was to have the battens (the vertical pieces) to be 4' long, lying between the bottom of the boards and our floor trim, and 12" apart from each other.  Unfortunately, the sloping basement required John to individually measure for each batten and cut them each to size.  I'm pretty sure there was a better/different way we should have done this, but oh well.  We're just beginners.  To make the process quicker, John made a 12" template block and started measuring for each batten, marking the wall with a number and writing down the corresponding length so he could make several cuts at once.  He also cut the bottom of each batten at a 45 degree angle so they slope nicely down to the trim instead of sticking out and just looking like... well, a board nailed to the wall.

Our first battens.
My job in all this was to go through and patch all the little holes the nails left behind.  I started off using Elmer's Carpenter's White Wood Filler, which I absolutely hate.  Even more than the blue tape.  It's extremely hard to squeeze out of the tube, so anyone with limited use of their hands (due to arthritis or the such) would be unable to use it or in horrible pain afterwards.  I was and I'm young and viral virile.  Once you're able to squeeze out a bit, it's very hard to work with and often crumbles or just completely falls off.  Forget trying to patch anything larger than a nail hole.  You'll spend an hour trying to carefully mold the compound, only to have it just fall off or be destroyed in subsequent sanding.  Yeah, then you have to sand the junk down which also takes forever (especially when someone has gone drunk with pneumatic nailing power...) and creates all sorts of nasty dust to clean up and inhale.

Abandon all hope, ye who decide to use this junk.
After endlessly patching with this stuff, I felt full of despair and on the verge of tears as I saw I still had hundreds of tiny holes to patch and sand.  Luckily, John had mercy on my poor soul and bought a new option: Red Devil's Pre-Mixed Glazing Compound.  OK, so I guess it's not technically for patching holes, but it worked sooooo much better, it would make my Grandma say, "Well, goodnight!"  Instead of a nasty paste, it has the consistency of a putty, so it goes right into the holes without forcing it and scrapes off clean, thus eliminating the need for subsequent sanding.  It's almost immediately ready to be painted, so once we got going with our Red Devil, the pace picked up.  We used a system of John applying the putty and me following behind, scraping off the excess.  If you can see in the photo below, the board holes were patched with Evil Elmer's while the battens were filled with Red Devil.  Look how clean the Red Devil scraped off, without any sanding required.


As you can see above, I also went through and Frogged the boards in preparation of painting the whole deal white.  At the time, I thought it was a waste and my Shur-Lines would be able to handle it, but after painting, I'm very glad I did.  Otherwise, it would have been another round with Flaming Torch.

So, we eventually got all the B&Bs up, all the holes patched up, and the only thing left was to paint them all white, or as we call it: Phase 3.


Extreme Makeover: Creepy Basement Edition - Phase 1

Despite it being cold, dark and sometimes spricket-infested, we spend a bunch of time in our basement... because it's home to our big screen TV, TIVO, and Xbox.  Sure, we'd like to be those people who don't own a TV and so proudly advertise the fact we never watch any, spending all our time being productive and awesome, but we're not.  I sit in traffic for hours, work all day, and dang it, I just want to come home and watch Glee.  I think it is only natural that our basement is our first room to receive a complete overhaul.

Here's our "before".  It looks so pitiful with just one piece of art, one candle and a Dyson handvac.

Our design plan was dreamt up by John.  I've got him reading some DIY blogs and he came across an idea to use board and batten as wainscoting.  He thought it would be a perfect way to add some interest and flair to our drab basement.  Or... he just wanted an excuse to finally buy an air compressor and pneumatic nail gun... the world will never know (I'm pretty sure it's the latter).

John pondering his evil design plan.

John's inspiration photo, taken from Ana White's website.
The first step on our basement fauxscoting project (John's clever term) was to paint the basement walls with our accent color.  We decided to follow suit with our inspiration and pick a bright, fun color to liven it up down there.  We chose Behr's "Flaming Torch", a warm, almost pumpkin orange that picks up on the tones of our oak floors.

Ta-da!

I started taping off at the ceiling and down the stairs (since our walls meet directly with the carpeted steps).  The ceiling taping came to a quick end as I got tired of trying to get the stupid tape up there and I was feeling brave and confident in my new Shur-Line paintbrushes.

Curse you, wicked blue tape!

Elliot quality-inspecting my work.

So, of course, I did the cutting in along the ceiling and nooks and crannies (alcoves?  do you know this word?... alcoves? - inside "In Bruges" joke) whilst John went to town with the roller.  Yeah, I'm trying to bring back "whilst".  If Conan can have "thrice", I can have "whilst".


If you can look past all the junk, there's me, up in the corner.

After Day 1 of painting, we were left with this...


Up the stairs (obviously).  Finally starting to cover up the damage caused in Couch v. Stairs


Anyone notice how in some lights (or lack thereof), the orange appears a little... Home Depot orange?  Eeks.  I think we might spend a little bit too much time there...

With the accent color up on the walls, we were exhausted (I should have mentioned this project didn't start until about 6:00 p.m. and we finished painting at about 3:00 a.m.), but happy with our results and excited to get started on Phase Two: Board and Battens.


Wednesday, December 1, 2010

3 - 2 - 1 ...Compost!

I've started - and actually finished - making the structure to house our compost pile. It's some really high tech stuff. The first step of the project, as with any new house project, was a trip to The Home Depot. Boy-oh-boy, I love Home Depot. I think I make, on average, one trip per day and probably more like two trips per day on weekends.

Here's my shopping-list:

  1. Rubber mallet
  2. 4 wooden stakes (I think they are four or five feet long)
  3. 25 ft of chicken wire

I think all the supplies ran a bit under $40, but I won't have to ever buy a rubber mallet again!

Here's the required tools that I already owned:

  1. Electric Nailer/Staple Gun
  2. Hammer
  3. 4 foot level

Amanda helped me pick out a nice backyard spot to build the pile.

"a nice backyard spot"


I figured the project would take me less than 30 minutes, so I dove right in!

Dang...that is a sweet Narwhal shirt!
The first step was to measure out and mark where I wanted the posts.  Then I drove the posts into the ground.  Then I stapled the chicken wire to the outside of the posts.

As I suspected, the building was a piece of cake.  Mostly.  The ground is quite rocky and clayish and I think I broke a part of the fourth post...as you can see (front left), it's a bit crooked.  I tried using my level when driving the posts, but this one hit a rock, went sideways, and was never the same.

Day 1
Done and done!  Completed compost pile structure.  Now it's time to make some sweet dirt for our gardens next year.

Day 1.  Pile of leaves on the outside to the left of the pile...one apple.

By day 14, I'd bought myself a Leaf Blower and got to work on the yard.

Day 14
Now it's day 26ish and it's too dark for me to get a current photo.  I've done two runs through the lawn with my blower, mulching the leaves as I go, but with our latest rains, the previously full compost pile has been battered down to being merely half full.  That's fine with me as the trees are finally letting go of their last leaves.  I should be able to spend a few hours this weekend clearing the rest of the front, side and back yards completing my leaf duties for the year and again filling the compost pile.


Wednesday, November 24, 2010

Grafton's First Thanksgiving

What could be a better time to host Thanksgiving than one month from moving into our first house?  Well, that's our plan, anyways.  My parents (and Shadow) are currently en-route to visit us for the weekend and celebrate the holiday (hooray!).  I'm super excited to see my family again and to have our first non-Keith visitors to our home.  Of course, I had crazy dreams about how much more progress we would have made by now, but I think all things considered, we've made some good strides.  If I could just quit my darn job, I could get so much more done...

One of our biggest hurdles to having overnight guests was figuring out a shower curtain solution for our upstairs guest bathroom, which looks like this...


... minus John creepily hiding in the corner... usually....
It's great to have the third full bathroom, but what were the contractors thinking we'd do to enclose it??  Thankfully, we're just about the most clever people I know.  Here's our solution: a ceiling-mounted track, á la IKEA's KVARTAL system.  John and Dremel Multi Max worked together to mount the track along the ceiling and now we just need to install a curtain.  To allow it to hang correctly, that's going to require some Frankensteining of an extra-long shower curtain we picked up the other night at Bed Bath & Beyond. 

KVARTAL... IKEA, you've done it again!

We'll see how that goes... Just in case, though, we bought a rod and shower curtain for our downstairs guest bathroom.  Always good to have a back up plan.

Although you can't really tell by Target's photo, the shower curtain looks so fancy.  It's more of a vanilla color than the white it appears and the embroidered bordered has a bit of a sheen to it.  Paired with a matching vanilla cloth liner, the sun shining through it this morning made it look like it was glowing.  So classy!

Anywho, the gracious Hilton Gods are letting me free at noon today, so it's a race to get our last minute projects and sprucing up done before my parents and Shadow arrive.  Hopefully along the way, we'll snap some photos of our progress to share.  Things are looking good at Grafton.  We definitely have a lot to be thankful for this year.

Happy Thanksgiving!

Monday, November 15, 2010

Busy weekend!

It's funny/disgusting how fast the weekends go by.  It seems like it just began, but here we are and it's already a new week. We had a very busy, but productive weekend at Casa Bedtelyon, and my only regret is there wasn't more time for naps.  :)

The weather was amazing, filled with clear, sunny skies and temperatures around 65.  Just that perfect fall weather that seduced us into taking a short break early Saturday afternoon to run to one of our favorite places - Old Town Alexandria.  We made a quick stop at the Book Bank, a terrific used bookstore where we always seem to find something to buy (like the very handy "How to Be Pope"), before making a slightly longer stop at Random Harvest.  They carry an incredible mix of one-of-a-kind antiques and gorgeous new pieces, with everything expertly grouped and wanting to come home with me.  Although we can't afford anything in there, I love to browse the showroom and dream of one day owning such classy furniture and home decor.  I think I fell in love with just about every lamp in there.  I didn't know it was possible to actually love lamp.  After that, we walked over to Restoration Hardware to pick up a set of knobs to replace the unfortunate ones that adorned our master bathroom vanity.  While we liked the overall look and feel of the existing knobs, my OCD would not allow their brushed finish in an otherwise polished nickel environment.  Lucky for us, they were holding a "Friends and Family" sale, so we were able to pick up the knobs and an extra hook all for 20% off.  Check out the transformation...

Our knob of choice... RH's Gilmore knob

Before: Brushed knobs.  Boo!

After: Polished knobs.  Yay!

Back at the home front, we assembled two of our dining chairs (which wasn't nearly as difficult as I was imagining), installed new toilet seats on all of our toilets (whisper-close is the way to go), and John did a bit of leaf blowing.

Sunday morning began with chocolate chip pancakes, which I must say, is a great way to start a day full of housework (yay chocolate/syrup buzz).  John did more leaf blowing/mulching, and as you can see here, thoroughly enjoys it.  Our yard consists almost entirely of deciduous trees, so luckily for John, there will be plenty of leaf-blowing in his future.

Blow, baby, blow!
While John played in the yard, I took on a new project - spray painting.  In reading all sorts of DIY blogs, I've discovered you can spray painting just about everything under the sun to give new life to old items or help give something a new purpose.  In our case, we purchased a small TV stand for our upstairs living room that needed some feet to lift it up a bit.  We picked up some feet at IKEA, but the only color option is plasticy gray and we needed something black.  Here are the results of my first attempt at spray painting...

Little plasticy feet before...
Little black foot after!
While the feet dried, we decided it would be a perfect time for a Home Depot run.  What Sunday afternoon would be complete without one...or several?  On our way out, we were surveying our pathetic landscaping at the front door and concluded the flower beds are in need of some stone edgers, so a trip to Campbell and Ferrara was added to the itinerary.  We have frequented this local nursery/landscape design center since we moved to the Alexandria/Annandale area and would spend many an afternoon strolling throughout their grounds dreaming of one day having a yard to landscape, but never thought we would be able to afford any sort of property in the area, so it's certainly a dream come true to finally have some land.  With winter just around the corner, now isn't the time to be filling our land with plants, but Campbell and Ferrara was having a great 60% off sale on their outdoor pots, so we picked up a few for next spring.

Pot party!

After returning with our sweet finds, we happened to run into our across the street neighbor and John was able to borrow his ladder to clean out our gutters... which desperately needed some TLC.  Eventually we'll get some gutter guards, but for now, John will have to take care of it.  And look how thrilled he looks to be doing so.


By the time John was done on the roof, my spray painted feet were dry and ready to be installed.  We chose IKEA's Mosjö tv stand to complete our entertainment center and the $40 price tag couldn't be beat.  Assembling the unit was a snap, the feet screwed in perfectly, and just as we were scooting it into place, we realized it was just a couple inches too big.  A real long story and a Dremel Multi-Max later, the unit fit perfectly into place and we were ready to call it quits for the weekend.

Before: mismatching and gross!  Note Elliot being helpful as always, overseeing from his cat tree...

After: so nice!  Check out those cute feet!  Now we just need to do some clever book/odds and ends arrangements.