Showing posts with label product review. Show all posts

Sunday, January 8, 2012

Merry Elfa-mas To Me!

Back at Overlook, we were enormously spoiled with a cavernous walk-in closet complete with shelving units and lighting.  Here at 64 year old Grafton, our master bedroom closets are minuscule in comparison.  I've been able to make it work, but since we moved in, I've been dreaming about adding an Elfa storage system.  Since most of our readers are Michiganders, you may not be familiar with the heaven-on-earth that is the Container Store (sadly, it looks like the nearest store location is Chicago).  Just another reason to abandon the Mitten and join us here in NoVa (obvious hint-hint, Mom and Dad).  Once a year, Container Store has their 30% off Elfa Sale and I just so happened to have a bit o' cash in my pocket from a Christmas bonus and thought: 2012 is the year my dreams come true.

So, you can go online and enter the measurements of your space and the closet wizard will suggest some designs based on the info you provide.  That is what I did.  Here is what the wizard and I decided on:


It's pretty great because it breaks down every component of your design and you can make all sorts of adjustments and it'll give you the exact price, so there aren't any surprises at check-out.  Once you're done, you can submit your design to your nearest store and they'll put together all the pieces in a cart for easy and quick check-out!  Amazing!  I didn't quite get that at first, so I just printed out my design and brought it into the store and a helpful employee still pulled all the pieces whilst we browsed the store.

Back at home with all the parts, I had to pull out all my junk and then remove the existing shelf and bar... and patch up the wall where our demolition caused some minor damage.

Before Elfa.  The horror! 
My handsome assistant demo'ing the existing shelf brace.
Post-spackle.
The walls of my closet were pretty banged up from me repeatedly throwing my shoes in there.  I thought, why not paint in there?  We have bought paint for our master bathroom and bedroom (months and months ago, as usual), so I brought out the lighter shade designated for the bathroom and went to town on the closet.

Freshly painted!
I'm not sure if you can really get a feel of the color, but it's a soft gray that looks so much better than the flat, banged up white and infinitely better than the nasty old yellowed paper color of our bedroom walls.  I'm glad I love it since our bathroom will one day be that color.  FYI, it's Benjamin Moore's "Big Bend Beige" color matched to Behr's Premium Plus Ultra base.

Once the paint was dried, we installed the Elfa.  You can pay Container Store to install it for you, which would have cost us an additional $180, but we were able to do it in about 30 minutes... which half of that was peeling off all the stupid price tags and opening assorted packaging.  I finally got my Elfa and I love it.  I'm still working on complete organization, but here's a sorta-after for you:


Doesn't that look so much better already??  If you can't tell, there's a top shelf that runs the entire width of the closet which is currently empty.  One thing I'd note for women, buying a couple solid shelves might be better than the wire ones I went with.  I found some of my skinnier-heeled shoes have a hard time balancing on the wires, so we might return one or two for the solid shelves.  I'm just hoping one day when we're ready to leave Grafton, it might help someone realize how much you can shove in a small space and not be scared off by our tiny closets.  In the meantime, I love my newly organized closet and am slightly afraid of how happy organization makes me...

A Slice of Paradise

OK, warning going into this post: it'll be my cheesiest post yet.  *dorky snickering*

As I mentioned in my last post, we made a trip to the Container Store last weekend and really, ever since the ball dropped and 2012 rolled in, we've been on a crazy organizing trip.  We were wandering the aisles and I (of course) came across something I never knew I needed, but now that I have, I don't know how I lived without: a single cheese slice container.  For individually wrapped Kraft slices.  You know, for grilled cheese?

Tell me this hasn't happened to you:  You buy your Kraft slices, bring them home, they sit nicely in your little cheese drawer until one day, the time comes where you must open said cheese slices.  While you try so hardly to carefully open the package and maintain some of its structural integrity, it rips all the way down the side and slices go flying and you curse your cheese slices and the depths of hell from which they came!  Sure, you might try to carefully stack the slices and slide them back into the demolished shell of a package, but it won't hold.  They won't stay.  You just end up with a mutilated wrapper that somehow goes missing in the cheese drawer and a whole stack of slices sitting nakedly, just waiting to collapse.

Shameful.
Apparently, some geniuses/wizards at "Resourceful Products, Inc." felt our pain, understood our misery, and came up with the revolutionary "Single Cheese Slice Container".  And at $1.99, who could resist?  Don't they know I'd probably pay like $5 for this innovative technology??  Fools.  But now, my Kraft slices safely reside in their plastic domicile, waiting for the day they will be chosen to grace a couple slices of bread and accompany a steaming bowl of tomato soup.


Is it wrong that a simple box for holding cheese slices makes me so happy?

Tuesday, June 7, 2011

Dexter's Second Birthday Party

About a month ago, I talked about Dexter's first birthday party and plans for his second.  I can hardly believe it has already been a month, let alone another year has gone by.  Saturday was the big day and boy were we busy the last few days leading up to the party.  In our typical fashion, we waited until the last minutes to take care of everything, but luckily, I'd say it all went off without a hitch.  We did our shopping and cleaning over the long Memorial Day weekend, John called on Tuesday and got our food ordered from Rockland's, a few tables and some chairs reserved, and made an appointment for Dexter to get his birthday haircut.  Then Saturday morning, we were up bright and early to do our last second cleaning, setting up and decorating.  I had the crazy idea I might fit in a quick nap before 5:00, but no luck for me.  Fortunately, we did manage to pull everything together and the weather miraculously cooperated without any of the sweltering heat of last year.

Now for the details and I'll start off with something random... the "Windex Outdoor All-in-One Glass Cleaning Tool" is amazing.  After a ton of deliberation, we finally cracked and bought one.  The biggest hold-up was its price at about $14.99 at Target.  However, our windows were so nasty (mostly due to our MDF project back in January that resulted in mountains of dust on the ground and a disgusting layer all over the siding and windows), we had to do something.  The kit comes with a Swiffer-like apparatus (a pole that you stick a cleaning pad on) that's easy to assemble.  Then you just squirt down the pad with a hose, spray your window, scoot the pad around, and spray it clean.  That's it.  No wiping or anything.  We worked together with John manning the hose and me scooting the pad and in no time we were done.  Just like it promised, we were left with a streak-free shine on our windows... and I even did my back windshield.  The kit only comes with one pad and the refills are a little pricey, too, but if we keep up with our window cleaning frequency of once every eight months, I think we can foot the $10 or so.  :)

Look how happy you can be to wash your windows!  yay!
OK, back on track, with the outside all clean, we were free to do our thing inside.  I had grand plans in the beginning of DIYing some decorations and all that, but I had to take a step back and remind myself it's a dog birthday party and we can't afford to go nuts and don't want to end up as new subject matter for TLC to feature along with Hoarders, Extreme Couponers, and Crazy Eating Habits people.  So, we made our first trip to Party Depot.  It was kind of a weird store with a weird vibe, but lucky for us, we found some inexpensive decorations to spice up our place... just a few cute fan decorations (decorations shaped like fans, not decorations for fans like some may have thought...), a package of paper lanterns, and some streamers.  I think it may have cost a whopping total of $10.  Here's our set up.  Once people arrived, our photo taking kind of fell off, so boo to that.  Oh, and check out our awesomely painted kitchen.  Yeah, we finally finished painting the rest of our main floor, but our place has been so much of a mess since then, it hasn't been appropriate for photos...

That's not a creepy stalker in the doorway, that's just our friend Paul.
And because every kid who goes to a party likes to take home a little goody bag, I prepared doggy bags for our canine guests.  I baked two kinds of dog biscuits, a peanut butter based treat and a beef and cheddar (gotta have your sweet and savory), and threw in a squeaky Kong tennis ball.  Maybe that was too much...


Here are our guests, human and canine, (hopefully) enjoying themselves.  Our boys had a great time meeting and playing with other dogs.  It was incredibly nice having the fence up to keep everyone safe.  Chewie had an amazing time playing with our friend Keith's dog, Bailey.  I guess he has a thing for older women.  Apparently she did, too, as Keith said she was asleep in the car before they turned onto the first street from our house.  We were thrilled to have our friends over and catch up.  Now that we have our house and yard, I think we'll have to schedule more (smaller) parties here and there because it's just too much fun eating, drinking, and laughing all evening.  We're so lucky to have such amazing sons and friends.  :)

Jasmine making sure she's protected from mosquito bites.
Jet doing a jig... or something.
And then acting as dog whisperer.
The guys hogging the comfy chairs.  Typical.

Wednesday, February 2, 2011

Extreme Makeover: Creepy Basement Edition - Phase 3

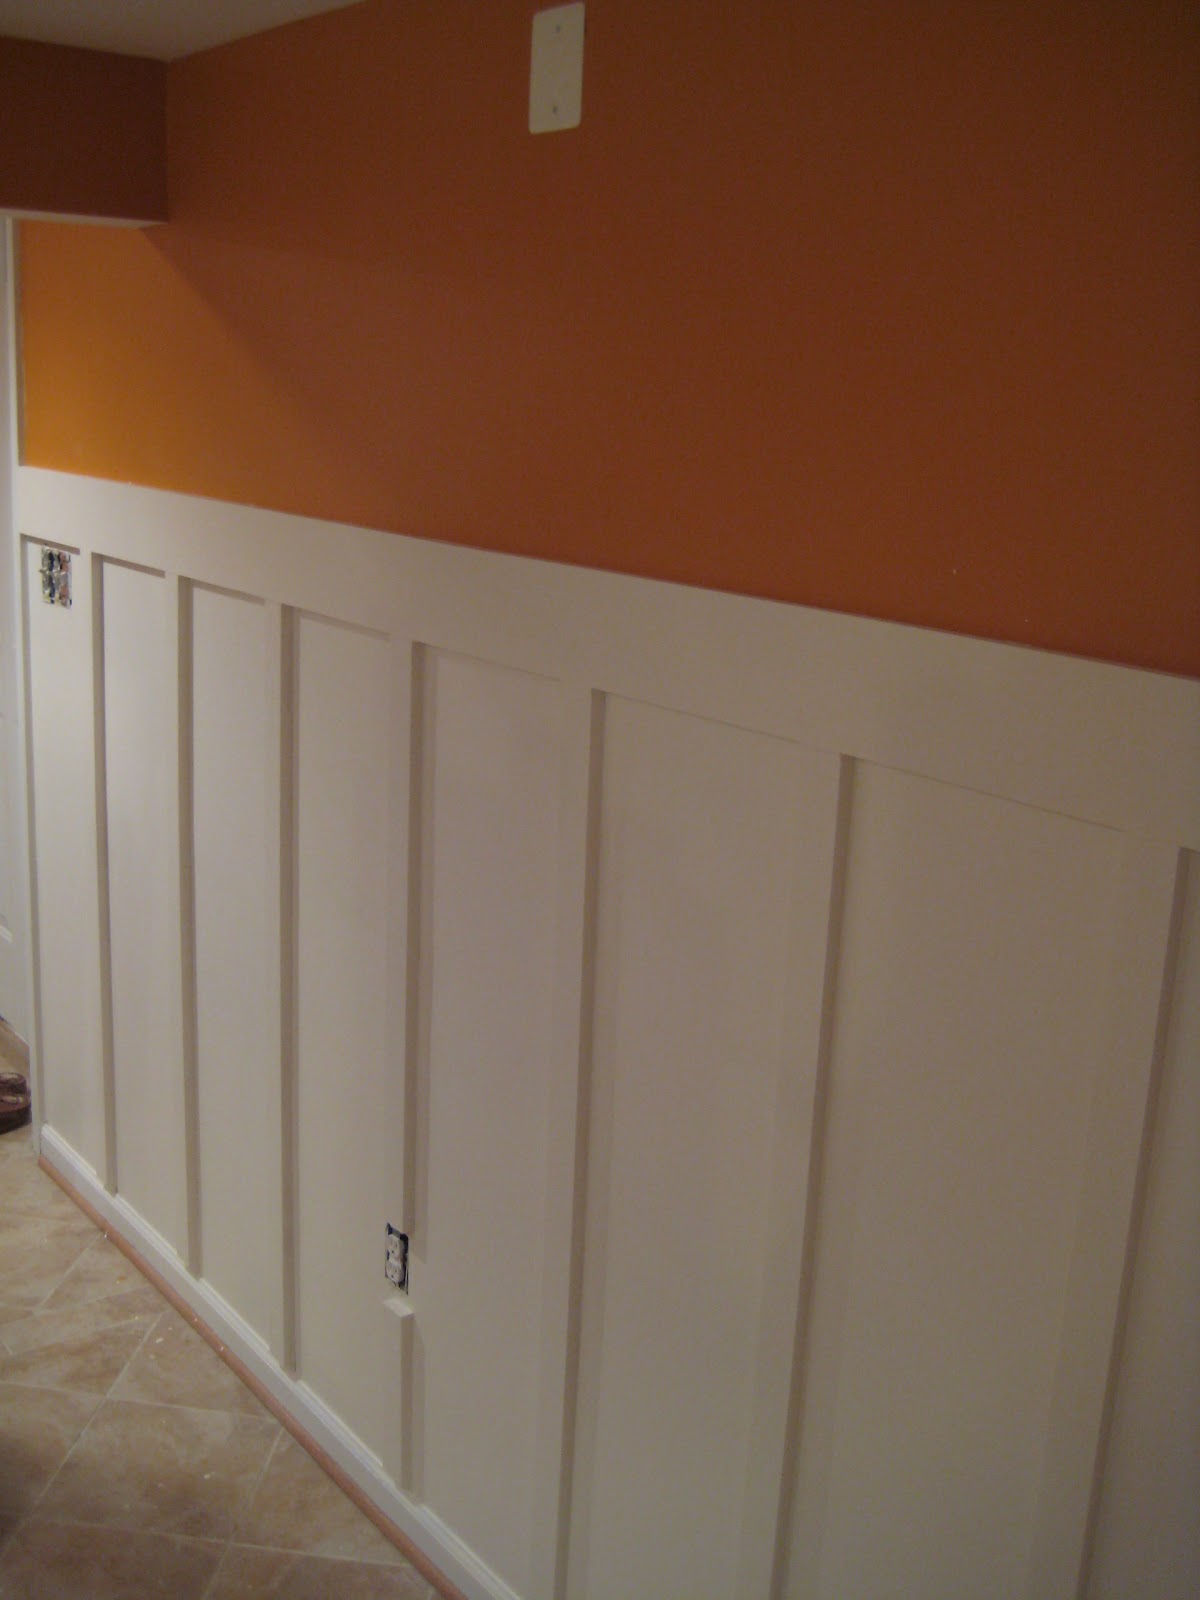
After a week of painting, sawing, nailing, hole filling, more painting, and severe disruption of our nightly television watching schedule, I am more than happy to report that our second Extreme Makeover has concluded.  Surprisingly, we have walked away with a few scrapes, mildly sore knees, and just a bit of paint stuck in our hair.  I left off last (Phase 2) with the boards all secured to the walls, holes filled, and everything just waiting to be painted... so here we go on Phase 3.

For the whole shebang underneath the orange accent color, we chose a warm white to brighten up our space even more and tone down the intensity of the Flaming Torch.  The color we chose to go with, Behr's Bleached Linen, is just perfect.  It has only a bit of creamyness to it, kind of like a French Vanilla coffee creamer.  Probably something no one would ever notice as not 100% white, but we wanted just a touch of warmth since our basement sure could use it.  With two gallons of the paint in hand, we set off painting... me with my trusty cutting-in brushes and John with his roller.

Creamy!  nom nom nom
I quickly realized how porous the MDF actually is and found it pretty challenging to get my paint to spread along the edges of all the boards.  During the first night of painting, I got very little accomplished and it was clear another strategy was needed.  John also faced an issue with his pink roller being too... nappy? and leaving a sponge paint-like texture on the boards as well as flicking paint all over.  Since we weren't going for a whole sponge-paint/Jackson Pollock look, it was back to the Depot. 

Pollock's Number 1... the National Gallery of Art says it
"legitimized the convergence and mastery of chance, intuition and control."  I don't get it.

Millions of board sides to paint... OK, maybe not millions...

The next night, we tried again, this time I had a tiny foam edging roller and John had a smoother-napped roller.  This angle worked much better as the foam roller deposited more paint than my brushes and the smooth-napped roller left John with a cleaner result.  Plus, his roller completely covered the end, so there was no horrible plastic bit scraping off paint... which let him cut in closer and help cover the boards I was so desperately trying to paint.  Win-win for all!

The handy dandy foam roller.

The roller cover... although, John said it had a tendency to
slide across the wall instead of rolling...hmm.

Even with our better system and equipment, painting still took forever.  Luckily, we also picked up two pairs of knee pads at Home Depot, which made scooting around on the cold, hard tile floor way more comfortable.  We hope they'll also come in handy in spring and summer when we head outside to tackle some landscaping projects.  Or when we just feel like a round of basement roller derby.


We finally finished it all last Friday night and I'm so glad to be hanging up my paintbrushes for now.  I think the whole thing turned out pretty well for our first big project.  The boards do gap in some areas, so we're planning on going through and filling those with some sort of caulk to make it look all flush and lovely.  Now we just need some art on the walls and a couple rugs on the floor, and we'll be good to go!


Lessons learned from our basement makeover...

1) The right tools make all the difference.  Blue painter's tape is just wretched and unreliable.  Frog Tape for the win!  Shur-Line might have some stupid products, but their Teflon paint brushes are great.  Not all rollers are created equal and it's important to know which one is right for your surface.

2) MDF might be inexpensive, but it definitely has its faults.  It makes a wicked fine dust that makes a horrible mess and I'd recommend both safety glasses and a mask when making cuts.  It's also very porous on the cut surfaces, so I think taking the extra time to prime it would be worth it.

3) If we ever do a board and batten or any sort of similar wainscoting type project, I would definitely paint the entire wall behind it and maybe the trim itself before installation.  I'm sure it's twelve of one, a dozen of the other, but it sure seemed like a pain the way we did it.

4) We should buy Home Depot stock.

Thursday, January 27, 2011

Extreme Makeover: Creepy Basement Edition - Phase 2

With the paint up on the walls and all dry (detailed in Phase 1) it was time to start preparing the board and battens.  Due to budget restrictions, we decided to use MDF.  During our Depot run, we picked up three 4'x8' sheets of MDF and had them make the initial cuts so we could squeeze them in the back of John's Escape.  They still stuck a bit out the hatch window, but luckily (not to our wallet), we only live about three minutes away from the Depot.

The MDF sheets chilling in the dining room.

Since we didn't finish painting until 3:00 a.m. Saturday morning, cutting these guys would have to wait until... later in the morning.  Poor John thought he was going to get a chance to sleep in, but unfortunately, was awoken by me around 9:30 or so.  I just couldn't help myself.  I'm definitely a would rather never see the morning person, but the excitement of power tools was too great for me.  After fueling up with some chocolate chip pancakes, we bundled up and headed outside to start making the B&Bs.  Using John's table saw, we worked out a system of John feeding the sheet in, me directing it, John pushing it through the end, and then I catch the pieces on the other side.  Once we got this figured out, cutting down the boards took no time.  I'm sure our neighbors thought we were crazy, out in the freezing temperatures, dashing about, tossing boards into a pile, and coating ourselves and backyard with MDF fuzz.

Our pile o' boards.

Me cleaning up in the wake of our MDF destruction.

A mountain of MDF shavings.
We started the process of affixing all these pieces to the walls by installing the boards (the horizontal pieces).  There was a snag with the air compressor that set us back (note to newbie air compressor owners: check your drain valve...), but once we got that figured out (thanks again, Papa Harold!), it started moving pretty quickly.  The boards were cut 8' long and 5" wide and we hung them 4' up the wall... except our basement is nowhere near level, so the boards are initially 4' up, but then vary as you move about... extremely annoying.  This oversight also resulted in the orange not being painted down far enough in about half the basement, so I was reunited with my Shur-Lines to fill in the gaps.  Definitely a pain, but also a learning experience.  *sigh*

The boards.  And yeah, we eat at KFC/Taco Bell.  Don't judge us.

The plan was to have the battens (the vertical pieces) to be 4' long, lying between the bottom of the boards and our floor trim, and 12" apart from each other.  Unfortunately, the sloping basement required John to individually measure for each batten and cut them each to size.  I'm pretty sure there was a better/different way we should have done this, but oh well.  We're just beginners.  To make the process quicker, John made a 12" template block and started measuring for each batten, marking the wall with a number and writing down the corresponding length so he could make several cuts at once.  He also cut the bottom of each batten at a 45 degree angle so they slope nicely down to the trim instead of sticking out and just looking like... well, a board nailed to the wall.

Our first battens.
My job in all this was to go through and patch all the little holes the nails left behind.  I started off using Elmer's Carpenter's White Wood Filler, which I absolutely hate.  Even more than the blue tape.  It's extremely hard to squeeze out of the tube, so anyone with limited use of their hands (due to arthritis or the such) would be unable to use it or in horrible pain afterwards.  I was and I'm young and viral virile.  Once you're able to squeeze out a bit, it's very hard to work with and often crumbles or just completely falls off.  Forget trying to patch anything larger than a nail hole.  You'll spend an hour trying to carefully mold the compound, only to have it just fall off or be destroyed in subsequent sanding.  Yeah, then you have to sand the junk down which also takes forever (especially when someone has gone drunk with pneumatic nailing power...) and creates all sorts of nasty dust to clean up and inhale.

Abandon all hope, ye who decide to use this junk.
After endlessly patching with this stuff, I felt full of despair and on the verge of tears as I saw I still had hundreds of tiny holes to patch and sand.  Luckily, John had mercy on my poor soul and bought a new option: Red Devil's Pre-Mixed Glazing Compound.  OK, so I guess it's not technically for patching holes, but it worked sooooo much better, it would make my Grandma say, "Well, goodnight!"  Instead of a nasty paste, it has the consistency of a putty, so it goes right into the holes without forcing it and scrapes off clean, thus eliminating the need for subsequent sanding.  It's almost immediately ready to be painted, so once we got going with our Red Devil, the pace picked up.  We used a system of John applying the putty and me following behind, scraping off the excess.  If you can see in the photo below, the board holes were patched with Evil Elmer's while the battens were filled with Red Devil.  Look how clean the Red Devil scraped off, without any sanding required.


As you can see above, I also went through and Frogged the boards in preparation of painting the whole deal white.  At the time, I thought it was a waste and my Shur-Lines would be able to handle it, but after painting, I'm very glad I did.  Otherwise, it would have been another round with Flaming Torch.

So, we eventually got all the B&Bs up, all the holes patched up, and the only thing left was to paint them all white, or as we call it: Phase 3.


Monday, January 24, 2011

A Brush With Destiny

This past Saturday started pretty slow for us.  Slept in late, had some lunch, watched some TV.  Over lunch, we started discussing our horribly cold and drab basement and launched a renovation plan.  We tend to make big decisions quickly (go in for an oil change, leave with two new cars...), yet for some reason tend to dwell on the insignificant/less important... I'm sure there's some psychology behind that.  Probably traumatized as youths.  Who knows?  Anyways, we made a late afternoon trip to the Depot and picked up a bunch of supplies for our Awesome Plan of Basement Domination (no domination actually involved, we're not those kind of people), to be detailed later.  Of course, one aspect of our plan is painting and I am here to tell you about the discovery that is sure to change your life.

My painting duty is always cutting in.  John takes over the rollers and within minutes, he's practically painted an entire room, while I'm still crouched in a corner/up on a stepstool/contortioning over a toilet/imagining a way I could suspend myself from the ceiling upside down, trying desperately to create straight lines and avoid painting on trim/doors/toilets/mirrors/electrocuting myself around outlets.  It's a wretched job that I love/hate and my OCD/control issues won't let me not do.  Frog Tape was a first step toward salvation from complete insanity.  I foolishly reverted back to the standard, blue tape this weekend, in an attempt to save a bit of money since the Frog Tape is more expensive and we had a whole ton of basement cutting in to tackle and honestly, I found it first.  What a mistake.  It quite obviously did not adhere to the ceiling nearly as well as the Frog, yet when I finally tore it off, it came off in multiple pieces... with one tiny speck of blue still stuck up on the ceiling.  So frustrating.

Now, cue my new find, descending from Home Depot Heaven, upon a cloud, all bathed in rays of sun: Shur-Line's Teflon Surface Protector brushes.  I've tried several of Shur-Line's products before, like the ridiculous little pad you scoot around and supposedly will give you clean lines.  Yeah right.  There's no way to dip the pad in your tray without also getting paint all over the gripper! 

With all the gimmicks out there, I was extremely skeptical.  However, these brushes are amazing.  The Teflon helps keep the bristles together and apply paint in a smooth, uninterrupted stroke, versus the usual bristles flapping everywhere and leaving gaps along the way and streaks on the trim.  They're conveniently sold in a three-pack of sizes (advertised as: "1" Angle Rattail, 1-1/2" Angle Sash, 2" Beavertail").  Who says that?  Oh yeah, "Hey John.  Can you pass me my Beavertail?" 

Note: Mine came in a user/environment friendly cardboard package and
they've switched to bamboo handles.  Guess it makes up for all that Teflon...

Using the one-inch angled brush, I was able to cut in, without the use of tape, throughout our entire basement, with extraordinary success.  I did have to tape off a bit around our carpeted stairs (which, the Frog stuck to just as well as non-fluffy surface and not one drop of paint snuck through onto the berber) and around the utility sink.  I should have taped off along the ceiling down the stairs, as the meeting of the walls and ceiling do not form any sort of straight line and it ended up looking wavy, though not to the fault of my beloved Teflon Rattail.

So, there's my advertisement for the day.  If anyone out there has any painting in their future, I would definitely, definitely recommend picking up a set for yourself.  The three pack was only about $15.  Who can beat $5 a brush!  Especially if you're the poor sucker that has to do the cutting in.  Trust me, it'll save you a whole bunch of time, money, and agony.

Now, stay posted for updates on the project itself.  It's quite the tale.  Not tail, as in Beavertail brush.  Seriously?
*Note: No beavers were harmed in the writing of this post.