Showing posts with label old town. Show all posts

Tuesday, July 26, 2011

Laundry "Room" Update: Part 1

I absolutely hate doing laundry and put off doing it for slightly disturbing lengths of time.  For some reason, though, I dream of one day having a huge laundry room, full of windows letting in tons of natural light, countertops galore, and a small flat screen TV that I can watch my stories on.  Apparently I'm also 80 in my dream... However, our current situation is the complete opposite.  Our laundry "room" is a small space in the basement tucked away to the left of the stairs.  There is just enough room along the wall for the washer, dryer, and a utility sink, and just enough depth for the doors to swing open and moderate maneuverability.  I suppose if you're a realtor, you could call it "cozy" and it certainly doesn't waste any square footage.

When we moved in, it was a complete blank slate with just the utility sink and hook-ups.  The day after we moved in, we had our laundry machines delivered, as I mentioned in this post way back in November.  The space has looked the same ever since except we've painted the walls Flaming Torch and the tops of the machines are now covered in detergent bottles and dryer sheets.  Classy.  Back then, we dreamed of one day adding some shelves or cabinets, as well as a countertop.  Well, some of that dream has finally come true.
Our laundry nook, circa November 2010
Our laundry nook as of yesterday... what an improvement...
In yet another fit of us putting off our other 3,000 projects, we decided last Sunday was the perfect time to drive down to IKEA and check out their cabinet selection.  After wandering around the showrooms for a while, we finally happened upon a style we liked and headed over to the customer service station to price out a couple wall cabinets.  Happily, it was about half of what we had priced out online.  I don't know what it is about IKEA's website, but I can't figure out the cabinets for the life of me.  

We decided to go with two AKURUM cabinets with Ståt doors.  I thought the doors had a cute modern cottage look to them and once we got them home, we realized the lines in the doors nicely play off of our board and batten wall treatment.  Yay for happy accidents.  So, installation was fairly simple.  On Sunday night, we sat right down and put together the cabinets which was standard IKEA assembly.  Then we needed a hack saw to trim down the metal bracket/rail/attacher thing that attaches the cabinet to the wall, which we didn't have, so that was that for the night.

The cabinet frames.
We took the day off on Monday night to enjoy the skirt steak special at Overwood in Old Town (who could resist?), but tonight, we were back on track.  John tried sawing through the metal bracket with the saw, which made a horrible metal-on-metal noise and really didn't work at all at first.  He then tried clamping it down and switched out the blade for one with more oomph and this time, he managed to cut right through.

I told John to look victorious and this is what he came up with...
He screwed that into the wall while I stood on the other side of the wall in the cat room and made sure the screws didn't miss the studs, penetrate some electrical wiring, and shock him dead.  Once that was up, we got the cabinets up without too much problem, except when one nut was dropped and of course fell right in between our machines.


After that, we just had to pop in the hardware to attach the doors and then stick the doors onto the cabinets.  We also sprung for the additional $5 door dampers so they close smoothly and without any slamming.  Kind of like my beloved "whisper close" toilet seats.  Then it was time to install the shelves.  We bought two packs of shelves with two shelves each, but decided we only really need one shelf per cabinet at this time.  It's a little sad how excited we were that our jumbo HE Tide slides in perfectly into the cabinet.


* I apologize for the weird, dark, grainy photos.  Our basement has horrible lighting.  :(
We also bought some shiny little knobs for the cabinets, but that requires us to drill through the doors to install them, which we didn't really feel like tackling tonight.  Besides, I think it looks pretty OK without knobs, so who knows?  Maybe we'll just go knob-free.  

So, that's that.  We finally got our laundry storage tackled and ended up with way more space than we even really need at this time.  Like I mentioned, we'd still like to add a counter top for a convenient folding area and are contemplating replacing the utility sink with something more visually appealing and maybe adding a garbage disposal so we can rinse out the cats' nasty wet food dishes.  There won't be any floods of sunlight or mini TVs in my future, but who wants to spend that much time doing laundry anyways?

Sunday, March 27, 2011

Postcard Art

Bit by bit we've been adding art to our home, mostly based on places with special significance to us, like San Francisco, Eastern Market and DC.  We realized, strangely enough, that we didn't have one piece of Old Town Alexandria art, even though it's one of our most favorite and frequented places.  We have picked up most of our art at the Eastern Market, but even though Old Town is so close by, none of the artists ever feature Old Town.

We found ourselves back in Old Town last weekend while John's mom, Beth, and her friend Gail were in town for a visit.  While doing some shopping, we visited The Christmas Attic, a great little boutique shop one block from the Potomac River and located in what used to be a tobacco warehouse back in the 18th century.  As I'm sure you can surmise, they have a ton of Christmas ornaments and decor, but also sell a variety of other knick-knacks, including Old Town and DC themed items.  I found these cute postcards made by Found Images featuring old images of different Old Town landmarks.  At only $2 a pop, I thought it would be a great, inexpensive way to finally honor Old Town in our home.


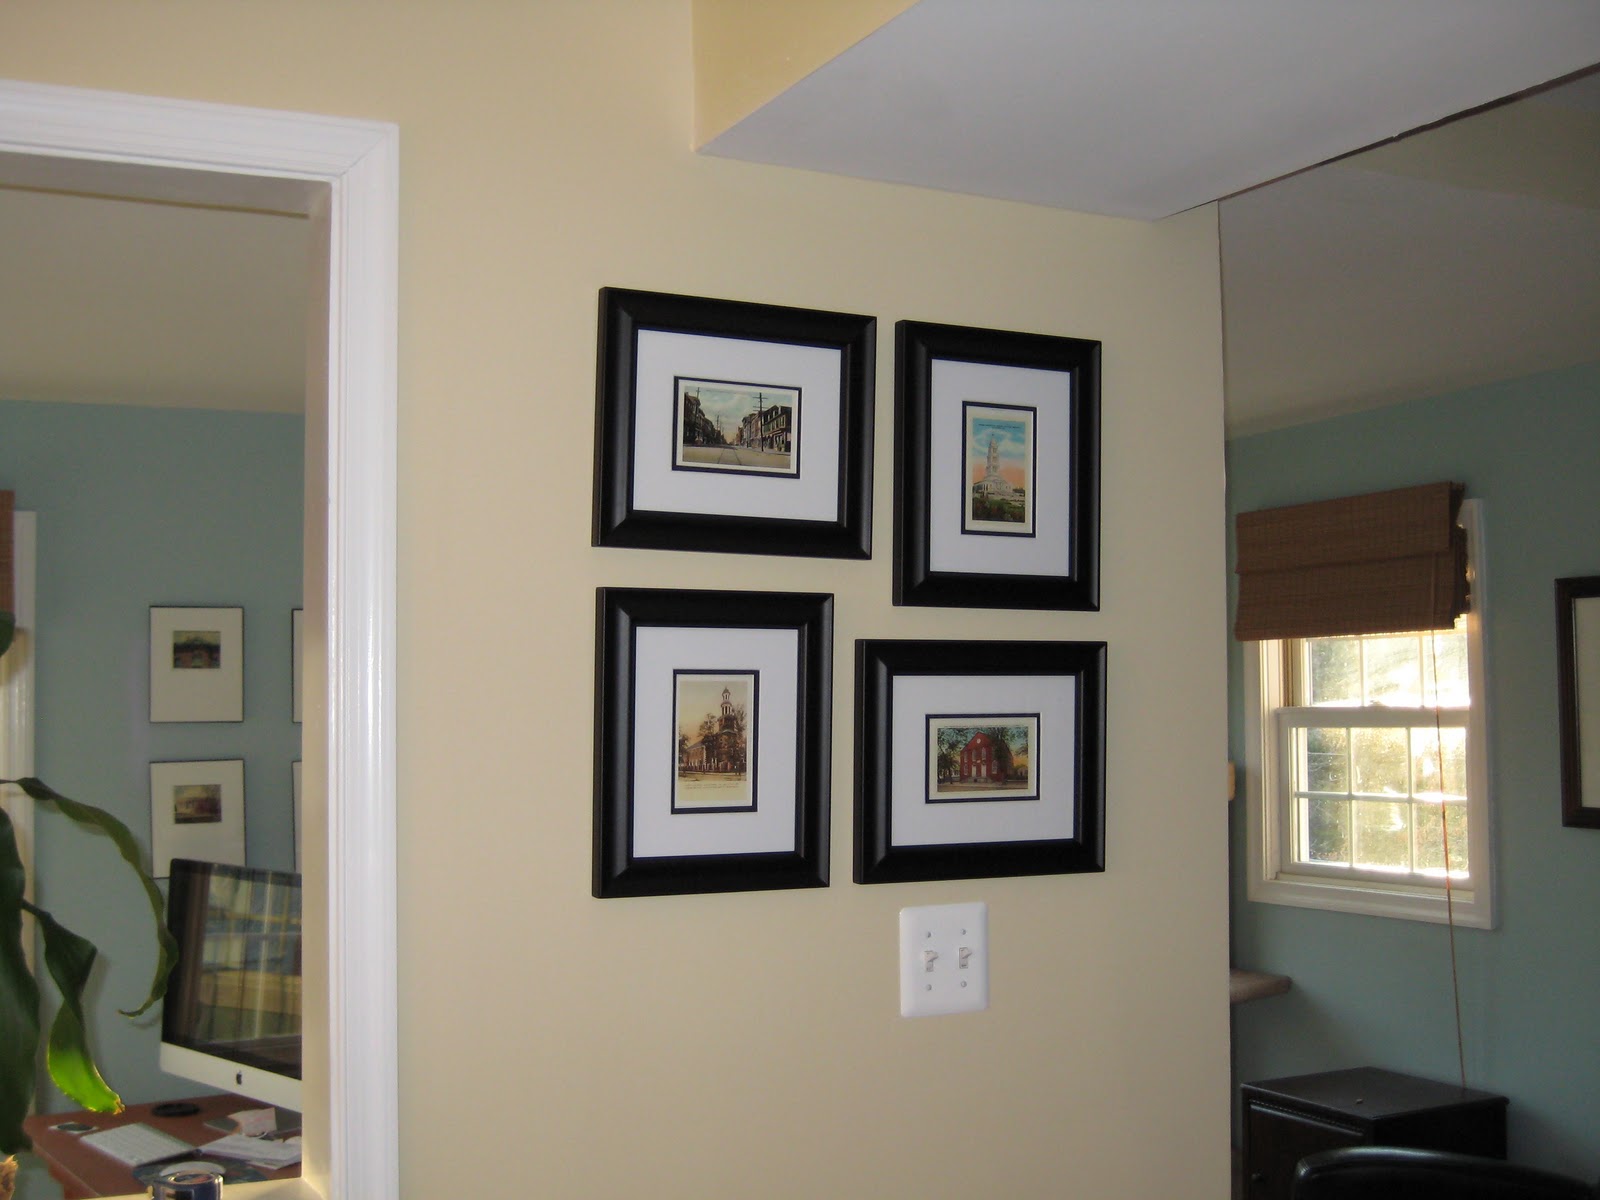
The first photo on the top says "King Street Looking West" and has an image of the main street running through Old Town that today is home to tons of boutique shops and restaurants and always seems to be packed with tourists and locals alike.  Moving clockwise, the next card is an image of the George Washington Masonic Memorial.  The memorial was built in the 1920s by Freemasons to honor George Washington and today offers tours throughout the building.  John and I went once and the tour itself is pretty cheesy (including a glimpse at a reproduction of the Arc of the Covenant...), but the views from the very top can't be beat.  The next two cards feature images of two churches built back in the late 1700s and still stand today as landmarks in Old Town.

So yesterday John and I went to Michael's to pick up frames for the cards.  Oddly enough, we had a really hard time finding frames for 4x6 photos with a mat.  We finally found mats sold individually at 8x10 with a 4x6 opening, so we picked up four of those and four 8x10 frames (with a 5x7 opening).  At least the frames were 40% off to make up for the frustration.


After a quick switcheroo and popping in the cards, John helped me hang them all in a grid in our dining room and we had a brand new addition to our decor.


To make room for our new art, we had to move our Union Station piece (shown in this post), but we had a perfectly empty spot for him right on the other side of the wall, so he didn't have to go far and now our office/reading room is filled up.

That's pretty much all we accomplished this weekend.  I guess we were feeling pretty lazy.  I did get a gnarly paper cut from one of the mats, so, you know, I think I needed to take it easy and heal.  :)

Sunday, March 6, 2011

Hexa-Gon' Crazy!

As I mentioned in my last post, I have a couple projects mulling around in my mind, just waiting on me to get around to finally doing them.  Well, I'm happy to say I finally tackled one of them.  Since they both involved furniture painting, I decided to start with the little hexagon-shaped end table before attempting the larger buffet. 

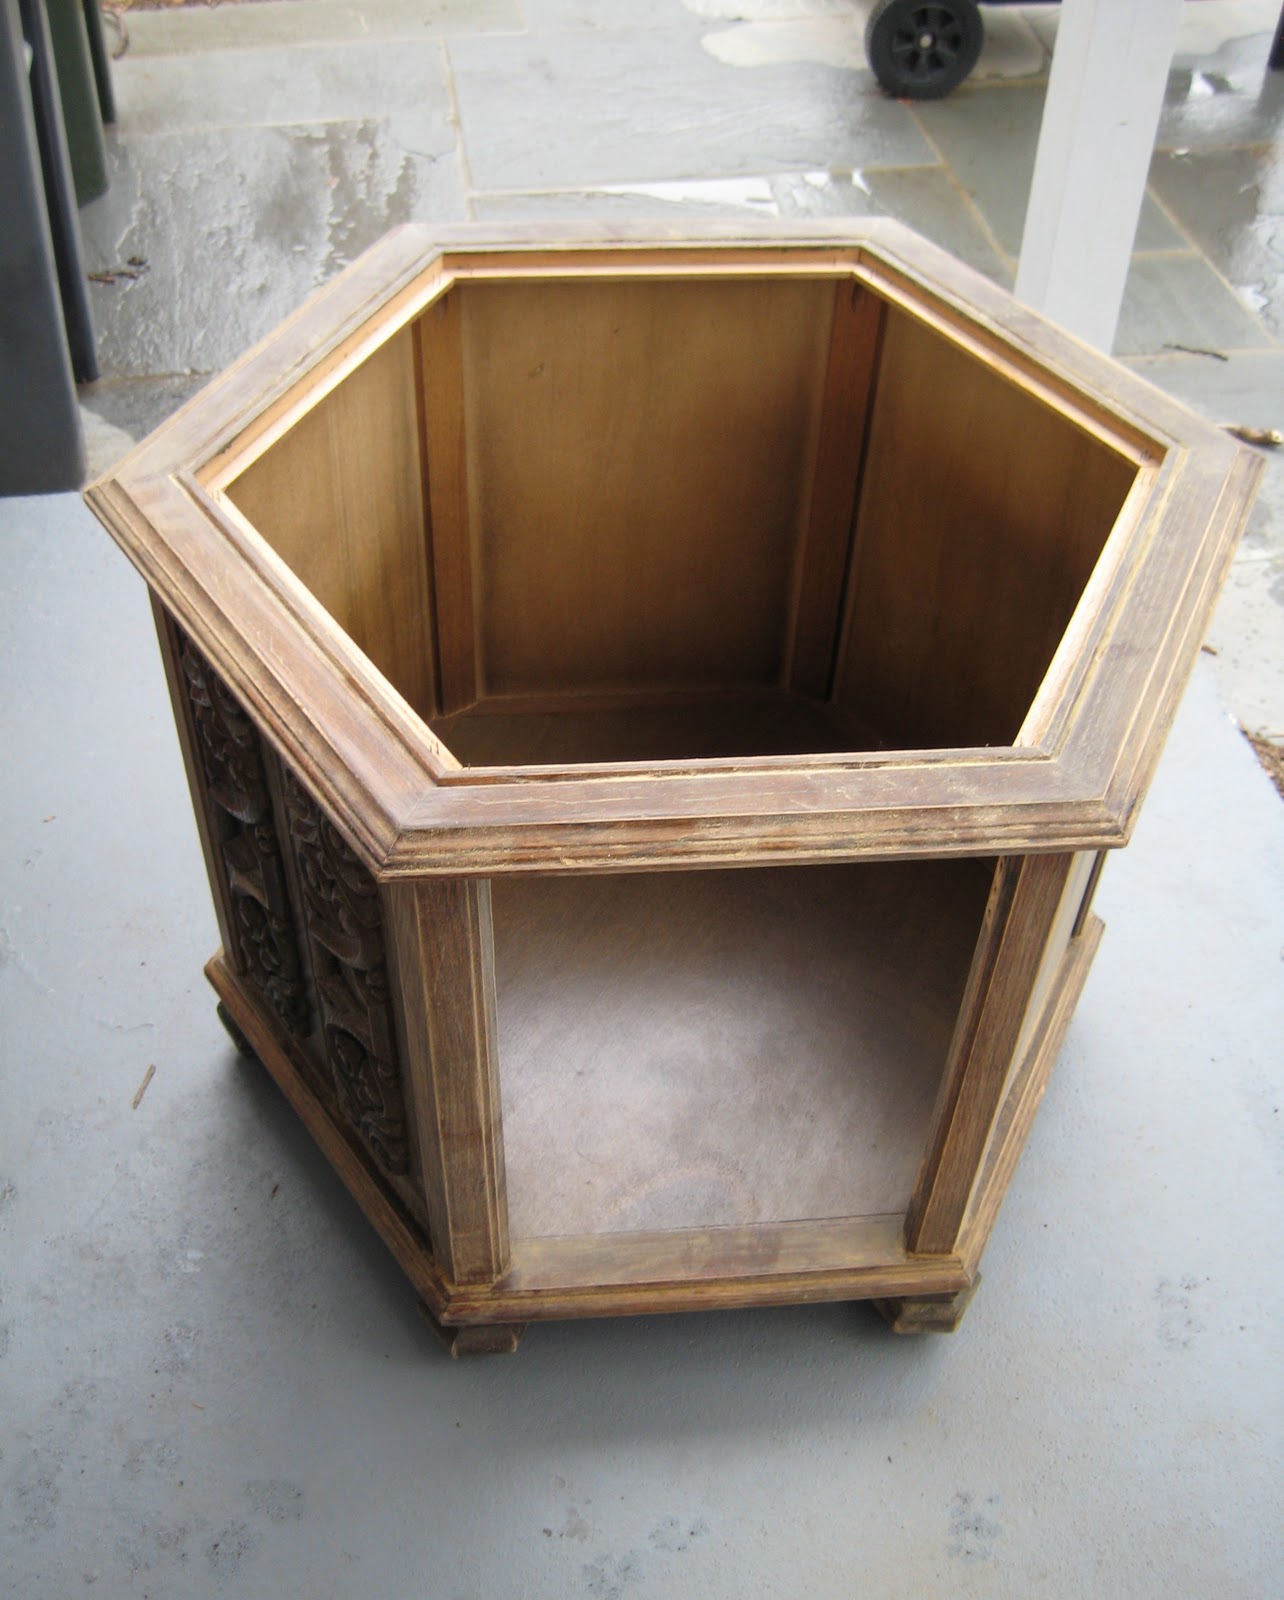
The table, in case you forgot about it.
I had originally envisioned the table in white or off-white and maybe adding a subtle accent color, along with a neutral decoupaged top.  All those plans flew right out the window, though, when John and I visited Paper Source a couple Friday nights ago during a trip to Old Town.  John encouraged me to go with something more bold and fun, and with the plethora of beautiful papers in stock, I couldn't resist.  After careful consideration, we chose this pattern.  The blue background works well with the blues in our curtains, rug, and kitchen, while the little mustard yellow flowers and gold accents add a pop of flare.


Now the question remained of what color(s) to paint the table itself.  Again feeling bold, we decided to play off the mustard flowers and go with yellow.  Our living room is so blah right now and after painting the basement orange, we're really enjoying more vibrant colors.  Unfortunately, the pattern is so small and scattered, we couldn't do an exact color match, but we did find a nice Behr choice... Solar Fusion!  How bold and exciting!  And fusion?  Perfect for my physicist husband.


We also picked up a gallon of Glidden's Grey Gripper Primer since we were using a lighter color than the current stain of the table.  Plus, the buffet is going a deep charcoal color and this primer will help keep that bold and covered.

Finally armed with my arsenal of supplies, I started by Mod Podging the paper to the top insert.  You can't tell in the photos, but the top had some sort of faux textured finish.  We wanted a nice, flat surface, so luckily John was able to pop the top off and flip it over to expose a perfectly non-faux surface, just waiting to be Podged.  I gave the top and edges a quick sanding to remove some bits of adhesive and it was ready to go.  After watching this tutorial video, I traced out the top and cut it down using my handy paper cutter to get straight edges.  The paper was a smidge too small, but I was able to add a small strip for a patch along one side... which was extremely frustrating, so let's not discuss that.

Topless table.  ooh la la!
If anyone feels compelled to watch the video and do some Mod Podging of their own, I definitely recommend using a brayer.  When I first layed out my paper, it was full of small creases and bubbles, but just a few rolls with the brayer took care of it and it was perfectly flat.

A brayer.
The next step was to apply the primer to the table.  I first took the topless table outside and roughed it up a bit with some 200-grit sandpaper to help the primer stick and get rid of any rough bits.


I used my Shur-Lines again and it was all easy going except around the carving detail on one panel, which took a little more effort to get into all the nooks and crannies.  Probably should have used a smaller craft brush, but oh well.  I got the job done and ended up with this nice blue-gray table.  The color actually isn't half bad...


Once the primer had dried, I started off with a coat of Solar Fusion.  We went with a semi-gloss finish, which I'm sure will look great, but I really don't like the consistency or lack of spreadability.  After one coat, I was left with this... which doesn't look anything like the paint chip above.  It's definitely much more suiting of the "Fusion" name and kinda looks a little radioactive at this point.


I let this dry for a couple of days (read: overnight, but then it was Tuesday after the three-day President's Day weekend and someone didn't feel like painting after work...) and went back to do coats two through five and the feet.  That's right... it took five coats of paint to really cover everything.  Much more than I expected and thank goodness it's a small table.  After the last coat was dry, it was time to pop the top back in and observe the glorious results.

Elliot is such a camera hog.
The top.
To finally put this project to rest, I'll need to come up with a little cushion for the boys.  I haven't really been fabric shopping since my mom used to make my Halloween costumes, so hopefully I can find something cute.  Maybe a really thin stripe or gingham?  I'm still holding onto the panel we removed in case they show no interest and we want to pop it back on one day.

So, that's that.  I'd call my first adventure in furniture painting a success.  We'll see how I feel after tackling the buffet...

Thursday, January 6, 2011

Learning to Love: Turning a Foe into a Friend

I'm the kind of person who can hold onto a grudge for way too long, be completely hung up on one small flaw, and generally carry around a half empty glass.  Luckily for me, I married a man who dances on rainbows and beams enough light to stun my retinas and distract me from the things that would otherwise drive me crazy.  Like my own personal Buddha, he provides me with annoying inspirational thoughts like, "In forgiving others, you forgive yourself" or help yourself... or something basically telling me to get over it and move on.

For a few years now, I've been waging an internal war on one of my most dreaded enemies: the Baker's Rack.  We picked it up at IKEA way back in the day to provide some extra storage in our kitchen/dining area and it has just been one of those things I've never loved, never been able to find a way to actually make it useful or attractive, and can't help but dream of just launching it out a window.  Structurally, I think it just completely lacks any sort of style.  Aesthetically, the only thing really going for it are its clean lines.  Functionally, all it's able to provide is a surface upon which some item could sit (assuming it doesn't need any support) and hope to not fall victim to roaming Catzillas (as did a souvenir Bluemont Vineyard wine glass meet its end, may it rest in pieces).

The offender, who has been discontinued.
Apparently, I'm not the only one who hates the thing.
Baker's Rack followed us to Grafton, its cumbersome metal frame and heavy glass shelves once again sneaking into our home and taking residence in our dining room.  Not being able to find a perfect place for it to loom, it now sits up against the stairs, partially obstructing the view between the living room and kitchen.  Somehow, it knows we need it, though, as our greatly reduced cabinet space has left my collection of small kitchen appliances homeless and wandering, the pet treats scattered, and some other random things just lying about... randomly?

Maybe it was the week long break we had over the holidays that renewed my spirit.  Maybe my heart grew three sizes.  Whatever it was, last weekend, I finally found the strength to look past the horror of the Baker's Rack and try to work with it instead of against it.

First step: pet treats.  As the proud parents of three loved (and well-fed) petsons, treats are plentiful at our house and previously took residence in a clunky basket that was too big for the shelf and further obstructed the view.  My solution?  Unload all the treats into a bunch of cute glass jars, allowing easier access to the treats (you know pets can't get their treats fast enough) and the transparency keeps things open.  I added a nice black and white photo of Elliot John gave me for Valentine's Day a couple years back to bring in an artsy touch (he's so glamorous), and finished it all off with a golden prosperity fish John's mom gave us for Christmas for a bit of flare.  Who knew pet treats could look so nice?


Second step: gettin' spicy!  After cleaning up and moving some things that definitely didn't belong, I was left with one pathetic little mortar and pestle.  John's mom also gave us a small stainless steel spice/salt tray for Christmas, so I thought that would be a perfect companion.  I created some homemade "art" by cutting out the logo on a bag from The Spice and Tea Exchange, a great new boutique shop in Old Town, and reusing an old frame from our now-defunct gnome art.  Inspired by the red in the logo, I used a bright red box to give height to the tray and pulled out some reddish spices to bring in even more color.


Next step: baking appliances.  Although my stand mixer and food processor don't get as much use as I'd like them to, they still need a home and one that's relatively accessible since they both weigh about 1,000 pounds.  Plus, they look so nice, who would want to hide them?  Two appliances looked too bare, so I quickly flipped through a Stonewall Kitchen catalog and found the perfect addition... an image of some yummy looking whoopie pies accompanied by the inspirational message "Peace, Love & Baking".  What more could a person want out of life?  One more frame was reused and I got another piece of free art!


The next two shelves still need some TLC, but I'm proud of my progress and happy to report the Baker's Rack is no longer in danger of being pitched out the window.  Sure, I'd still get rid of it in a heartbeat, but for now, we need the storage and it will do.  I think it's a good step toward organization, decorating, and improved mental health.  Win!

Monday, November 15, 2010

Busy weekend!

It's funny/disgusting how fast the weekends go by.  It seems like it just began, but here we are and it's already a new week. We had a very busy, but productive weekend at Casa Bedtelyon, and my only regret is there wasn't more time for naps.  :)

The weather was amazing, filled with clear, sunny skies and temperatures around 65.  Just that perfect fall weather that seduced us into taking a short break early Saturday afternoon to run to one of our favorite places - Old Town Alexandria.  We made a quick stop at the Book Bank, a terrific used bookstore where we always seem to find something to buy (like the very handy "How to Be Pope"), before making a slightly longer stop at Random Harvest.  They carry an incredible mix of one-of-a-kind antiques and gorgeous new pieces, with everything expertly grouped and wanting to come home with me.  Although we can't afford anything in there, I love to browse the showroom and dream of one day owning such classy furniture and home decor.  I think I fell in love with just about every lamp in there.  I didn't know it was possible to actually love lamp.  After that, we walked over to Restoration Hardware to pick up a set of knobs to replace the unfortunate ones that adorned our master bathroom vanity.  While we liked the overall look and feel of the existing knobs, my OCD would not allow their brushed finish in an otherwise polished nickel environment.  Lucky for us, they were holding a "Friends and Family" sale, so we were able to pick up the knobs and an extra hook all for 20% off.  Check out the transformation...

Our knob of choice... RH's Gilmore knob

Before: Brushed knobs.  Boo!

After: Polished knobs.  Yay!

Back at the home front, we assembled two of our dining chairs (which wasn't nearly as difficult as I was imagining), installed new toilet seats on all of our toilets (whisper-close is the way to go), and John did a bit of leaf blowing.

Sunday morning began with chocolate chip pancakes, which I must say, is a great way to start a day full of housework (yay chocolate/syrup buzz).  John did more leaf blowing/mulching, and as you can see here, thoroughly enjoys it.  Our yard consists almost entirely of deciduous trees, so luckily for John, there will be plenty of leaf-blowing in his future.

Blow, baby, blow!
While John played in the yard, I took on a new project - spray painting.  In reading all sorts of DIY blogs, I've discovered you can spray painting just about everything under the sun to give new life to old items or help give something a new purpose.  In our case, we purchased a small TV stand for our upstairs living room that needed some feet to lift it up a bit.  We picked up some feet at IKEA, but the only color option is plasticy gray and we needed something black.  Here are the results of my first attempt at spray painting...

Little plasticy feet before...
Little black foot after!
While the feet dried, we decided it would be a perfect time for a Home Depot run.  What Sunday afternoon would be complete without one...or several?  On our way out, we were surveying our pathetic landscaping at the front door and concluded the flower beds are in need of some stone edgers, so a trip to Campbell and Ferrara was added to the itinerary.  We have frequented this local nursery/landscape design center since we moved to the Alexandria/Annandale area and would spend many an afternoon strolling throughout their grounds dreaming of one day having a yard to landscape, but never thought we would be able to afford any sort of property in the area, so it's certainly a dream come true to finally have some land.  With winter just around the corner, now isn't the time to be filling our land with plants, but Campbell and Ferrara was having a great 60% off sale on their outdoor pots, so we picked up a few for next spring.

Pot party!

After returning with our sweet finds, we happened to run into our across the street neighbor and John was able to borrow his ladder to clean out our gutters... which desperately needed some TLC.  Eventually we'll get some gutter guards, but for now, John will have to take care of it.  And look how thrilled he looks to be doing so.


By the time John was done on the roof, my spray painted feet were dry and ready to be installed.  We chose IKEA's Mosjö tv stand to complete our entertainment center and the $40 price tag couldn't be beat.  Assembling the unit was a snap, the feet screwed in perfectly, and just as we were scooting it into place, we realized it was just a couple inches too big.  A real long story and a Dremel Multi-Max later, the unit fit perfectly into place and we were ready to call it quits for the weekend.

Before: mismatching and gross!  Note Elliot being helpful as always, overseeing from his cat tree...

After: so nice!  Check out those cute feet!  Now we just need to do some clever book/odds and ends arrangements.