Monday, August 22, 2011

Return to the Slanty Bathroom

Way back in January and as one of our very first Grafton projects, John and I painted our upstairs guest bathroom.  When we moved in, it was a horrible mint color and we thought we'd tone it down with a creamy chocolate brown on the walls and a soft blue-green on the ceiling.  At first, we were thrilled with the results, but looking back, I think we were just happy to have the mint gone and would have been happy with any other color.  A few months down the road with our new color scheme, we were sad to discover it made the room feel small and dark.  So, until we can figure out how to bust out walls and install windows... it was back to the drawing board/paint chip aisle.

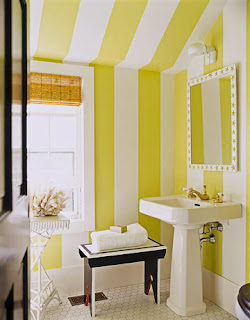
Inspired by this bathroom, found on House Beautiful's website in the slideshow "Beautiful Designer Bathrooms", I convinced John to let me try out stripes.  Since it's such a small, plain room, I hoped some bright stripes might help jazz it up and provide some height to the room.  As an aside, aren't those little hexagonal tiles adorable?  Again, I am a little saddened on how modern they went with our home remodel.  Maybe one day we can help bring it back to its roots.


I'm not quite as brave as the designer of this bathroom, so to soften up the stripes, I decided to go with a warm yellow and creamy white, so we have the contrast, but it's not too in-your-face.  I browsed around on Benjamin Moore's website for a bit and sent John out to collect some paint chips before finally deciding on Sundance for the yellow and Creme Brulee for the creamy white (on the same paint chip, just two colors apart).  We headed over to Home Depot with our chips in hand (yes, we're still cheapos who steal Benjamin Moore's amazing selection of chips and get them color matched to cheaper Behr paint) and got our paint.  Thanks to the mistake of a carleless Orange Vest, we ended up getting a gallon each for the price of a quart, so yay for extra free paint!

Our first step to actually implementing our redesign was to paint over everything (well, just the walls) with the Sundance.  Even with our "paint and primer in one", this took maybe three or four coats and forever.  Literally, it was so frustrating and then we got side tracked by several other things, just getting the yellow up took me almost two months.  Shame on me.  After that, it was time for the Creme Brulee stripes which was even more horrible.  OK, it probably wouldn't have been that bad if our room wasn't teeny and our weeks-long heatwave didn't turn the bathroom into an oven.  So, don't be scared of stripes.  Be scared of being trapped in a teeny oven (or I suppose any size oven). 

To do our stripes, I first measured the length of the wall and tried to come up with a stripe width that would give me an even number of stripes that weren't too wide or too skinny.  The wall is 70 inches long, so 5 inches would give me 14 nicely sized stripes.  I went along measuring every 5 inches and putting down a small square of Frog Tape to mark it off.  The trickiest part was to remember what would be painted white and what was left yellow.  The white bits had to have 5 inches of exposed wall while the yellow bits were partially covered by tape.  Then I had to actually tape off the stripes.  I did this using our suction cup laser level, by crouching on the floor, beaming up the laser to match up with my tape squares, and then making sure it was level for straight stripes... in the dark so I could see the beam line. 

Laser level in action!
Good times, crouching in the dark in the oven bathroom... I then carefully applied the tape in a single strip, placing the edge along the laser beam.  John was merciful enough to help me with the ceiling stripes, with his amazing height and monkey-like long and strong arms.


With the tape finally up after months and months, it was time to paint the stripes.  Since some of the tape stripes had been on for a while, I made sure to run my thumb over the edges to make sure they were still stuck on well.  Frog Tape says it'll stick for up to 21 days, but it seemed to do well for us for over a month.  I didn't have a small roller, so I painted all my stripes with my Purdy Cub paintbrush.  Definitely tedious, but I think it gives me the most control.  After crouching around the toilet, crawling around on the floor, going up and down my step ladder, and doing a few ninja moves on the vanity (while being cooked by our two sun-like light fixtures... on the brighside, I think my face got a little tan...), the paint was up and John took down the tape and we were done.  Sidenote: taking down the tape ASAP is a good practice to avoid the paint drying and peeling off as well as providing some inspiration to keep going.

Our stripes are done and I love them so much, even though the process was painful.  They're like my little stripe children.  Here's our almost-complete bathroom.  I'm pretty sure we have the worst house ever for photographs, with our tiny rooms and poor lighting.  These photos don't really do the colors justice and that makes me sad.


So, next steps?  Definitely need to do some decorating in there.  I'm thinking of some watercolor bird prints by dimdi on Etsy.  Maybe like this robin, the state bird of Michigan and frequent backyard visitor of ours.  Simple and whimsical, right?  Plus, we could brag about our imported Italian art.  Molto di fantasia!


I'm also working on a handmade (by me and my sad sewing skillz) shower curtain, using this tutorial I found on Design*Sponge, but with just two fabrics with a solid band at the top and bottom, surrounding a subtle floral fabric in the middle.


We'll see.  At my current rate of project completion, I just might do all this by December!  erf.
Tuesday, August 16, 2011

Wine Cork Art!

Hi, my name is Amanda and I have a drinking problem.  OK, I like to think of it more as a "solution" to life's miseries... and of course all the celebrations like, "Hooray, it's Wednesday!" or "A Panda Express is opening in a more convenient location for us!".  We've amassed quite a collection of corks (which wasn't as massive as I was expecting, so maybe I'm not too much of a lush...) over the years and have been using my Mom's method of "store them away until one day I find the inspiration/motivation to do something with the darn things".  Back at Overlook, we threw them in a glass jar which was easy and looked OK, but hadn't really found a place for them at the Grafton (although, some do end up in a little cut crystal dish we hide in the weird square in our kitchen cabinets... or just roaming wildly in the same weird square... seriously, what did they possibly think we'd put in there??).

Ick.  It looks worse in photos.  I especially love the exposed, unfinished cabinet bottom... bleh.
Anyways, the other day, I was looking around on Pinterest (as I mentioned in my last post) for ideas on what to do with my corks.  I saw cork initials, which looked cute, but I'm not big on initial/monogram things.  Of course, trivets or making things that look like trivets and sticking them on a wall.  Loose corks in a jar (done that).  Finally, I thought, I'll incorporate the randomness of corks in a jar/vase/whatever with framed corks and throw a bunch in a shadow box.  Luckily for me, Michael's had their frames on sale for 40% off (when are they not on sale?  who do they think they are?  Kohl's?) and I found an additional 25% your entire purchase coupon on their website.  So, I picked up the cheapest shadow box I could find and a pretty sheet of scrapbook paper to use as a mat/accent for a grand total of $8.16 (not counting the numerous bottles of wine it took to harvest the corks)... I got this guy:


Which we then hung in the basement to bring our "art" grand total down there up to a whopping... two pieces.  I have dreams of that entire wall being covered in wine-themed things, but at the rate I'm moving at now, I might have five pieces up before we move out.  Oh well.  It's a bit of progress.  I don't know if I'm 100% happy with it, but if I decide to display the corks differently, all I have to do is pop open the back and dump them all out.  For now, it works.

Just ignore everything on the top of the buffet... including our decanter/cable holder and giant sponge...

Spray Painting More Stuff!

This past weekend I had high hopes of moving on to Phase Two of our built-in project (finally cutting the boards), but Mother Nature had other plans for us, which included storms both days.  Not wanting to end up with a bunch of soggy boards or be electrocuted, we were forced to move onto other projects.  Sure, I could have worked on some existing projects, like finishing up the slanty bathroom re-do, sewing the shower curtain for the same slanty bathroom, or heck, even clean something, but none of that sounded any fun.  I'm not entirely sure how I defined "fun" in hindsight of my adventures...

Somehow I ended up with a bunch of things I did not like in their current state and thought spray painting them would be an easy fix.  First up: IKEA lantern.  We bought the lantern months ago and stuck it on top of our too-small-for-the-wall entry way shelf thing.  Unfortunately, it became another black-on-black situation and just seemed to disappear on the shelf.  So, I thought, how could I make it pop?  Paint it red!  Poor Buddha is our only bit of red and I thought it would help him feel at home among our blue and yellow accents.  Blue, yellow, and red?  Maybe it's all too primary colors, but I like it think of it more as... modern cottage awesomeness.  So, out to the yard it went and after a couple coats of red spray paint, the lantern is now, well, red and much more visible.  I forgot "before" pictures, but I'm sure you can imagine it as black.


Next up: (now this is an exciting one) plant saucer!  I bought an awesome pot months(?) ago at Campbell & Ferrara's for my amazingly still alive violet, but they didn't have any matching saucers.  Dumb.... which reminds me of this commercial...


We bought a plain terra cotta saucer with the intention of painting it to match and like everything else, it sat untouched for months.  After a few shots of spray paint, I now have a sort of matching tray for my pot.  Although the can promises a reflective, metallic finish, I did not find this to be so.  It is metallic-ish, but not reflective and shiny like the pot.  Oh well.  It's close enough and not terra cotta anymore.


Next victim: picture frame!  I think the only room in our house that hasn't been featured in any projects is our guest bedroom which is too bad because it's probably the nicest room in our house.  We only ever go in there to retrieve extra toilet paper, paper towels, etc. from the closet (since our house has no linen closets... darn you house from 1948!), so I guess it's not on our minds much.  I have been thinking about it lately, though, and have decided I'll try for a apple green and navy blue color scheme and stick with our weird collection of illustrations from old books.  We have our apple green comforter, so to bring in the first touch of navy blue, I decided to spray paint a frame we have holding our awesome bison print.  I also added a "mat" consisting of some fun scrapbooking paper that I just cut down to size and stuck the print on top of.


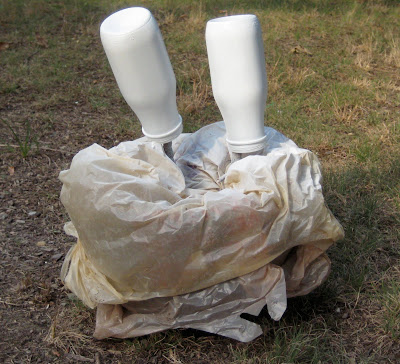
Final project: Frappuccino bottles!  I was scrolling through Pinterest (another site designed specifically to distract me from doing anything productive) the other day and saw some cute little white bottles/vases and I thought to myself, those look like Frappuccino bottles (as I actually had a Frappuccino bottle in hand).  I washed out two bottles, removed the labels (which took a bit of Goo Gone-ing), washed off the Goo Gone, and headed out to the yard with some matte white spray paint.  I thought, how do I spray paint these bottles easily?  Solution: shove sticks in the dirt, place bottles on top, spray.  However, our "dirt" should just be called "concrete" and I could not penetrate the "dirt" at all.  John suggested using an empty flower pot (the final home of our poor bleeding heart before it met its maker), so I put two plastic shopping bags over the pot to prevent that from becoming white, stuck my sticks through the bags and into the dirt, and placed the bottles on the sticks.  That worked wonderfully and now I have two little vases that look more like ceramic than glass because of the matte finish!  Lovely!

Before!
Nakey!
Gettin' sprayed!
On a shelf!  Looks kind of pathetic...
PS, don't the spray painted bottles kind of sort of look like these vases from West Elm?  The little jug sells for $19!  All four bottles only cost me about $5 and I got to enjoy some delicious coffee treats!


In the end, I now have a "new" lantern, picture frame, and two vases thanks to the miracle of spray paint.  Oh, and enough mosquito bites to make me look like I have some sort of pox.  I think Virginia mosquitoes must be craftier than Michigan mosquitoes because I was completely eaten up before I even realized I was being feasted upon.  Maybe that's why I felt lightheaded and not because of the paint fumes...

Or maybe it's because I feasted my eyes upon these handsome boys...


Apologies for grainy pet photos.  The threat of a flash makes Dexter go:

Wednesday, August 10, 2011

6 Months = 4 Pillows

Sweet cheesus, I just might be the laziest, most procrastinating person in the world.  Way, way back in February I was trolling Design*Sponge and came across this tutorial on zippered throw pillows (the same tutorial I used to make the petbed/end table pillow).  It seemed easy enough and I thought it would be a perfect project to get cracking on my sewing and jazz up our lackluster throw pillows that came included with our sectional.  While they are softish and perfect for naps, they practically disappear on the couch and don't add much visual interest.  On top of that, Chewie has recently taken it upon himself to chew little holes in the corners of the pillows, so I guess he didn't like them much, either.


I convinced dragged John to Jo-Ann's and found some fun cotton fabrics to accent our orange walls, along with matching zippers and thread.  Back at home... it took me almost six months to finish the darn things.  I honestly don't remember when I actually started, but through some email investigation, it was mid-February when I asked John if he'd take me out to Jo-Ann's to hunt for fabric.  I started with the plain green-blue fabric and it was just a nightmare.  I can't cut a straight line to save my life and pretty much botched my first squares, but somehow managed to get them in a square shape.  Then I didn't understand the instructions on installing the zippers and did a whole bunch of the exact opposite things as I should have done.  Let's just say there was a bunch of seam ripping going on.  It was pretty dismal and distressing and an easy project to set aside until I had grown some courage.  In the meantime, we came up with a bunch of other things and my poor empty sacks sat alone along with the untouched floral fabric.
The two fabrics.  I forgot any "before" or "during" photos.  Also notice lifelike cat head pillow.
This also happened...

The innards of one of pillow forms.  It didn't deserve this.  :'(
My craziness drives John crazy and he instituted a "no new projects until Amanda finishes old projects" rule... which we sorta almost follow.  I realized I need to stay focused, too, or our house will be littered with empty pillow sacks and half-finished painting projects and sadness.  Like it is now, but I'm working on it!  So, a couple weekends ago I finally sat down and took care of these darn things.  You might remember I had a nice thing going upstairs in my Mom Den, but with our wicked heat wave, it's about 1,000 degrees on our second floor and I was afraid of being found all dessicated like the creepy dried up apple man my Grandma had in front of my sewing machine, pillow cases still unfinished... so I gathered up my stuff and moved down into the basement where I could sew and watch Candice Olson (the only downside being it gave Elliot more angles to jump up on the table and lay on my fabric, or dig on my fabric, or sit under the table and paw at my fabric...).

My current situation, complete with pet butts.
I read and re-read the instructions and stared at my fabric and examined my zippers and thought back to all my mistakes and moved forward.  Luckily, it went so much better the second time around.  I still struggled to cut square squares, even though I was using my new cutting board, my fancy rotary cutter, a level (for a straight edge), and! an actual square!  I don't know what my problem is.  By some miracle, I didn't mess them up too badly and I'd have to say, they came out pretty OK.

A pillow, six months in the making! 
A zipper!  Check out my mediocre skills!
So, that's that.  In six months, I finished four pillows.  Maybe five, if you count the pet bed hexapillow.  In the meantime, I've managed to amass fabric with the intentions of making a shower curtain for our upstairs slanty bathroom, a window covering for John's office, and more pillows for our main floor living room!  I guess I didn't do to well sticking to my "no new projects" rule, but my setbacks and struggles with these wretched pillows didn't seem to dampen my enthusiasm, either...

Thursday, August 4, 2011

Project Built-Ins: Planning

Our house is small in general and our upstairs living room got only a tiny slice of our humble home pie.  With our current situation, we have two large, brown-black bookcases surrounding a small brown-black TV stand, upon which sits a black rectangle of a TV.  Back in Overlook where ceilings were high, windows and sunlight were aplenty, the black seemed to balance all the light, but now it just seems to weigh down our little room.  We've been dreaming of a wall of built-ins practically since we moved in, but with very little experience, know-how, or just plain guts, we put it off and kept it only in our dreams.  I don't know if the summer heat has made us crazy, but a couple weekends ago, we finally decided to take the plunge and get cracking.

This is an older photo (we've since painted and added a bunch more stuff to our shelves, but I feel too lazy to take a new photo at this time. :)
The first step in our planning process was to find some inspiration to work off of.  Maybe there's an awesome place where you can find plans for things like this, but I don't know where that is.  Instead, I stumbled upon this photo, featured in one of Apartment Therapy's House Tours:


I was instantly drawn to how open, airy, and modern his shelves look.  It doesn't seem huge and imposing, but more of a subtle focal point... if that makes sense.  With its simple, yet elegant design, I thought it would serve as our perfect inspiration piece.  Unfortunately, the next step wasn't as fun because it required some math and spatial skills, both of which I sadly lack, but here's how it went down...

1)  We measured the dimensions of our wall.  Easy.  Except our stupid, slanty house isn't square anywhere, so the left side of our wall is actually 0.5" shorter than the right side.  grr.  We just decided to go with that height and hope no one notices.

Super techical drawing.
2)  Since our built-ins will house a TV, we used that as our starting point.  We currently have a 32", but plan on upgrading to a 42", so we had to account for that (I hopped on Best Buy and checked out the stats on a few 42" TVs and took the average of those).  Also Googling around, Sony recommends leaving 4" of ventilation space around a TV, so we added that into our measurements.  We also need a space for the cable box, so I just measured the current cubby we use because that seems to be working out fine.

*side note* As I mentioned, I'm spatially-challenged, so my saving grace here was graph paper.  I counted out my squares and figured out we could fit a scale of one square = 4" and went with that.  It was much easier for me to see the proportions and how it'll all look in the end.  Plus, who doesn't love a trip to Staples?  I heart office supplies in a weird way.

*side note 2* One thing I had to keep in mind is the shelves take up space.  We are going to use 3/4" wood, so with each line I drew for a shelf, I had to note that was 3/4" of space used.  A small detail, but something I could easily understand forgetting.

3)  Now we had to decide on the heights of the shelves.  I liked the look of having larger books on the bottom shelf and then tapering off as we move up, so we measured some of our larger books and the shelves they currently sit on.  I added that on, plus 4" of feet at the bottom (we picked 4" of feet because our current stand sits up about 4" and we liked how the inspiration built-ins sit up on feet and not a solid base).  With our layers of feet, bottom large shelf, cable box cubby, space for TV, and additional space for the shelves themselves, it was time to add all that up and subtract it from our remaining height to see what else we could fit in. 
4)  Once all the horizontal shelves were drawn in, it was time to decide how to place the vertical supports.  One of my favorite aspects of the inspiration photo are the open ends.  Right now, our bookcase has solid ends, so as you enter the living room from the dining room, you're confronted with a wall of black.  I love how the open ends are more... open and provide a small space for little knick-knacks.  To still provide stability, we decided to alternate starting with 8" in, then 3" in, except for the bottom shelf, which we only did 2" in since it's the bottom shelf where all the weight will press down on.  For the remainder of the vertical supports, I just randomly stuck them in where I thought they'd look best.

After many hours of calculating, measuring, drawing, erasing, and pondering, we finally had our sketch.  Before skipping off to Home Depot, we sat down and made a cut list to (1) make it easier for us when it came time to actually make all the cuts and (2) know exactly how much wood we would need.  Then it was time to actually make our trip out for supplies.

In speaking with a very helpful employee (usually very rare at our store) and going back and forth to stare at our various options, we settled on birch plywood because it was cheap, strong, and will be covered by a few coats of primer and paint, so who cares what it looks like?  The edges are a little rough, so he recommended some stripping we can add simply by ironing it on.  Hopefully that'll be as easy as it sounds.  Along with that, we picked up more pocket screws, pocket hole plugs, wood glue, primer, and straight-off-the-shelf ultra white paint.  We also had them cut down our boards a bit to reduce the amount of cuts we'll have to make and, well, they just wouldn't fit in John's SUV otherwise.

Iron-on veneer tape stuff!
Back at home, we dragged out the saw and sawhorses, put on our safety glasses and bug spray, and... realized John's Ryobi table saw's rip guard only goes up to 12"... meaning we couldn't make our larger cuts (like 18").  So... we put away the saw and sawhorses, took off our safety glasses, lugged everything inside, and washed off our sweat, tears, and bug spray in defeat.  What to do now?  Well, we contemplated trying to borrow a saw, if we could find someone who has one around here, or possibly renting one for a day.  John had another thought that he might be able to use the workshop at our local Woodcraft and stopped by one afternoon to check out that possibility.  In speaking with the more experience gentlemen, one suggested using a long, straight board to make a jig/guide to use in conjunction with a circular saw.  That seems to be our best option and we really don't have too many larger cuts to make.

So, we have a plan and all our materials and then this ridiculous heat wave came rolling in and now it's impossible to be outside for too long before feeling like you just might pass out.  Until the temperatures drop to a bearable level, we're stuck with plywood in our kitchen, but at least we've made a small bit of progress.

Tuesday, July 26, 2011

Laundry "Room" Update: Part 1

I absolutely hate doing laundry and put off doing it for slightly disturbing lengths of time.  For some reason, though, I dream of one day having a huge laundry room, full of windows letting in tons of natural light, countertops galore, and a small flat screen TV that I can watch my stories on.  Apparently I'm also 80 in my dream... However, our current situation is the complete opposite.  Our laundry "room" is a small space in the basement tucked away to the left of the stairs.  There is just enough room along the wall for the washer, dryer, and a utility sink, and just enough depth for the doors to swing open and moderate maneuverability.  I suppose if you're a realtor, you could call it "cozy" and it certainly doesn't waste any square footage.

When we moved in, it was a complete blank slate with just the utility sink and hook-ups.  The day after we moved in, we had our laundry machines delivered, as I mentioned in this post way back in November.  The space has looked the same ever since except we've painted the walls Flaming Torch and the tops of the machines are now covered in detergent bottles and dryer sheets.  Classy.  Back then, we dreamed of one day adding some shelves or cabinets, as well as a countertop.  Well, some of that dream has finally come true.
Our laundry nook, circa November 2010
Our laundry nook as of yesterday... what an improvement...
In yet another fit of us putting off our other 3,000 projects, we decided last Sunday was the perfect time to drive down to IKEA and check out their cabinet selection.  After wandering around the showrooms for a while, we finally happened upon a style we liked and headed over to the customer service station to price out a couple wall cabinets.  Happily, it was about half of what we had priced out online.  I don't know what it is about IKEA's website, but I can't figure out the cabinets for the life of me.  

We decided to go with two AKURUM cabinets with Ståt doors.  I thought the doors had a cute modern cottage look to them and once we got them home, we realized the lines in the doors nicely play off of our board and batten wall treatment.  Yay for happy accidents.  So, installation was fairly simple.  On Sunday night, we sat right down and put together the cabinets which was standard IKEA assembly.  Then we needed a hack saw to trim down the metal bracket/rail/attacher thing that attaches the cabinet to the wall, which we didn't have, so that was that for the night.

The cabinet frames.
We took the day off on Monday night to enjoy the skirt steak special at Overwood in Old Town (who could resist?), but tonight, we were back on track.  John tried sawing through the metal bracket with the saw, which made a horrible metal-on-metal noise and really didn't work at all at first.  He then tried clamping it down and switched out the blade for one with more oomph and this time, he managed to cut right through.

I told John to look victorious and this is what he came up with...
He screwed that into the wall while I stood on the other side of the wall in the cat room and made sure the screws didn't miss the studs, penetrate some electrical wiring, and shock him dead.  Once that was up, we got the cabinets up without too much problem, except when one nut was dropped and of course fell right in between our machines.


After that, we just had to pop in the hardware to attach the doors and then stick the doors onto the cabinets.  We also sprung for the additional $5 door dampers so they close smoothly and without any slamming.  Kind of like my beloved "whisper close" toilet seats.  Then it was time to install the shelves.  We bought two packs of shelves with two shelves each, but decided we only really need one shelf per cabinet at this time.  It's a little sad how excited we were that our jumbo HE Tide slides in perfectly into the cabinet.


* I apologize for the weird, dark, grainy photos.  Our basement has horrible lighting.  :(
We also bought some shiny little knobs for the cabinets, but that requires us to drill through the doors to install them, which we didn't really feel like tackling tonight.  Besides, I think it looks pretty OK without knobs, so who knows?  Maybe we'll just go knob-free.  

So, that's that.  We finally got our laundry storage tackled and ended up with way more space than we even really need at this time.  Like I mentioned, we'd still like to add a counter top for a convenient folding area and are contemplating replacing the utility sink with something more visually appealing and maybe adding a garbage disposal so we can rinse out the cats' nasty wet food dishes.  There won't be any floods of sunlight or mini TVs in my future, but who wants to spend that much time doing laundry anyways?

Monday, July 18, 2011

More End Table Madness!

Just when you thought the topic of end tables couldn't get any more exciting!  Late last night, I provided an update on our new end tables we scored from Craigslist.  Well, our weekend has just been chock full o' end table delight.  Remember way back in the beginning of March, I painted and decoupaged an old end table my parents were so kind to give us?  Then I sewed a little hexagon-shaped cushion to fit inside of it with the hopes one day a pet would venture in and use it as a little bed?  Well, I am elated to report that day has finally come... four months later.

John and I were sitting in our living room on Saturday discussing our (spoiler alert!) living room built-in project, when out of nowhere, Elliot came strolling by, poked his head into the table/hopeful pet bed, and promptly ventured in, did a spin, and laid right down!  To add to this Saturday miracle, he actually stayed there long enough for John to grab the camera and snap some evidence for us to share.  Here is my glorious catson chilling in the bed and filling his mommy's heart with joy and pride.


And just for fun, here he is earlier that day sleeping in the cat tree with his poor (and extremely tolerant) brother, Kiefer.  Aren't they the cutest things?


If we ever have human kids, we'll totally be the creepy parents taking hundreds of photos of our children sleeping.  :)