Our house is small in general and our upstairs living room got only a tiny slice of our humble home pie. With our current situation, we have two large, brown-black bookcases surrounding a small brown-black TV stand, upon which sits a black rectangle of a TV. Back in Overlook where ceilings were high, windows and sunlight were aplenty, the black seemed to balance all the light, but now it just seems to weigh down our little room. We've been dreaming of a wall of built-ins practically since we moved in, but with very little experience, know-how, or just plain guts, we put it off and kept it only in our dreams. I don't know if the summer heat has made us crazy, but a couple weekends ago, we finally decided to take the plunge and get cracking.
 |
| This is an older photo (we've since painted and added a bunch more stuff to our shelves, but I feel too lazy to take a new photo at this time. :) |
The first step in our planning process was to find some inspiration to work off of. Maybe there's an awesome place where you can find plans for things like this, but I don't know where that is. Instead, I stumbled upon this photo, featured in one of
Apartment Therapy's House Tours:
I was instantly drawn to how open, airy, and modern his shelves look. It doesn't seem huge and imposing, but more of a subtle focal point... if that makes sense. With its simple, yet elegant design, I thought it would serve as our perfect inspiration piece. Unfortunately, the next step wasn't as fun because it required some math and spatial skills, both of which I sadly lack, but here's how it went down...
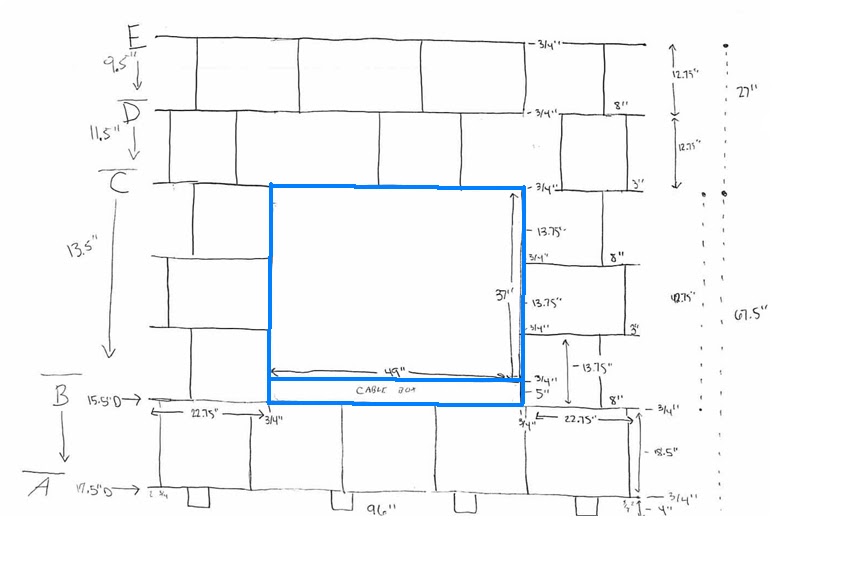
1) We measured the dimensions of our wall. Easy. Except our stupid, slanty house isn't square anywhere, so the left side of our wall is actually 0.5" shorter than the right side. grr. We just decided to go with that height and hope no one notices.
 |
| Super techical drawing. |
2) Since our built-ins will house a TV, we used that as our starting point. We currently have a 32", but plan on upgrading to a 42", so we had to account for that (I hopped on Best Buy and checked out the stats on a few 42" TVs and took the average of those). Also Googling around, Sony recommends leaving 4" of ventilation space around a TV, so we added that into our measurements. We also need a space for the cable box, so I just measured the current cubby we use because that seems to be working out fine.
*side note* As I mentioned, I'm spatially-challenged, so my saving grace here was graph paper. I counted out my squares and figured out we could fit a scale of one square = 4" and went with that. It was much easier for me to see the proportions and how it'll all look in the end. Plus, who doesn't love a trip to Staples? I heart office supplies in a weird way.
*side note 2* One thing I had to keep in mind is the shelves take up space. We are going to use 3/4" wood, so with each line I drew for a shelf, I had to note that was 3/4" of space used. A small detail, but something I could easily understand forgetting.
3) Now we had to decide on the heights of the shelves. I liked the look of having larger books on the bottom shelf and then tapering off as we move up, so we measured some of our larger books and the shelves they currently sit on. I added that on, plus 4" of feet at the bottom (we picked 4" of feet because our current stand sits up about 4" and we liked how the inspiration built-ins sit up on feet and not a solid base). With our layers of feet, bottom large shelf, cable box cubby, space for TV, and additional space for the shelves themselves, it was time to add all that up and subtract it from our remaining height to see what else we could fit in.

4) Once all the horizontal shelves were drawn in, it was time to decide how to place the vertical supports. One of my favorite aspects of the inspiration photo are the open ends. Right now, our bookcase has solid ends, so as you enter the living room from the dining room, you're confronted with a wall of black. I love how the open ends are more... open and provide a small space for little knick-knacks. To still provide stability, we decided to alternate starting with 8" in, then 3" in, except for the bottom shelf, which we only did 2" in since it's the bottom shelf where all the weight will press down on. For the remainder of the vertical supports, I just randomly stuck them in where I thought they'd look best.

After many hours of calculating, measuring, drawing, erasing, and pondering, we finally had our sketch. Before skipping off to Home Depot, we sat down and made a cut list to (1) make it easier for us when it came time to actually make all the cuts and (2) know exactly how much wood we would need. Then it was time to actually make our trip out for supplies.
In speaking with a very helpful employee (usually very rare at our store) and going back and forth to stare at our various options, we settled on birch plywood because it was cheap, strong, and will be covered by a few coats of primer and paint, so who cares what it looks like? The edges are a little rough, so he recommended some stripping we can add simply by ironing it on. Hopefully that'll be as easy as it sounds. Along with that, we picked up more pocket screws, pocket hole plugs, wood glue, primer, and straight-off-the-shelf ultra white paint. We also had them cut down our boards a bit to reduce the amount of cuts we'll have to make and, well, they just wouldn't fit in John's SUV otherwise.
 |
| Iron-on veneer tape stuff! |
Back at home, we dragged out the saw and sawhorses, put on our safety glasses and bug spray, and... realized John's Ryobi table saw's rip guard only goes up to 12"... meaning we couldn't make our larger cuts (like 18"). So... we put away the saw and sawhorses, took off our safety glasses, lugged everything inside, and washed off our sweat, tears, and bug spray in defeat. What to do now? Well, we contemplated trying to borrow a saw, if we could find someone who has one around here, or possibly renting one for a day. John had another thought that he might be able to use the workshop at our local
Woodcraft and stopped by one afternoon to check out that possibility. In speaking with the more experience gentlemen, one suggested using a long, straight board to make a jig/guide to use in conjunction with a circular saw. That seems to be our best option and we really don't have too many larger cuts to make.
So, we have a plan and all our materials and then this ridiculous heat wave came rolling in and now it's impossible to be outside for too long before feeling like you just might pass out. Until the temperatures drop to a bearable level, we're stuck with plywood in our kitchen, but at least we've made a small bit of progress.


No comments:
Post a Comment