Sunday, July 17, 2011

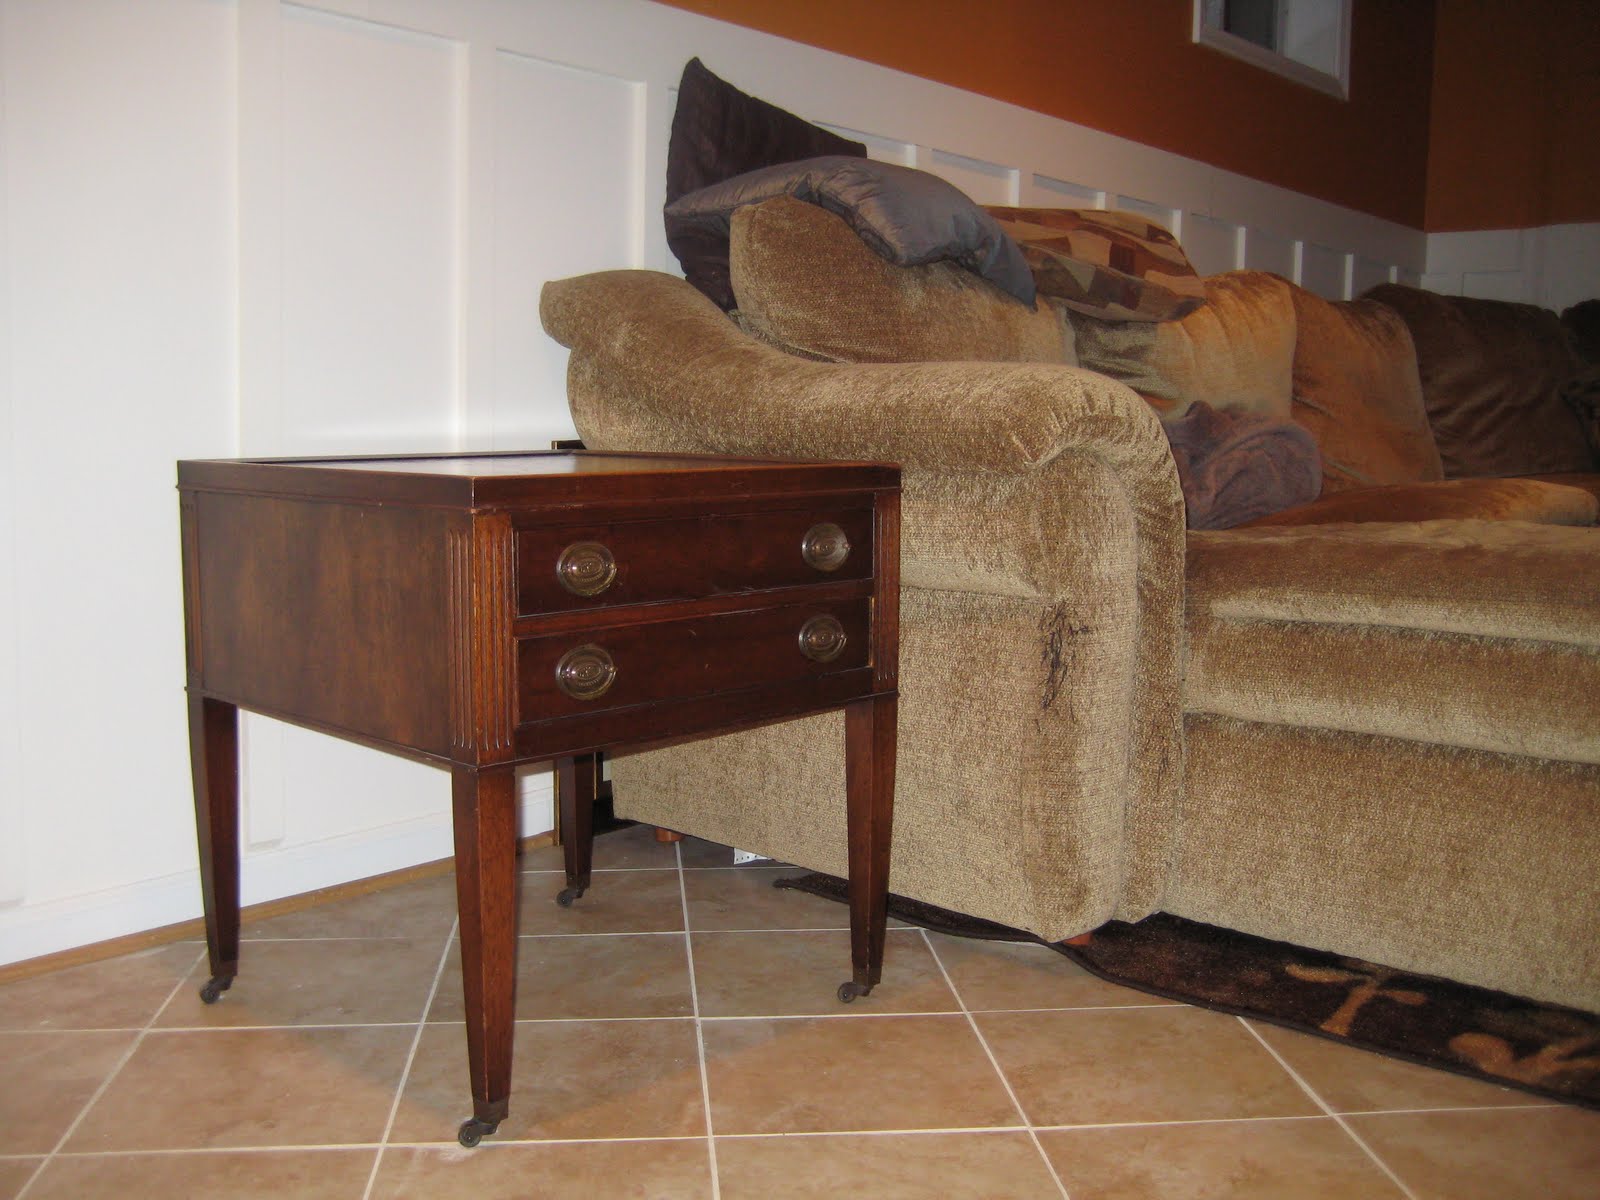
New End Tables!

I'm not busy enough at work, which I'm sure many people dream of, but really, it gets old and I'm starting to get scared that I may develop early onset Alzheimer's from my lack of stimulation or thoughts that require my hemispheres to work together.  As another side effect, I've become one of those people you see in the Bing commercials who just start rattling off random, unrelated words and facts from my long hours/days of perusing the internet.


One of my favorite pastimes is scouring the furniture listings on Craigslist in the hopes of finding something I didn't know I needed.  Most often, people are selling their nasty old junk at insane prices, but every once in a while, you can score a sweet deal.  In the past, we've picked up our awesome pie safe and a vintage record cabinet that we use as a side table in our office.  Last Tuesday, I stumbled upon a listing for some vintage looking end tables that I thought would fit perfectly with our sectional in the basement since our Lack side tables recently met their demise (we took them outside for Dexter's birthday party, forgot to bring them back in, humidity + laminated furniture = disaster).

What our end tables looked like before all the black laminate peeled off...

Luckily, I was able to convince John we needed them, so the next day we went venturing off to pick up our tables.  Unfortunately for us, there was a huge storm in the middle of the day Wednesday, which ended by 3:30 or 4:00, but the damage was already done.  Traffic was a nightmare on the larger side streets, so we decided to try the smaller side streets, which were just as busy.  We finally escaped the traffic and our spirits were lifting... until we realized my Google Maps was on "walking" directions (from our trip to NYC) and not "driving", which lead us to a park where "trail" literally meant trail and not a street named trail... ugh.


At this point (all the traffic had set us back almost an hour), I was ready to just go driving through the park, but since John was driving and is decidedly more sane than me, we turned around, got our directions on "driving", and finally made our way to our destination.  The side tables' current owners were an army family, and as a result, the tables had lived in exciting places like Jordan, Bahrain, and North Carolina!  They picked up the tables years ago at an antique shop and had travelled the world with them since.  I love having a back story like that instead of the usual, "Well, it was a lazy Sunday when we travelled to IKEA, brought home the box, battled the construction for hours, and now here we are with the same table as a million other people".

So, here are our new end tables!


John's providing us with a sense of scale. 

The top is a tooled leather.
Close-up of the detail. 
In its new home.
Close-up of the feet.

I'm really happy with them.  They're much larger than I was expecting, but that's great because we really needed something with bulk to compete with our massive sectional and not feel all wimpy next to it.  For some reason, the pulls on the front of the tables didn't really click with me until we saw them in person and I realized pulls mean drawers... which is perfect to finally provide a home for our remotes and John's Xbox controllers.  I'm in love with the little wheel feet, too.  I think overall, they just have great character.  I originally thought I'd be adding them to my list of things to paint, but right now we're pretty happy with them, so I think I'll let that idea simmer for a while.  At the very least, I might give the hardware a shot of spray paint to perk them up a little.

Another happy adventure in Craigslisting.  If you just forget about our misadventures in actually getting there (and I won't even get into the return trip drama, but I'll just note that we had to stop at 7-11 for a couple of six-packs on the way home)...

Saturday, July 2, 2011

Trash Pad: Part 1

Holy moly, I can't believe it has been a month since we've last posted... or done anything worth posting about.  We were in New York for a week, but other than that, I guess we've just been super lazy lately.  Even though it was 94 degrees today, we forced ourselves outside to begin a project we sort of began months ago.

As you know, we have no shed or garage or outdoor storage, except for our small under-the-addition space that we spruced up a month ago with some lattice renovations.  We do have two big ol' bins for our trash and recycling that just sit next to the house and generally look ugly.  In a small effort to make them look a little nicer, a few months ago I wandered into the overgrown space to the right of our house where someone had thrown a bunch of paver rock things.  With their random shapes, I thought I could piece them together and form a cute landing pad for the bins to sit on.  Unfortunately, they were just a bit too random and no matter how I moved them around, it just didn't work out right.  Plus, they are all different widths and I suppose I could have dug down to make them level, but who wants to do that much work?  Over the last couple of months, rain showers and the weight of the bins helped push the stones more firmly into place, but it was still kind of ugly.

My sad attempt at a rustic/natural looking trash pad.
The bins on their sad trash pad.
Eventually, we'd like to go all out and build ourselves a trash shed, inspired by this article on the This Old House website.  Look how cute it looks:


To start off, though, we decided to replace the pad with something... better.  So, we headed out to Lowe's yesterday afternoon to check out our paver options.  I wanted to go with something cute and fancy, but realized once we build the shed, no one will ever see them, so why pay extra?  We just picked up some cheap, plain concrete squares, a couple bags of patio and paver base, and a tamp.

Our first step was to utilize slave-puppy labor and have Chewie haul away all the old stones.


Then John had the horrible task of digging down about an inch in our nasty clay/rocks to help get a nice, flat surface.  This was not made any more enjoyable by the 94 degree heat.  Luckily, we have our oaks to provide shade, so at least it wasn't in full-on sun.

Kinda looks like a grave...
Our next step was to spread out the patio and paver gravel base for the bricks to sit in.  We dumped out our two bags of that, spread it around with the metal shovel, and John went crazy with the tamp.

Dump...
Spread...
Tamped!
We then started laying down the bricks, only to realize they weren't lying as flat as we'd like them.  After some discussion, we decided we probably needed a bit of paver sand, so it was off to Home Depot.  Following the same technique of dump, spread, and tamp, we were left with what looked like a giant graham cracker crust.


Once it was all smoothed down, John and I carefully placed the bricks and stomped on them a little to get them in their place.  Here's the new pad:


Not much to look at really, but like I said, it'll eventually all be enclosed with our awesome trash shed.  Until then, at least our bins have a nice, even surface to sit on.


So, that's not a very exciting project to come back with after a month long hiatus, but it's one more thing marked off the list.  Plus, it's only the beginning of a three-day weekend, so who knows what else we'll force ourselves to get around to doing. :)

Tuesday, June 7, 2011

Baking: Human and Dog Treats!

In my last post, I mentioned I baked dog treats for Dexter's birthday party.  I love to bake and I love my dogs, so it's a win-win situation for me (and the dogs).  I figured maybe someone out there might be a little weird like me and enjoy baking for pets, so here's my recipe for beef and cheddar biscuits:

Ingredients!
1 cup rolled oats
1/3 cup margarine
3/4 cup cornmeal
2 tsp white sugar
2 tsp beef bouillon granules
1/2 cup milk
1 cup shredded cheddar cheese
1 egg
3 cups whole wheat flour
1 cup boiling water

1) Preheat your oven to 325.  Combine the oats, margarine, and boiling water.  Let this butter oatmeal stand for about 10 minutes and either grease your cookie sheets or line them with parchment paper.  I went with the parchment paper route because clean up is way easier.

2) Mix in the other ingredients and then add the flour one cup at a time until a stiff dough is formed.

3) Knead the dough, pat it out to about half an inch or so, and cut it up into whatever cute shapes you want.  I still don't have a bone-shaped cutter, so I used a Michigan-shaped cutter John's mom gave me (just the LP, sorry Yoopers).  Place your biscuits about an inch apart and bake 'em for about 35-45 minutes, or until golden brown.

This made quite a few Michigan-shaped biscuits, so you can throw them in a Ziploc and you're set with homemade treats for a while (depending on the piggyness of your dog).  They're Dexter and Chewie tested and approved for taste and Amanda approved for super baking easiness.  I also made some peanut butter based treats, but wasn't very happy with how dry the dough was and not easy to spread out and cut, so I won't bother passing on that recipe and will continue on my search for a second dog biscuit recipe.

Say Yes to Michigan-shaped dog treats!
Since I couldn't let the dogs have all the fun, I also made some human treats: smores bars!  I love smores and so far haven't been allowed to build fires in the yard due to fear of lighting our trees on fire and ending up burning down the neighborhood.  So, I had to settle and make some bars, which I'm happy to say, were a huge hit and whet my smore appetite (OK, I lie... such a thing is not possible).  For those of you out there who can't have a fire or don't want to deal with a fire or just want to make a bunch of smores to have on hand for smores attacks, here's the recipe:

Ingredients!

7 graham crackers, broken into one-inch pieces
6 tbsp unsalted butter, melted and cooled
3 tbsp light brown sugar
2 tbsp all-purpose flour
1/8 tsp salt
1.5 cups milk chocolate chips
2 cups mini marshmallows

1) First of all, melt the butter and set it aside to cool.  I always forget to do that and panic when I have hot butter.  So do that now!!  Then adjust an oven rack to the middle position and heat your oven to 325 and grease (or do a foil-sling (see below) and grease that) an 8" baking dish.

2) Process the graham crackers in a food processor to fine, even crumbs.  Maybe about 30 seconds.  Toss in the sugar, flour, salt, and pour in the butter.  Pulse all this until it's nice and combined.  Sprinkle it into your dish, flatten it down into a crust, and bake it for about 12-15 minutes, or until it's starting to brown.

3) Straight from the oven, sprinkle the chips over top of the crust and let them sit and get all soft and squishy for about 5 minutes.  Spread your melty chips over the crust and go ahead and lick the spatula if you're done with it.  Who can resist a chocolate-covered spatula?  I cannot.  Spread the marshmallows on top of that and stick it in the fridge until the chocolate is set (about an hour).

4) Now adjust an oven rack to about 10 inches from the broiler element and heat the broiler.  I have two settings - "Lo" and "Hi".  "Lo" worked fine for me.  Broil the bars until the tops of your marshmallows have slightly browned.  I made two batches and the first took about two minutes.  The second took about six.  Just watch them like a smore hawk and it'll be OK.

5) Let your bars cool (you might have to stick them back in the fridge depending on how warm it is in your kitchen) and then chop them up (see handy Pam knife tip below).  You can make 16 nice-sized bars, 8 big bars, 4 greedy-sized bars, or maybe one you-have-a-problem-sized bar.  Make sure to test at least one... you know, for quality control.  :)

My smore bars straight from the oven, still chillin' in their foil sling.  I've got to learn to take better photos...
Now, for some tips my "The America's Test Kitchen Family Baking Book" (best baking book ever... or at least that I've discovered in my few years of baking...) (also, if you're going to buy it, buy it on Amazon unless you have an awesome coupon from Border's... sorry Border's, but if you don't want to have to close all your stores, how can you charge full price always and never have anything in stock?).


Tip Number One: Foil Sling.  Get your pan.  Get your foil.  Tear off a foil sheet and lay it in the pan horizontally, with enough extra to stick up over the sides.  Tear off another foil sheet and lay it vertically, again with enough extra to stick up over the sides.  Make sure it's all snug in the pan, like a nice foil liner.  Now spritz it with your Pam.  When your bars (of any kind, it doesn't just have to be smores!) are done, you can pop up the sling, gently pull down the sides, and bam!  There's your whatever lying there all ready to be cut up.  No digging it out of a pan!  No bottoms permanently seared to the pan and your treat horribly disfigured!  Plus, the pan is probably clean enough that you can easily use it for batch number two or just toss it back into the cupboard.  *rejoice!*

Vertical foil (please excuse my weird half picture, half Paint creation)


Horizontal foil
Tip Number Two: Spray your knife with Pam!  Especially with the melty little marshmallows, you don't want gross goo all over your knife, gumming up the works and desecrating your bars.  So, spray your knife with Pam and it'll glide right through them.  Seriously.  I didn't have one marshmallow string connected to my knife.  Easy peasy!


Doesn't stuff like that make you hate yourself?  Like, why didn't I think of that?  It's so simple!  It's stuff that helps me and hopefully it'll help someone else.  With all the time you save not having to dig out bars, crying into messed up bars, cleaning up pans and sticky, gross knives, think of all the time you can spend eating!  *cabbage patch victory dance*

So, those are my two recipes.  A hit by dogs and humans alike.  Some humans tasted the dog treats and said they were "bland".  No dogs tasted the human treats, as chocolate is not good for our buddies, but of course, mommy snuck them a few bits of graham crackers and marshmallows.  Good times all around.

Dexter's Second Birthday Party

About a month ago, I talked about Dexter's first birthday party and plans for his second.  I can hardly believe it has already been a month, let alone another year has gone by.  Saturday was the big day and boy were we busy the last few days leading up to the party.  In our typical fashion, we waited until the last minutes to take care of everything, but luckily, I'd say it all went off without a hitch.  We did our shopping and cleaning over the long Memorial Day weekend, John called on Tuesday and got our food ordered from Rockland's, a few tables and some chairs reserved, and made an appointment for Dexter to get his birthday haircut.  Then Saturday morning, we were up bright and early to do our last second cleaning, setting up and decorating.  I had the crazy idea I might fit in a quick nap before 5:00, but no luck for me.  Fortunately, we did manage to pull everything together and the weather miraculously cooperated without any of the sweltering heat of last year.

Now for the details and I'll start off with something random... the "Windex Outdoor All-in-One Glass Cleaning Tool" is amazing.  After a ton of deliberation, we finally cracked and bought one.  The biggest hold-up was its price at about $14.99 at Target.  However, our windows were so nasty (mostly due to our MDF project back in January that resulted in mountains of dust on the ground and a disgusting layer all over the siding and windows), we had to do something.  The kit comes with a Swiffer-like apparatus (a pole that you stick a cleaning pad on) that's easy to assemble.  Then you just squirt down the pad with a hose, spray your window, scoot the pad around, and spray it clean.  That's it.  No wiping or anything.  We worked together with John manning the hose and me scooting the pad and in no time we were done.  Just like it promised, we were left with a streak-free shine on our windows... and I even did my back windshield.  The kit only comes with one pad and the refills are a little pricey, too, but if we keep up with our window cleaning frequency of once every eight months, I think we can foot the $10 or so.  :)

Look how happy you can be to wash your windows!  yay!
OK, back on track, with the outside all clean, we were free to do our thing inside.  I had grand plans in the beginning of DIYing some decorations and all that, but I had to take a step back and remind myself it's a dog birthday party and we can't afford to go nuts and don't want to end up as new subject matter for TLC to feature along with Hoarders, Extreme Couponers, and Crazy Eating Habits people.  So, we made our first trip to Party Depot.  It was kind of a weird store with a weird vibe, but lucky for us, we found some inexpensive decorations to spice up our place... just a few cute fan decorations (decorations shaped like fans, not decorations for fans like some may have thought...), a package of paper lanterns, and some streamers.  I think it may have cost a whopping total of $10.  Here's our set up.  Once people arrived, our photo taking kind of fell off, so boo to that.  Oh, and check out our awesomely painted kitchen.  Yeah, we finally finished painting the rest of our main floor, but our place has been so much of a mess since then, it hasn't been appropriate for photos...

That's not a creepy stalker in the doorway, that's just our friend Paul.
And because every kid who goes to a party likes to take home a little goody bag, I prepared doggy bags for our canine guests.  I baked two kinds of dog biscuits, a peanut butter based treat and a beef and cheddar (gotta have your sweet and savory), and threw in a squeaky Kong tennis ball.  Maybe that was too much...


Here are our guests, human and canine, (hopefully) enjoying themselves.  Our boys had a great time meeting and playing with other dogs.  It was incredibly nice having the fence up to keep everyone safe.  Chewie had an amazing time playing with our friend Keith's dog, Bailey.  I guess he has a thing for older women.  Apparently she did, too, as Keith said she was asleep in the car before they turned onto the first street from our house.  We were thrilled to have our friends over and catch up.  Now that we have our house and yard, I think we'll have to schedule more (smaller) parties here and there because it's just too much fun eating, drinking, and laughing all evening.  We're so lucky to have such amazing sons and friends.  :)

Jasmine making sure she's protected from mosquito bites.
Jet doing a jig... or something.
And then acting as dog whisperer.
The guys hogging the comfy chairs.  Typical.

Wednesday, June 1, 2011

Lattice Rejoice!

I can't believe it has been almost two weeks since our last post.  We've been dealing with a bad mix of laziness and project ADD. We have a few projects in the works and keep alternating between them without really accomplishing anything.  We finally crossed one project off our list this weekend, though - replacing the lattice skirt underneath the addition.

In its existing state, two pieces of white vinyl lattice were screwed directly into the exterior of the bottom of the addition and just left wild and free on all other sides.  As a result, it started to sag and get all bendy and terrible looking.  Since we don't have a shed or garage, we've been using the under-addition space as storage for things like bags of dirt and mulch and our garden tools.
Before left side lattice.
Before right side lattice.  We actually forgot to take "befores" so these aren't great photos.
The unsightly lattice and tackiness of a bunch of junk has been haunting us for quite a while and we have been forming our plan of attack, but couldn't act on it because John needed a circular saw.  During our last trip to Michigan, we were discussing our projects with my parents and lo and behold, my Dad just happened to have an extra circular saw (of course).  Unfortunately, the TSA frowns on passengers travelling with power tools, so we had to wait until he could so kindly ship it to us.  Without any further excuses, we were ready to replace our rotten lattice.
Thanks, Papa Harold!
I should mention we took our inspiration for this project from the This Old House article "How to Install Porch Lattice", in case anyone wants a better written technical description.  So, first we obviously ripped out the nasty piece on the right, but decided to keep the left one.  As you can see in the photo above, our cable wire was run right through one of the holes and we decided it would be a pain to deal with that, so we'd just work around it and save us the cost of another lattice panel.

Nakey!
Our first step was to make the frames that would hold the lattice securely in place.  Once all the wood was cut to size, John attempted to use his new Kreg Jig to make pocket holes, but unfortunately, the wood was slightly damp and the sides pulled apart.  We had to wait while the boards sat in the sun to dry out... and then spent the night inside to completely dry.

The sunbathing boards.
After the boards were finally dry, John drilled in the pocket holes and screwed together all the frames, and then it was my turn to paint them all.  We just went with straight-off-the-shelf white to blend in with the siding.

One pitiful looking frame.  We were working at night after work, so please excuse the poor lighting.
John then used the frames as a template to cut out the lattice panels, using his new-to-him circular saw.  Look, we're putting our old fence chunks to good use as a work table... and sawing in the dark which probably isn't the safest thing to do...


Then came the arduous task of painting all the lattice panels.  It was kind of a pain trying to get all the sides covered, especially while we were being eaten alive by mosquitoes.  Luckily, we were really happy with the color we chose - Martha Stewart's "Sea Glass" color matched to our favorite Behr paint and primer.


Dexter seemed to like it, too, as he couldn't help but keep rubbing up against our sawhorses and ended up with a bit of Sea Glass in his fur.


Once the lattice was dry, John screwed the panels onto the frames.  We then attached the right-side panel using some L-brackets.  You can see the piece of wood here where the old lattice was directly screwed into.


To secure the front panels, we used hinges and attached a handle, allowing us to lift the panels and access our storage space.  I gave the hinges and their screws a quick once over with some white spray paint to help them blend in with the siding and frames.


Our new panels and the creepy dungeon hole.
John displaying the liftable panels and rejoicing in our success.
Finally, John painted the last vinyl lattice panel we decided to keep on the left-side and hung the frame directly over it.  We still need to paint the screw heads to help them blend in, but it looks a lot better than it did to begin with.  Don't our Manhattan euonymus look cute in front of it?


And that was that!  All together, it was really easy and was a pretty inexpensive improvement.  It took longer than we expected due to rain delays, the boards being unexpectedly damp, and trying to beat the dark (and mosquitoes) after work.

Now for a gratuitous cute pet photo.  Look at this adorable little face peering through the fence.