Thursday, January 12, 2012

Elfa Redux

Back a year or two ago when I first announced my desire to get an Elfa system for my closet, John laughed at me.  He couldn't understand why anyone would want to spend a couple hundred dollars (or more) to add some shelves to their closet.  Oh how the tides have turned.  Following the installation of my Elfa system, he was instantly overcome with jealousy.  Thus began our Elfa Redux.

John saw the benefits of an organized and glorious closet and decided he, too, needed an Elfa.  So, he did the same wizarding I did and came up with his own closet design.  It's pretty similar to mine, as there's only so much you can do in a small space, but you'll see he has more room for shirts and a space for pants while I had more room for dresses (I make him store his dresses in the attic).


This time, he submitted the order electronically, and sure enough, when we arrived, a cart was waiting for us full of his Elfa components.  We did the same prep work as before - demolition, repair, and painting.  In case anyone out there is curious on how to go about installing an Elfa unit...

First, you hang up a support strip along the top of the closet.  They provide you with the screws, and all you really have to do is ensure it's all level and screw it in.

Don't you love how level/even the intersection of our ceiling and wall is?
Next, you just pop in the hanging bracket braces and slide them according to the appropriate spacing.  You're given a spacing guide, so you just scoot it over until it's properly spaced.


Then you just pop in the brackets and set the shelves in place.  You can space them as you'd like, according to whatever you'd like to store and if you don't like the placement, you can just pop them back out and try again.


Once your shelves are in, you pop in the rod brackets and snap in the rod itself.


Before you know it, you're done and so happy you didn't spend a ton of money paying some fool to install it for you!  Rejoice!


This time around, we removed all the tags and stickers beforehand and total installation was only about 15 minutes.  Of course, our systems are about as simple as they come.  

John's final product.
So, that's that.  Two nicely organized closets in two weekends.  Pretty good progress for us since on average, I think projects usually take us about 4 months from start to finish...

Sunday, January 8, 2012

Merry Elfa-mas To Me!

Back at Overlook, we were enormously spoiled with a cavernous walk-in closet complete with shelving units and lighting.  Here at 64 year old Grafton, our master bedroom closets are minuscule in comparison.  I've been able to make it work, but since we moved in, I've been dreaming about adding an Elfa storage system.  Since most of our readers are Michiganders, you may not be familiar with the heaven-on-earth that is the Container Store (sadly, it looks like the nearest store location is Chicago).  Just another reason to abandon the Mitten and join us here in NoVa (obvious hint-hint, Mom and Dad).  Once a year, Container Store has their 30% off Elfa Sale and I just so happened to have a bit o' cash in my pocket from a Christmas bonus and thought: 2012 is the year my dreams come true.

So, you can go online and enter the measurements of your space and the closet wizard will suggest some designs based on the info you provide.  That is what I did.  Here is what the wizard and I decided on:


It's pretty great because it breaks down every component of your design and you can make all sorts of adjustments and it'll give you the exact price, so there aren't any surprises at check-out.  Once you're done, you can submit your design to your nearest store and they'll put together all the pieces in a cart for easy and quick check-out!  Amazing!  I didn't quite get that at first, so I just printed out my design and brought it into the store and a helpful employee still pulled all the pieces whilst we browsed the store.

Back at home with all the parts, I had to pull out all my junk and then remove the existing shelf and bar... and patch up the wall where our demolition caused some minor damage.

Before Elfa.  The horror! 
My handsome assistant demo'ing the existing shelf brace.
Post-spackle.
The walls of my closet were pretty banged up from me repeatedly throwing my shoes in there.  I thought, why not paint in there?  We have bought paint for our master bathroom and bedroom (months and months ago, as usual), so I brought out the lighter shade designated for the bathroom and went to town on the closet.

Freshly painted!
I'm not sure if you can really get a feel of the color, but it's a soft gray that looks so much better than the flat, banged up white and infinitely better than the nasty old yellowed paper color of our bedroom walls.  I'm glad I love it since our bathroom will one day be that color.  FYI, it's Benjamin Moore's "Big Bend Beige" color matched to Behr's Premium Plus Ultra base.

Once the paint was dried, we installed the Elfa.  You can pay Container Store to install it for you, which would have cost us an additional $180, but we were able to do it in about 30 minutes... which half of that was peeling off all the stupid price tags and opening assorted packaging.  I finally got my Elfa and I love it.  I'm still working on complete organization, but here's a sorta-after for you:


Doesn't that look so much better already??  If you can't tell, there's a top shelf that runs the entire width of the closet which is currently empty.  One thing I'd note for women, buying a couple solid shelves might be better than the wire ones I went with.  I found some of my skinnier-heeled shoes have a hard time balancing on the wires, so we might return one or two for the solid shelves.  I'm just hoping one day when we're ready to leave Grafton, it might help someone realize how much you can shove in a small space and not be scared off by our tiny closets.  In the meantime, I love my newly organized closet and am slightly afraid of how happy organization makes me...

A Slice of Paradise

OK, warning going into this post: it'll be my cheesiest post yet.  *dorky snickering*

As I mentioned in my last post, we made a trip to the Container Store last weekend and really, ever since the ball dropped and 2012 rolled in, we've been on a crazy organizing trip.  We were wandering the aisles and I (of course) came across something I never knew I needed, but now that I have, I don't know how I lived without: a single cheese slice container.  For individually wrapped Kraft slices.  You know, for grilled cheese?

Tell me this hasn't happened to you:  You buy your Kraft slices, bring them home, they sit nicely in your little cheese drawer until one day, the time comes where you must open said cheese slices.  While you try so hardly to carefully open the package and maintain some of its structural integrity, it rips all the way down the side and slices go flying and you curse your cheese slices and the depths of hell from which they came!  Sure, you might try to carefully stack the slices and slide them back into the demolished shell of a package, but it won't hold.  They won't stay.  You just end up with a mutilated wrapper that somehow goes missing in the cheese drawer and a whole stack of slices sitting nakedly, just waiting to collapse.

Shameful.
Apparently, some geniuses/wizards at "Resourceful Products, Inc." felt our pain, understood our misery, and came up with the revolutionary "Single Cheese Slice Container".  And at $1.99, who could resist?  Don't they know I'd probably pay like $5 for this innovative technology??  Fools.  But now, my Kraft slices safely reside in their plastic domicile, waiting for the day they will be chosen to grace a couple slices of bread and accompany a steaming bowl of tomato soup.


Is it wrong that a simple box for holding cheese slices makes me so happy?

Saturday, January 7, 2012

Banishment of the Baker's Rack

Just about a year ago, I did some work on our baker's rack that made me not want to pitch it out the window anymore.  Try as I might, my hate for the stupid thing continued to fester for another year until it was just too much.  The baker's rack had to go.  We finally got our act together on a couple fronts which laid the path for banishment.  First, we (mostly) cleaned and organized the unfinished portion of our basement which allowed for some infrequently used appliances to be moved downstairs (a post on that will be forthcoming).  Second, we came up with something that looks so much better in the space the baker's rack used to occupy.

Offensive.
Look how horribly it blocked the view.  Ignore the wood in our kitchen.  Those will eventually be our built-ins.  I hope.

Back in June, we were at my parents' house and I noticed they had a vintage Singer sewing machine stand base in their garage... that my Dad was using as a base for a drill press.  I managed to convince them I could put it to much better use and they were kind enough to bring it down to us in August.  Just like all of our projects, the stand sat in the basement for 4.5 months until we finally got around to doing something with it.

We decided to build a top for the stand to use it as a little side table.  We contemplated buying a small piece of granite or marble or possible a more expensive cut of fancy wood, but decided in the end, we're cheap.  We ended up buying a 10 foot 1x4 piece of maple and a can of stain at Home Depot.  To make it look a little more interesting, I came up with this very technical and intricate pattern:


John dragged his saw and wood outside (last weekend when it was like 20 degrees out when this weekend it was 60!  Darn our luck!) and while we shivered in the cold, we cut up the wood into the 14 pieces we needed.

The chunks chillin' on the patio.
After I sanded the rough edges a bit, I stained the tops and sides of every piece.  It was the first staining project we've tried and I must say it went pretty well.

My staining station in the basement.
The pieces sat and dried overnight before John brought out his Kreg Jig and screwed in all the pocket holes to affix the pieces to each other.

Pocket holes in progress!

All the pieces screwed together.
Once that was done, all we had to do was screw our new top onto the base.  The base has four holes that we just used four one-inch screws and some washers to attach the top.  Easy peasy!  And now for the grand reveal!


We're not really sure what to put on it yet, but we're so happy with the end result.  The much smaller table doesn't block the view from the living room into the dining room and you wouldn't believe how much larger it makes the whole kitchen/dining room space feel.

Oh, I almost forgot about the stupid baker's rack.  As I mentioned, that's been banished to the basement where its job is now to hold cat litter and cans of cat food.  ha!

Monday, August 22, 2011

Return to the Slanty Bathroom

Way back in January and as one of our very first Grafton projects, John and I painted our upstairs guest bathroom.  When we moved in, it was a horrible mint color and we thought we'd tone it down with a creamy chocolate brown on the walls and a soft blue-green on the ceiling.  At first, we were thrilled with the results, but looking back, I think we were just happy to have the mint gone and would have been happy with any other color.  A few months down the road with our new color scheme, we were sad to discover it made the room feel small and dark.  So, until we can figure out how to bust out walls and install windows... it was back to the drawing board/paint chip aisle.

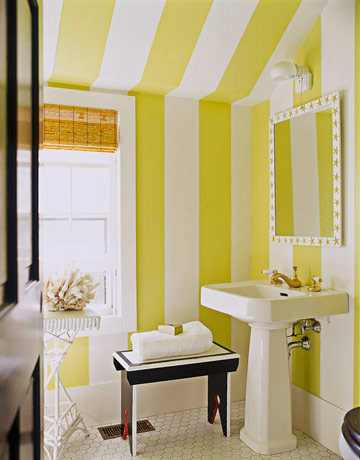
Inspired by this bathroom, found on House Beautiful's website in the slideshow "Beautiful Designer Bathrooms", I convinced John to let me try out stripes.  Since it's such a small, plain room, I hoped some bright stripes might help jazz it up and provide some height to the room.  As an aside, aren't those little hexagonal tiles adorable?  Again, I am a little saddened on how modern they went with our home remodel.  Maybe one day we can help bring it back to its roots.


I'm not quite as brave as the designer of this bathroom, so to soften up the stripes, I decided to go with a warm yellow and creamy white, so we have the contrast, but it's not too in-your-face.  I browsed around on Benjamin Moore's website for a bit and sent John out to collect some paint chips before finally deciding on Sundance for the yellow and Creme Brulee for the creamy white (on the same paint chip, just two colors apart).  We headed over to Home Depot with our chips in hand (yes, we're still cheapos who steal Benjamin Moore's amazing selection of chips and get them color matched to cheaper Behr paint) and got our paint.  Thanks to the mistake of a carleless Orange Vest, we ended up getting a gallon each for the price of a quart, so yay for extra free paint!

Our first step to actually implementing our redesign was to paint over everything (well, just the walls) with the Sundance.  Even with our "paint and primer in one", this took maybe three or four coats and forever.  Literally, it was so frustrating and then we got side tracked by several other things, just getting the yellow up took me almost two months.  Shame on me.  After that, it was time for the Creme Brulee stripes which was even more horrible.  OK, it probably wouldn't have been that bad if our room wasn't teeny and our weeks-long heatwave didn't turn the bathroom into an oven.  So, don't be scared of stripes.  Be scared of being trapped in a teeny oven (or I suppose any size oven). 

To do our stripes, I first measured the length of the wall and tried to come up with a stripe width that would give me an even number of stripes that weren't too wide or too skinny.  The wall is 70 inches long, so 5 inches would give me 14 nicely sized stripes.  I went along measuring every 5 inches and putting down a small square of Frog Tape to mark it off.  The trickiest part was to remember what would be painted white and what was left yellow.  The white bits had to have 5 inches of exposed wall while the yellow bits were partially covered by tape.  Then I had to actually tape off the stripes.  I did this using our suction cup laser level, by crouching on the floor, beaming up the laser to match up with my tape squares, and then making sure it was level for straight stripes... in the dark so I could see the beam line. 

Laser level in action!
Good times, crouching in the dark in the oven bathroom... I then carefully applied the tape in a single strip, placing the edge along the laser beam.  John was merciful enough to help me with the ceiling stripes, with his amazing height and monkey-like long and strong arms.


With the tape finally up after months and months, it was time to paint the stripes.  Since some of the tape stripes had been on for a while, I made sure to run my thumb over the edges to make sure they were still stuck on well.  Frog Tape says it'll stick for up to 21 days, but it seemed to do well for us for over a month.  I didn't have a small roller, so I painted all my stripes with my Purdy Cub paintbrush.  Definitely tedious, but I think it gives me the most control.  After crouching around the toilet, crawling around on the floor, going up and down my step ladder, and doing a few ninja moves on the vanity (while being cooked by our two sun-like light fixtures... on the brighside, I think my face got a little tan...), the paint was up and John took down the tape and we were done.  Sidenote: taking down the tape ASAP is a good practice to avoid the paint drying and peeling off as well as providing some inspiration to keep going.

Our stripes are done and I love them so much, even though the process was painful.  They're like my little stripe children.  Here's our almost-complete bathroom.  I'm pretty sure we have the worst house ever for photographs, with our tiny rooms and poor lighting.  These photos don't really do the colors justice and that makes me sad.


So, next steps?  Definitely need to do some decorating in there.  I'm thinking of some watercolor bird prints by dimdi on Etsy.  Maybe like this robin, the state bird of Michigan and frequent backyard visitor of ours.  Simple and whimsical, right?  Plus, we could brag about our imported Italian art.  Molto di fantasia!


I'm also working on a handmade (by me and my sad sewing skillz) shower curtain, using this tutorial I found on Design*Sponge, but with just two fabrics with a solid band at the top and bottom, surrounding a subtle floral fabric in the middle.


We'll see.  At my current rate of project completion, I just might do all this by December!  erf.