Sunday, March 27, 2011

Postcard Art

Bit by bit we've been adding art to our home, mostly based on places with special significance to us, like San Francisco, Eastern Market and DC.  We realized, strangely enough, that we didn't have one piece of Old Town Alexandria art, even though it's one of our most favorite and frequented places.  We have picked up most of our art at the Eastern Market, but even though Old Town is so close by, none of the artists ever feature Old Town.

We found ourselves back in Old Town last weekend while John's mom, Beth, and her friend Gail were in town for a visit.  While doing some shopping, we visited The Christmas Attic, a great little boutique shop one block from the Potomac River and located in what used to be a tobacco warehouse back in the 18th century.  As I'm sure you can surmise, they have a ton of Christmas ornaments and decor, but also sell a variety of other knick-knacks, including Old Town and DC themed items.  I found these cute postcards made by Found Images featuring old images of different Old Town landmarks.  At only $2 a pop, I thought it would be a great, inexpensive way to finally honor Old Town in our home.


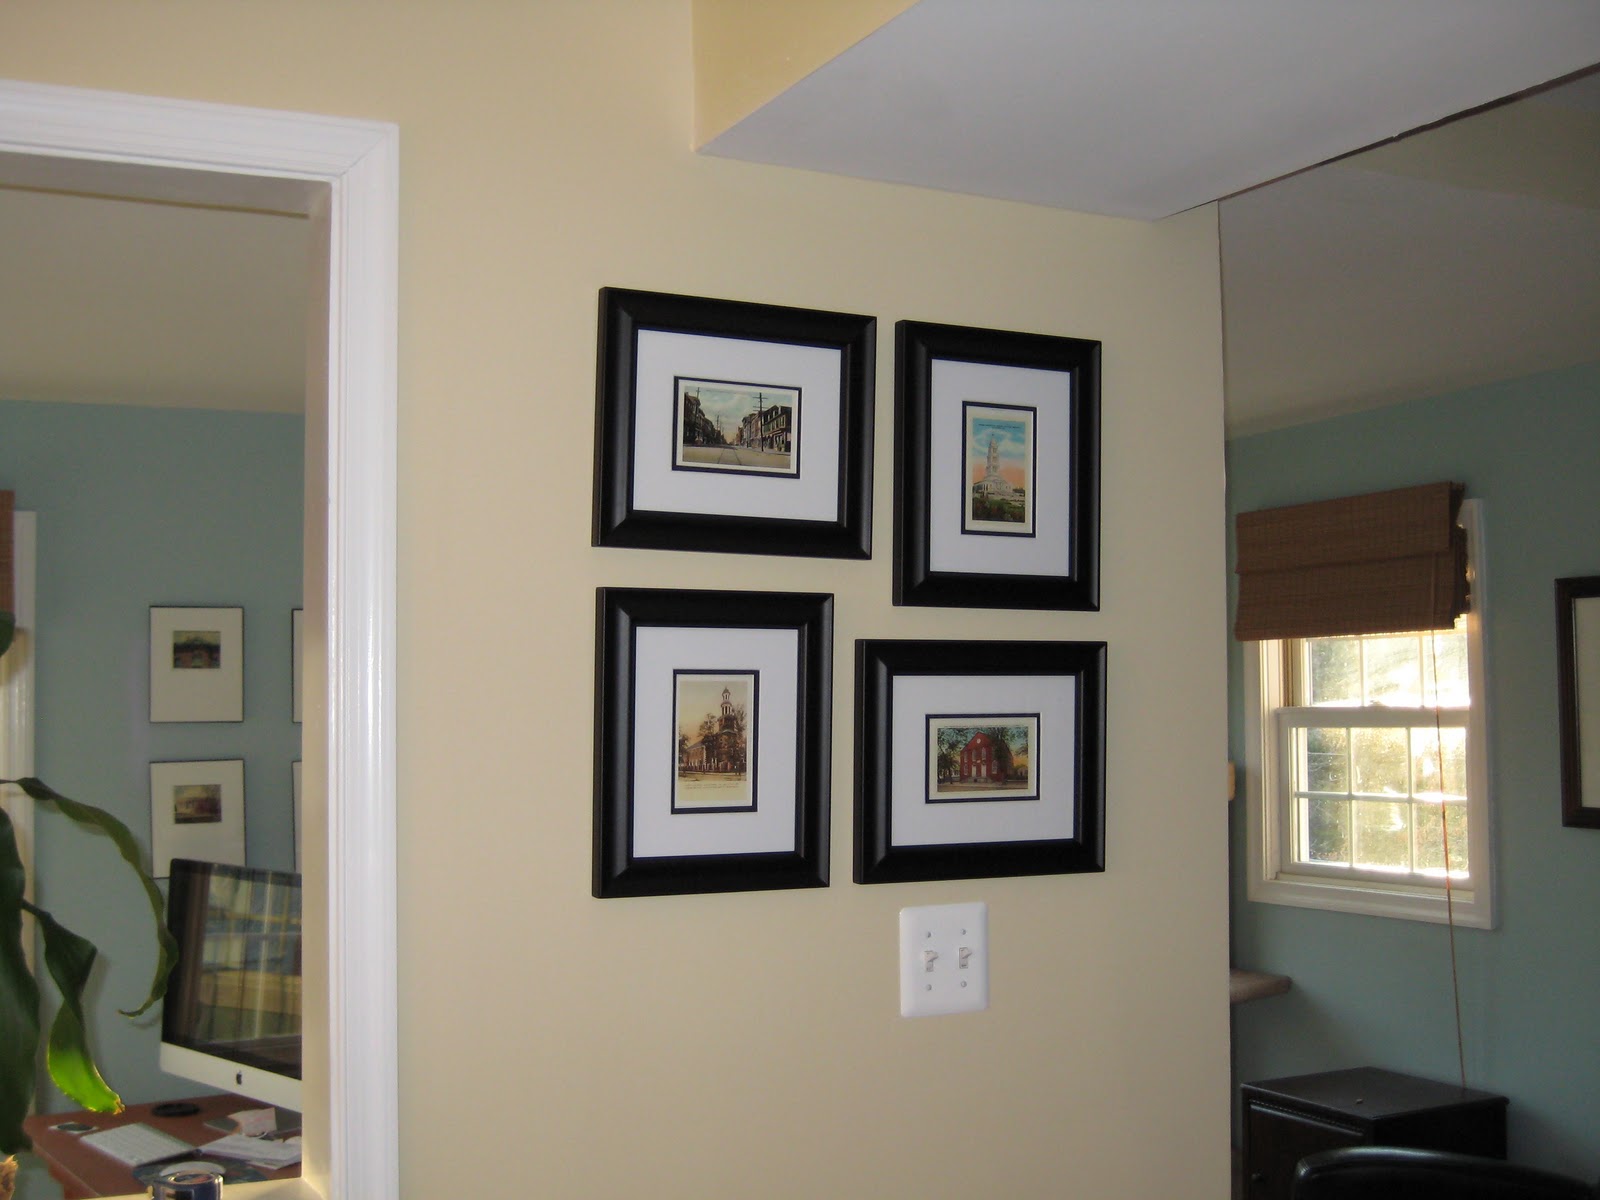
The first photo on the top says "King Street Looking West" and has an image of the main street running through Old Town that today is home to tons of boutique shops and restaurants and always seems to be packed with tourists and locals alike.  Moving clockwise, the next card is an image of the George Washington Masonic Memorial.  The memorial was built in the 1920s by Freemasons to honor George Washington and today offers tours throughout the building.  John and I went once and the tour itself is pretty cheesy (including a glimpse at a reproduction of the Arc of the Covenant...), but the views from the very top can't be beat.  The next two cards feature images of two churches built back in the late 1700s and still stand today as landmarks in Old Town.

So yesterday John and I went to Michael's to pick up frames for the cards.  Oddly enough, we had a really hard time finding frames for 4x6 photos with a mat.  We finally found mats sold individually at 8x10 with a 4x6 opening, so we picked up four of those and four 8x10 frames (with a 5x7 opening).  At least the frames were 40% off to make up for the frustration.


After a quick switcheroo and popping in the cards, John helped me hang them all in a grid in our dining room and we had a brand new addition to our decor.


To make room for our new art, we had to move our Union Station piece (shown in this post), but we had a perfectly empty spot for him right on the other side of the wall, so he didn't have to go far and now our office/reading room is filled up.

That's pretty much all we accomplished this weekend.  I guess we were feeling pretty lazy.  I did get a gnarly paper cut from one of the mats, so, you know, I think I needed to take it easy and heal.  :)

Wednesday, March 23, 2011

Taming the Flame

Two months ago, we so bravely tackled our basement board and batten project and part of that process involved painting half the basement and the stairway a cheery bright orange (Behr's Flaming Torch).  Since then, our basement decorating has fallen by the wayside.  I blame the arrival of springtime weather that has been drawing us outside more and more.  Plus, we really haven't decided which direction we want to go down there.  We've been kicking around ideas ranging from a wine country theme to honor our tied-for-second favorite places, Sonoma and Napa, to maybe something including vintage movie posters.

While we let those ideas ferment in our mindgrapes, we decided something had to be done about the stairwell.  The whole thing is a mess.  The intersection of the walls and ceiling isn't even, which is glaringly obvious when you see the orange meet white.  Plus, the sole light fixture is very bright and the way the light bounces around and hits the orange walls kinda feels like orange Push-Ups are being smashed into my eyes... but without any delicious sherbet to comfort me. 
To fix this, it was finally time to hang up all the wedding photos that have been sitting in a box since we moved in October.  We thought the addition of some framed photos would help break up the assault of orange and would provide the perfect place for a little collection of wedding memorabilia.  John thinks I'm crazy, but I hate having photos of us strewn about the house.  I know what I look like.  I haven't slipped that far into the deep end yet to need to go all Memento on the house.  And who needs to see my creepy exact same smile in every photo staring at them from all angles?  So, this is what we've come up with so far:


Our only new addition to the group was the "Love" print we picked up a month ago or so from Eastern Market, which John detailed in this post.  I loved the saying on it ("Love... because I like the sunshine in your eyes") because John is the sunlight in my life and it has all sort of bright and happy colors (including orange) to complement our paint.  I'd like to break up the collage frames and do those individually to spread it all out, and intersperse some non-photo elements, like a framed copy of our wedding invitation and program.  *sniff sniff*  Do you smell another trip to IKEA in the works?  I can almost smell the particle board and cinnamon rolls now...

So, a quick, inexpensive project.  We didn't even bother measuring anything since we were dealing with a weird triangle shaped wall (although John's careful use of his level would make Papa Harold proud).  Now our Flaming Torch has slightly been subdued and everyone can admire how cute and in love we were are.  :)

Saturday, March 19, 2011

Feeling Blue

Isn't it funny how one small, relatively insignificant change can completely alter your perspective or mood?  For me, I love new accessories (despite of my love of playing in the dirt, raking, and crawling around on the floor, I guess I am a girl).  Besides a few friends, the best thing I took away from my old job at GT was a bright pink Coach purse my attorneys got me for Christmas a couple years ago.  Whenever I carry it around, I feel like the fanciest person in the world and can't help but feel happy basking in its magenta glow.


For the past five months (can you believe our five month Graftoniversary is today?!) we have stared at our wickedly bland yellow/beige/brown walls with disdain and uncertainty of which color could possible usher in a new era of joy and relief from the never ending sorrow of walls reminiscent of old, musty paper.  After careful consideration of colors ranging from a brighter yellow, a cool grayish blue, a sagey green, and numerous variations of brown, we took the plunge and went with Benjamin Moore's Gossamer Blue.  Of course, you know that turned out well and we're thrilled about how much it has brightened up our little office space.

The blue office space.
Last weekend, I finally got around to spreading the Gossamer love to the small hallway space outside of our bedroom and guest bathroom.  Since we're hosting John's mom this weekend, we decided to take our painting project slowly, going room by room so we don't create a horrible painting disaster zone.  Cutting in took forever, as usual, but at least this time I had a chance to do the rolling, too.  In the end, we were left with this as our (sorta) brand new hallway:


One day we'll repair our trim... I hope.  :)


We can't believe how much of a difference our new color makes in our space.  The Gossamer-painted areas are so much more bright and airy.  I was so afraid the blue walls would darken our small space, but somehow, it makes it look bigger.  It makes the walls so soft, I just want to stand and pet them all day.  When I think about how great it'll all look when we put in the crown moulding, I almost swoon.  This weekend we're busy eating, drinking, and being merry all over NoVA and DC with Beth, but maybe the next weekend we'll tackle the living room and/or kitchen.  I'm not 100% sure what we'll do about the stairway going upstairs...  For one, there's a super tall wall to tackle, let alone the side walls... Looks like we'll have to break down and get ourselves a ladder (or I can finally get the rappelling equipment I've been wishing for).  And we're not sure we want to take the Gossamer up the stairs.  Don't want to have too much of a good thing, you know.

Flower Beds: Part Deux

Riding the high of our mulching success, we decided to make another trip to Meadow Farms the following day to pick up some pansies for our beds.  The re-mulching project made our beds look 100 times better, but we felt like they could use a splash of color.  Our existing variegated euonymus provide some bright greens, but really, it's all just a bunch of green and brown.  Since pansies are the only flowers recommended for planting at this time (we haven't officially reached our free from freezing threat time), that's what we went with.  We chose a bunch of yellow pansies with some dark wine-colored centers to provide that punch of color we were looking for.

One of our little pansies.
With our Manhattan euonymus' location still TBD, we also bought four little boxwoods to plant as a small hedge lining our front walkway.  That was the initial plan for the Manhattans, but we decided their size and unruly shape wouldn't work best as a walkway hedge.  So, armed with the four boxwoods, two plats of yellow pansies, a bag of Leafgro soil conditioner, and some sort of plant food stuff, we headed home to do our planting.

One little boxwood.
Our soil is evil.  It's gross, dense, and slimy clay riddled with tons of rocks of all sizes.  Needless to say, digging about 20 or so small holes to plant our new pansies was a pain.  We had to dig the hole, mix in the Leafgro with some of the evil clay, and then attempt to surround the poor things with lumps of the clay.  Looking back, and if we had the money, we should have dug down into the beds, removing the nasty clay and dumped in a whole ton of topsoil.  Hopefully our pansies will have the strength to take root and survive until May or June when they're expected to die off anyways.  What a sad pansy existence.  John also stuck a few in a planter box we used back at Overlook and hung that by the front door.  I'm sure the pansies in our clay look up at them and wish they could live in such a nice and cushy environment.

Little pansies and tiger blood bushes.

Hopefully it'll fill in...

Living the high life.

The new old planter box.
It was a little easier to plant the boxwoods since we could use the shovel and cut right through the clay.  We mixed in some Leafpro in their holes, too, and covered the base with a little blanket of leftover mulch.  By the time we had finished all of this, it became dark, so we now have four unplanted bushes.  At least they have each other to hang out with.  The two remaining boxwoods will be planted along the other side of the walkway and hopefully they'll all flourish and we'll end up with a cute little hedge.

Half a baby hedge.

Our half hedge/half homeless bushes... at least they have each other.
So, we've graduated from hardscaping to... softscaping?  I'm hoping we'll be able to overcome our terrible black thumbs of doom and destruction and the poor guys will make it at least a year.  We had a great time, though, playing in the dirt and trying to provide Grafton with a little bit of curb appeal.  However, I don't even want to think of the kinds of horrors that await us in the backyard: land of hard packed dirt, broken glass, a jillion rocks, exposed roots, poison ivy, and moss patches.  I wonder if I could get one of these back there...

So Mulch Fun!

After installing the brick edgers along our flower beds, it was obvious we couldn't stop there.  While we were digging around, we noticed how awful the existing mulch looked.  I'm no mulch expert, but the stuff looked a lot like... just a bunch of ground up junk and saw dust.  It was a disgrace to our new beautiful bricks, so we started researching our mulching options.  I found a great "Backyard Conservation Tip Sheet", courtesy of the USDA's Natural Resources Conservation Service, with a bunch of information on when and how to mulch.  The tip sheet suggests waiting to mulch until the ground has completely warmed, so we may have jumped the gun a bit on that.  However, our beds didn't contain any flowers, vegetables, or seeds and since the little bushes made it through a year of complete neglect, I don't think some slightly early mulching will do them any harm.  They must have tiger blood...

Eww... junky.
Instead of heading over to the Depot, we decided to check out a new-to-us local nursery, Meadows Farms Nursery.  Although it's still early in the season, we were pleasantly surprised to find a great selection of ground cover, bushes/shrubs, trees, and even some bright and happy pansies.  It was a beautifully sunny day, so we took our time strolling around their grounds and filling our heads with landscaping dreams.  We were also delighted to find their prices were much lower than our usual haunt, Campbell & Ferrara's, (more in line with the prices you'd expect at Home Depot) but with much better selection, quality, and customer service.  After chatting with the helpful garden center employees, we finally made our mulch selection... and of course had to pick up two more bushes.  At only $20 a pop, who could resist?

MFM: New Bedtelyon nursery of choice.
We decided to go with their shredded hardwood mulch because it was the most affordable option and came highly recommended from the staff.  It's supposed to hold up the best and I think has the best aesthetic appeal for our house, with a very natural and soft look to it.  Perfect for our little Cape Cod.  The bushes we chose are Manhattan Euonymus.  We loved their little glossy leaves and the fact they'll have little white flowers in late summer, followed by pinkish fruits in fall.  Plus, they're great for an informal hedge.  Now if we could just decide where to put them...

Homeless Euonymus bushes.
Before dumping in our new mulch, we first tried to rake out as much of the old junk as we could.  Then we just emptied the bags, raked it around the little bushes, and swept the scraps off the bricks.  The hardest part was lugging around the ginormous bags.  The mulch looks so soft and plush, and weirdly has a faint aroma I've smelled in wines before.  That must be the "earthy" smell they talk about.

Post-raking bed.

New bed (right of front door)

Another new bed!

And another!
So, with just a quick 2.2 mile drive to a great local nursery and about $100 later, our beds were further spruced up and we have two new little bushes to put somewhere and hopefully enjoy for years to come.

Tuesday, March 8, 2011

Living on the Edge(ing)

As I hinted in our last post, we started our first landscaping project over the weekend.  Saturday was a beautifully crisp late winter/early spring/spinter? day with blue skies and the sun shining to keep us warm (sorry Michigan folk... just look at the weather you could have if you all moved here *hint hint*).  We couldn't resist heading outside to work in our lackluster yard.  We started out back by raking up as many branches and sticks as we could, adding them to our ever growing pile, just waiting to be thrown into a glorious smore producing pyre.

nom nom nom...
Our spirits began to dampen in front at the dismal sight of our plain little box of a house with pretty much nothing going on in the way of curb appeal.  Sure, we love our little Cape Cod, but it has been long neglected and in desperate need of some love.  We visited a home and garden show a couple weekends ago and got a rough estimate on re-siding and a new portico, but that would run in the neighborhood of $10,000 for the siding and $8,500 for the portico... so obviously that's out of the question for a good long while.  Standing in our front yard, we decided we'd take a first small step by adding some edging stones along our "flower beds" surrounding the front of the house.

Our house looked a lot better last summer... still, it's pretty *yawn*
Naturally, we first visited our neighborhood Depot, but sadly, their in-stock selection of edging bricks was lacking.  Sure, they had those terrible concrete scalloped things, but in my opinion, those just look like you aren't even trying.  I had something more natural looking in mind that would play on the sort of cottage look of our house.

Boo!

So, the next stop was Lowe's, which I love sooo much more than the Depot due to the wider, brighter and cleaner aisles, much more helpful and knowledgable staff, better selection of appliances, and classier decor items... and there's a Krispy Kreme pretty much right next door.  Unfortunately, it's 10 miles away up a bad stretch that takes forever to get to.  Once we got there (of course reinvigorated with a Krispy Kreme sugar buzz), we quickly found what I had in mind and the super helpful landscape staff even loaded all 80 bricks into our car.  We were a little scared John's Escape wouldn't be able to handle the load, but it wasn't a problem at all.  It is built Ford Tough after all.

Our brick load.
We only had enough time to unload the car Saturday night, but went to bed excited to start first thing Sunday morning.  Of course it just had to rain pretty much all day Sunday, but we did manage to run out and dig some shallow trenches and stick a few bricks in.  Probably something I shouldn't have been doing while nursing a sinus infection, but I just couldn't help myself.  Luckily Monday was much nicer, so John worked on digging in the rest of the trench.  Once I got home at 5:30, we had just about half an hour before the sun sat to finish up, so we worked out a great system of me handing the bricks to John and he placed them in.  So we went from this...

Nakey plant beds.
*shudder*
To this:

Left side of the house outside our master bedroom.
Does anyone else see the ghost bichon in the window...?
There he is again!


We're both super happy how it turned out and how easy and relatively inexpensive the project was.  Our next step will be to re-mulch the beds (the stuff that's in there now looks way nastier in person) and then once we're comfortably past any chance of a freeze, we'll stick in some new flowers and maybe a couple more bushes.  The sod patches the contractors put in last summer seem to have no chance of revival, so we'll have to try re-seeding and hopefully end up with a nice patch of grass out front to greet friends and family.

Sunday, March 6, 2011

Productive Procrastinating

John's mom is paying us a visit in 11 days and we're so excited to see her and have her meet Grafton and her new grandpup, Chewie.

So pitiful.
Unfortunately, that means we need to clean up the disaster area that is our guest bedroom.  It didn't start off too bad and we actually had it set up pretty nice for my parents' visit back in November, but since then, it has been a dumping ground as we move from room to room and don't have room for something or the energy to unpack a box.  So, in our true nature, we keep finding project after project to do in lieu of actually undertaking such a wretched task as organizing and cleaning.  *shudder*

Last week I was battling a sinus infection which went undiagnosed until Friday when I finally caved and went to the urgent care clinic up the road in Annandale.  The Z-Pack I was prescribed and Vitamin C pills John kept forcing down my throat reinvigorated my DIY spirit and we managed to actually accomplish quite a bit this weekend... just nothing involving the guest bedroom.  :)

The most exciting project I'm going to keep to myself for now until we've made more progress.  Let's just say we were deterred by the crazy amount of rain we got today.  I was really hoping the 100% chance of rain was a mistake and we'd be able to finish it.  I couldn't contain my excitement this morning, waking up around 8:30 (that's super early for us on a weekend) and staring at John until he woke up at 9:00 and agreed we could start on our project.  Sadly, we only made it about 30 minutes before the rain was coming down too hard.  Last I checked, we have a pretty awesome mud moat.  Now I just need some attack beavers...

Determined not to let the rain... rain on our project parade?, we headed out to West Elm to pick up a new pair of curtain panels for the upstairs living room.  I know we just bought a pair not too long ago, but the fabric and color just seemed too heavy for the smallish window and our space.  We decided something lighter and airier would really be better, so we picked up a pair of their crinkle-cotton panels.  They came out super creased from the packaging, but a quick spin on our dryer's steam wrinkle care setting and a Febreeze Bounce sheet left them crease-free and springtime fresh.

Here they are with our new and improved end table/pet bed.
Once those were up, we couldn't help but notice how awful our first floor paint color is.  It's just a beige/tan/yellow... nothing.  We have been discussing possible colors since we first moved in and finally decided to take the plunge.  After thorough deliberation and paint swatch examination, we settled on Benjamin Moore's Gossamer Blue, which BM describes as "A timeless mid-tone that's soft and subtle, gossamer blue evokes the mellow, relaxed feeling of faded blue jeans and lazy summer days."  We loved the way it picked up the blues in our kitchen counter granite, complimented the blues throughout our space, and how it looks in both shady and bright spots.


Being the cheapos we are, we went to Home Depot to get it color matched to our favorite Behr paint and primer with a flat enamel finish.  We plan on carrying this color all throughout the living room, office/reading area, kitchen/dining area, hallway, and stairway heading upstairs.  Since that's a whole ton of painting, we just started in the office/reading area since it's pretty much its own room and wouldn't look weird if that's all we accomplished for a while.  In our usual I cut in and John rolls fashion (although he did help with the cutting in this time), we painted the room and here's our end result.


We are absolutely in love with our choice.  It surprisingly brightens the space and really makes the trim, bamboo shades, and wood floors pop.  Before, everything just faded into the terrible beige.  The photos don't really do it justice, as the blue looks warm, vibrant and soft.  We're definitely happy we love it since there will be a whole ton of it all over when we're finished.  And just think of how great it all look with a nice crown moulding to top it off.  mmmm...


Finally, just a small project... John located, filled up and hung our little window bird feeder on a dining room window.  Within just a couple hours, we had a few avian visitors to the delight of Elliot and Kiefer.  We can't wait to pick up a few more feeders to add to the yard and attract even more bird guests.


That was our weekend.  We might not have actually done anything we were supposed to do, but we did get a bunch done.  Plus, like I said, we still have 11 days to work on the guest bedroom.  Although, the next few days seem to be rain-free, according to the Weather Channel, so it might be back outdoors to work on our moat...