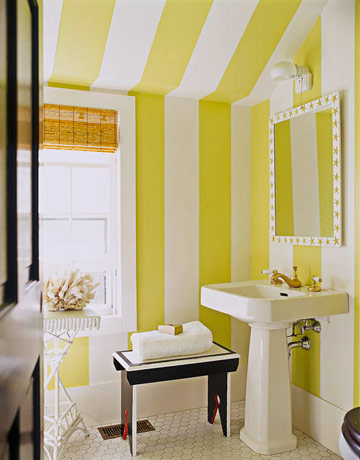
Inspired by this bathroom, found on House Beautiful's website in the slideshow "Beautiful Designer Bathrooms", I convinced John to let me try out stripes. Since it's such a small, plain room, I hoped some bright stripes might help jazz it up and provide some height to the room. As an aside, aren't those little hexagonal tiles adorable? Again, I am a little saddened on how modern they went with our home remodel. Maybe one day we can help bring it back to its roots.
Our first step to actually implementing our redesign was to paint over everything (well, just the walls) with the Sundance. Even with our "paint and primer in one", this took maybe three or four coats and forever. Literally, it was so frustrating and then we got side tracked by several other things, just getting the yellow up took me almost two months. Shame on me. After that, it was time for the Creme Brulee stripes which was even more horrible. OK, it probably wouldn't have been that bad if our room wasn't teeny and our weeks-long heatwave didn't turn the bathroom into an oven. So, don't be scared of stripes. Be scared of being trapped in a teeny oven (or I suppose any size oven).
To do our stripes, I first measured the length of the wall and tried to come up with a stripe width that would give me an even number of stripes that weren't too wide or too skinny. The wall is 70 inches long, so 5 inches would give me 14 nicely sized stripes. I went along measuring every 5 inches and putting down a small square of Frog Tape to mark it off. The trickiest part was to remember what would be painted white and what was left yellow. The white bits had to have 5 inches of exposed wall while the yellow bits were partially covered by tape. Then I had to actually tape off the stripes. I did this using our suction cup laser level, by crouching on the floor, beaming up the laser to match up with my tape squares, and then making sure it was level for straight stripes... in the dark so I could see the beam line.
 |
| Laser level in action! |


With the tape finally up after months and months, it was time to paint the stripes. Since some of the tape stripes had been on for a while, I made sure to run my thumb over the edges to make sure they were still stuck on well. Frog Tape says it'll stick for up to 21 days, but it seemed to do well for us for over a month. I didn't have a small roller, so I painted all my stripes with my Purdy Cub paintbrush. Definitely tedious, but I think it gives me the most control. After crouching around the toilet, crawling around on the floor, going up and down my step ladder, and doing a few ninja moves on the vanity (while being cooked by our two sun-like light fixtures... on the brighside, I think my face got a little tan...), the paint was up and John took down the tape and we were done. Sidenote: taking down the tape ASAP is a good practice to avoid the paint drying and peeling off as well as providing some inspiration to keep going.
Our stripes are done and I love them so much, even though the process was painful. They're like my little stripe children. Here's our almost-complete bathroom. I'm pretty sure we have the worst house ever for photographs, with our tiny rooms and poor lighting. These photos don't really do the colors justice and that makes me sad.


I'm also working on a handmade (by me and my sad sewing skillz) shower curtain, using this tutorial I found on Design*Sponge, but with just two fabrics with a solid band at the top and bottom, surrounding a subtle floral fabric in the middle.

We'll see. At my current rate of project completion, I just might do all this by December! erf.
No comments:
Post a Comment