Tuesday, July 26, 2011

Laundry "Room" Update: Part 1

I absolutely hate doing laundry and put off doing it for slightly disturbing lengths of time.  For some reason, though, I dream of one day having a huge laundry room, full of windows letting in tons of natural light, countertops galore, and a small flat screen TV that I can watch my stories on.  Apparently I'm also 80 in my dream... However, our current situation is the complete opposite.  Our laundry "room" is a small space in the basement tucked away to the left of the stairs.  There is just enough room along the wall for the washer, dryer, and a utility sink, and just enough depth for the doors to swing open and moderate maneuverability.  I suppose if you're a realtor, you could call it "cozy" and it certainly doesn't waste any square footage.

When we moved in, it was a complete blank slate with just the utility sink and hook-ups.  The day after we moved in, we had our laundry machines delivered, as I mentioned in this post way back in November.  The space has looked the same ever since except we've painted the walls Flaming Torch and the tops of the machines are now covered in detergent bottles and dryer sheets.  Classy.  Back then, we dreamed of one day adding some shelves or cabinets, as well as a countertop.  Well, some of that dream has finally come true.
Our laundry nook, circa November 2010
Our laundry nook as of yesterday... what an improvement...
In yet another fit of us putting off our other 3,000 projects, we decided last Sunday was the perfect time to drive down to IKEA and check out their cabinet selection.  After wandering around the showrooms for a while, we finally happened upon a style we liked and headed over to the customer service station to price out a couple wall cabinets.  Happily, it was about half of what we had priced out online.  I don't know what it is about IKEA's website, but I can't figure out the cabinets for the life of me.  

We decided to go with two AKURUM cabinets with Ståt doors.  I thought the doors had a cute modern cottage look to them and once we got them home, we realized the lines in the doors nicely play off of our board and batten wall treatment.  Yay for happy accidents.  So, installation was fairly simple.  On Sunday night, we sat right down and put together the cabinets which was standard IKEA assembly.  Then we needed a hack saw to trim down the metal bracket/rail/attacher thing that attaches the cabinet to the wall, which we didn't have, so that was that for the night.

The cabinet frames.
We took the day off on Monday night to enjoy the skirt steak special at Overwood in Old Town (who could resist?), but tonight, we were back on track.  John tried sawing through the metal bracket with the saw, which made a horrible metal-on-metal noise and really didn't work at all at first.  He then tried clamping it down and switched out the blade for one with more oomph and this time, he managed to cut right through.

I told John to look victorious and this is what he came up with...
He screwed that into the wall while I stood on the other side of the wall in the cat room and made sure the screws didn't miss the studs, penetrate some electrical wiring, and shock him dead.  Once that was up, we got the cabinets up without too much problem, except when one nut was dropped and of course fell right in between our machines.


After that, we just had to pop in the hardware to attach the doors and then stick the doors onto the cabinets.  We also sprung for the additional $5 door dampers so they close smoothly and without any slamming.  Kind of like my beloved "whisper close" toilet seats.  Then it was time to install the shelves.  We bought two packs of shelves with two shelves each, but decided we only really need one shelf per cabinet at this time.  It's a little sad how excited we were that our jumbo HE Tide slides in perfectly into the cabinet.


* I apologize for the weird, dark, grainy photos.  Our basement has horrible lighting.  :(
We also bought some shiny little knobs for the cabinets, but that requires us to drill through the doors to install them, which we didn't really feel like tackling tonight.  Besides, I think it looks pretty OK without knobs, so who knows?  Maybe we'll just go knob-free.  

So, that's that.  We finally got our laundry storage tackled and ended up with way more space than we even really need at this time.  Like I mentioned, we'd still like to add a counter top for a convenient folding area and are contemplating replacing the utility sink with something more visually appealing and maybe adding a garbage disposal so we can rinse out the cats' nasty wet food dishes.  There won't be any floods of sunlight or mini TVs in my future, but who wants to spend that much time doing laundry anyways?

Monday, July 18, 2011

More End Table Madness!

Just when you thought the topic of end tables couldn't get any more exciting!  Late last night, I provided an update on our new end tables we scored from Craigslist.  Well, our weekend has just been chock full o' end table delight.  Remember way back in the beginning of March, I painted and decoupaged an old end table my parents were so kind to give us?  Then I sewed a little hexagon-shaped cushion to fit inside of it with the hopes one day a pet would venture in and use it as a little bed?  Well, I am elated to report that day has finally come... four months later.

John and I were sitting in our living room on Saturday discussing our (spoiler alert!) living room built-in project, when out of nowhere, Elliot came strolling by, poked his head into the table/hopeful pet bed, and promptly ventured in, did a spin, and laid right down!  To add to this Saturday miracle, he actually stayed there long enough for John to grab the camera and snap some evidence for us to share.  Here is my glorious catson chilling in the bed and filling his mommy's heart with joy and pride.


And just for fun, here he is earlier that day sleeping in the cat tree with his poor (and extremely tolerant) brother, Kiefer.  Aren't they the cutest things?


If we ever have human kids, we'll totally be the creepy parents taking hundreds of photos of our children sleeping.  :)

Sunday, July 17, 2011

New End Tables!

I'm not busy enough at work, which I'm sure many people dream of, but really, it gets old and I'm starting to get scared that I may develop early onset Alzheimer's from my lack of stimulation or thoughts that require my hemispheres to work together.  As another side effect, I've become one of those people you see in the Bing commercials who just start rattling off random, unrelated words and facts from my long hours/days of perusing the internet.


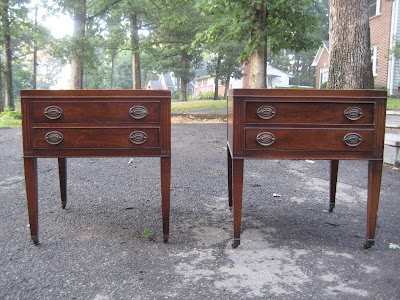
One of my favorite pastimes is scouring the furniture listings on Craigslist in the hopes of finding something I didn't know I needed.  Most often, people are selling their nasty old junk at insane prices, but every once in a while, you can score a sweet deal.  In the past, we've picked up our awesome pie safe and a vintage record cabinet that we use as a side table in our office.  Last Tuesday, I stumbled upon a listing for some vintage looking end tables that I thought would fit perfectly with our sectional in the basement since our Lack side tables recently met their demise (we took them outside for Dexter's birthday party, forgot to bring them back in, humidity + laminated furniture = disaster).

What our end tables looked like before all the black laminate peeled off...

Luckily, I was able to convince John we needed them, so the next day we went venturing off to pick up our tables.  Unfortunately for us, there was a huge storm in the middle of the day Wednesday, which ended by 3:30 or 4:00, but the damage was already done.  Traffic was a nightmare on the larger side streets, so we decided to try the smaller side streets, which were just as busy.  We finally escaped the traffic and our spirits were lifting... until we realized my Google Maps was on "walking" directions (from our trip to NYC) and not "driving", which lead us to a park where "trail" literally meant trail and not a street named trail... ugh.


At this point (all the traffic had set us back almost an hour), I was ready to just go driving through the park, but since John was driving and is decidedly more sane than me, we turned around, got our directions on "driving", and finally made our way to our destination.  The side tables' current owners were an army family, and as a result, the tables had lived in exciting places like Jordan, Bahrain, and North Carolina!  They picked up the tables years ago at an antique shop and had travelled the world with them since.  I love having a back story like that instead of the usual, "Well, it was a lazy Sunday when we travelled to IKEA, brought home the box, battled the construction for hours, and now here we are with the same table as a million other people".

So, here are our new end tables!


John's providing us with a sense of scale. 

The top is a tooled leather.
Close-up of the detail. 
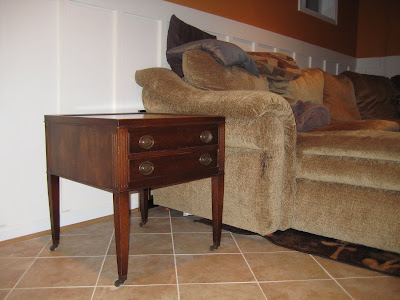
In its new home.
Close-up of the feet.

I'm really happy with them.  They're much larger than I was expecting, but that's great because we really needed something with bulk to compete with our massive sectional and not feel all wimpy next to it.  For some reason, the pulls on the front of the tables didn't really click with me until we saw them in person and I realized pulls mean drawers... which is perfect to finally provide a home for our remotes and John's Xbox controllers.  I'm in love with the little wheel feet, too.  I think overall, they just have great character.  I originally thought I'd be adding them to my list of things to paint, but right now we're pretty happy with them, so I think I'll let that idea simmer for a while.  At the very least, I might give the hardware a shot of spray paint to perk them up a little.

Another happy adventure in Craigslisting.  If you just forget about our misadventures in actually getting there (and I won't even get into the return trip drama, but I'll just note that we had to stop at 7-11 for a couple of six-packs on the way home)...

Saturday, July 2, 2011

Trash Pad: Part 1

Holy moly, I can't believe it has been a month since we've last posted... or done anything worth posting about.  We were in New York for a week, but other than that, I guess we've just been super lazy lately.  Even though it was 94 degrees today, we forced ourselves outside to begin a project we sort of began months ago.

As you know, we have no shed or garage or outdoor storage, except for our small under-the-addition space that we spruced up a month ago with some lattice renovations.  We do have two big ol' bins for our trash and recycling that just sit next to the house and generally look ugly.  In a small effort to make them look a little nicer, a few months ago I wandered into the overgrown space to the right of our house where someone had thrown a bunch of paver rock things.  With their random shapes, I thought I could piece them together and form a cute landing pad for the bins to sit on.  Unfortunately, they were just a bit too random and no matter how I moved them around, it just didn't work out right.  Plus, they are all different widths and I suppose I could have dug down to make them level, but who wants to do that much work?  Over the last couple of months, rain showers and the weight of the bins helped push the stones more firmly into place, but it was still kind of ugly.

My sad attempt at a rustic/natural looking trash pad.
The bins on their sad trash pad.
Eventually, we'd like to go all out and build ourselves a trash shed, inspired by this article on the This Old House website.  Look how cute it looks:


To start off, though, we decided to replace the pad with something... better.  So, we headed out to Lowe's yesterday afternoon to check out our paver options.  I wanted to go with something cute and fancy, but realized once we build the shed, no one will ever see them, so why pay extra?  We just picked up some cheap, plain concrete squares, a couple bags of patio and paver base, and a tamp.

Our first step was to utilize slave-puppy labor and have Chewie haul away all the old stones.


Then John had the horrible task of digging down about an inch in our nasty clay/rocks to help get a nice, flat surface.  This was not made any more enjoyable by the 94 degree heat.  Luckily, we have our oaks to provide shade, so at least it wasn't in full-on sun.

Kinda looks like a grave...
Our next step was to spread out the patio and paver gravel base for the bricks to sit in.  We dumped out our two bags of that, spread it around with the metal shovel, and John went crazy with the tamp.

Dump...
Spread...
Tamped!
We then started laying down the bricks, only to realize they weren't lying as flat as we'd like them.  After some discussion, we decided we probably needed a bit of paver sand, so it was off to Home Depot.  Following the same technique of dump, spread, and tamp, we were left with what looked like a giant graham cracker crust.


Once it was all smoothed down, John and I carefully placed the bricks and stomped on them a little to get them in their place.  Here's the new pad:


Not much to look at really, but like I said, it'll eventually all be enclosed with our awesome trash shed.  Until then, at least our bins have a nice, even surface to sit on.


So, that's not a very exciting project to come back with after a month long hiatus, but it's one more thing marked off the list.  Plus, it's only the beginning of a three-day weekend, so who knows what else we'll force ourselves to get around to doing. :)